๐Ÿงถ Beautiful โœจ Detailed ๐Ÿ’ Adorable

Adorable Kitten Amigurumi Pattern

Adorable Kitten Amigurumi Pattern
4.0โ˜… Rating
3-4 Hours Time Needed
1.9K Made This
โœ‚๏ธ

Beginner Friendly Level

Perfect for those just starting their sewing journey, with clear instructions and simple techniques

โฑ๏ธ

Weekend Treat

Takes 5-7 hours, making it an enjoyable project to finish over a couple of days.

๐Ÿงธ

Cute Companion

An adorable friend to cherish, handcrafted with love to bring comfort and joy for years to come.

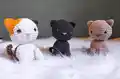
About This Adorable Kitten Amigurumi Pattern

This sweet kitten pattern brings together simple crochet techniques to create an absolutely adorable companion. With its round body, perky ears, and embroidered face details, this little cat captures the essence of feline charm in miniature form. The pattern works up quickly using basic stitches, making it accessible while still delivering impressive results that look professionally crafted.

Adorable Kitten Amigurumi Pattern crochet pattern - detailed view of completed project

Each component is worked in the round with clear stitch counts, ensuring your kitten maintains perfect proportions. The embroidered nose and eye details add personality and charm that make each finished piece truly one-of-a-kind.

Why You'll Love This Adorable Kitten Amigurumi Pattern

I absolutely love how this pattern creates such an endearing little character with relatively simple techniques! There's something magical about watching a basic ball of yarn transform into this sweet kitten face with those expressive embroidered features. I find the process of adding the facial details especially rewarding because that's when the kitten truly comes to life and develops its own unique personality. The compact size makes it perfect for using up yarn scraps, and the quick completion time means you can create a whole family of colorful cats in different shades. Plus, the satisfaction of gifting these handmade treasures to cat lovers is absolutely priceless!

Adorable Kitten Amigurumi Pattern step 1 - construction progress Adorable Kitten Amigurumi Pattern step 2 - assembly progress Adorable Kitten Amigurumi Pattern step 3 - details and accessories Adorable Kitten Amigurumi Pattern step 4 - final assembly and finishing

Switch Things Up

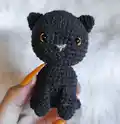
I love experimenting with color combinations to create unique kitten personalities! Try making a tabby by alternating two shades of brown or gray every few rounds on the body. For a calico effect, work random patches of orange, black, and white throughout your project. You could even create a Siamese-style kitten by using cream for the body and dark brown for the ears, paws, and tail.

Consider adding embellishments like a tiny crocheted bow between the ears, a small collar made from chain stitches, or even a miniature bell attached with a jump ring. I've made versions with embroidered closed eyes for a sleeping kitten, or added small pink cheeks with a bit of blush for extra sweetness. You can also experiment with ear shapes - make them larger and floppier, or add little tufts at the tips for a lynx-like appearance.

For a more realistic touch, try using fuzzy yarn for certain areas or add whiskers using fishing line or stiff thread. The possibilities are truly endless, and each small modification creates a completely different character with its own unique charm!

Common Mistakes & How to Fix Them

โœ— Forgetting to stuff the head and body firmly enough before closing, which results in a floppy kitten with poor shape definition โœ— Placing safety eyes too close together or at wrong height, making the face look unbalanced and less cute overall โœ— Not leaving long enough yarn tails when finishing pieces, making assembly difficult and causing weak attachment points that could come apart โœ— Skipping stitch markers and losing your place in rounds, leading to incorrect stitch counts and misshapen body parts

Adorable Kitten Amigurumi Pattern

Create your own charming little kitten friend with this delightful amigurumi pattern! This sweet project guides you through crafting an adorable feline companion complete with expressive embroidered features, tiny paws, and a cute tail. Perfect for cat lovers and crochet enthusiasts alike, this pattern results in a huggable kitty that will bring joy to anyone who receives it. The detailed instructions include everything from shaping the round head to adding those precious finishing touches that give your kitten its unique personality.

Beginner Friendly 3-4 Hours

Materials Needed for Adorable Kitten Amigurumi Pattern

โ€” Main Fabric

  • 01
    80 grams of cotton yarn or 3-strand cotton thread in colors of your choice

โ€” Tools Required

  • 01
    Yarn needle
  • 02
    Safety eyes size 6
  • 03
    Crochet hook suitable for yarn weight
  • 04
    Polyester stuffing
  • 05
    Scissors
  • 06
    Stitch markers

Progress Tracker

0% Complete

โ€” Head :

Round 1 :

6 sc in magic ring (6)

Round 2 :

6 inc (12)

Round 3 :

(1 sc, inc) (18)

Round 4 :

(2 sc, inc) (24)

Round 5 :

(3 sc, inc) (30)

Round 6 :

(4 sc, inc) (36)

Round 7 :

(5 sc, inc) (42)

Round 8-14 :

sc in each st (42)

Round 15 :

(5 sc, dec) (36)

Round 16 :

(4 sc, dec) (30)

Info :

Place eyes, embroider details and stuff

Round 17 :

(3 sc, dec) (24)

Round 18 :

(2 sc, dec) (18)

Round 19 :

(1 sc, dec) (12)

Round 20 :

6 dec (6)

Info :

Finish with slip stitch and cut yarn leaving long tail to sew through 6 stitches, pull tight and knot

โ€” Ears (make 2) :

Round 1 :

6 sc in magic ring (6)

Round 2 :

sc in each st (6)

Round 3 :

6 inc (12)

Round 4 :

sc in each st (12)

Info :

Finish with slip stitch and cut yarn leaving long tail to sew ear to head

โ€” Body :

Round 1 :

6 sc in magic ring (6)

Round 2 :

6 inc (12)

Round 3 :

(1 sc, inc) (18)

Round 4 :

(2 sc, inc) (24)

Round 5 :

(3 sc, inc) (30)

Round 6 :

(4 sc, inc) (36)

Round 7-12 :

sc in each st (36)

Round 13 :

(4 sc, dec) (30)

Round 14 :

(3 sc, dec) (24)

Info :

Stuff firmly and finish with slip stitch, leaving long tail to sew body to head

โ€” Face Embroidery :

Step 1 :

Calculate where the nose will be placed

Step 2 :

Insert needle at a point slightly away from where nose will go

Step 3 :

Bring needle out at one of the marked points

Step 4 :

Insert needle at second point and bring out at first point

Step 5 :

Begin wrapping this thread as many times as desired

Step 6 :

Pass needle to center of nose and embroider vertical line, then pass needle to where you first inserted it

Info :

Knot both threads together and hide ends inside the work. Embroider from one top or bottom edge to center, then from center to opposite edge

โ€” Front Paws (make 2) :

Round 1 :

5 sc in magic ring (5)

Round 2 :

5 inc (10)

Round 3-8 :

sc in each st (10)

Info :

Finish with slip stitch and cut yarn leaving long tail to sew paws to body

โ€” Back Paws (make 2) :

Round 1 :

5 sc in magic ring (5)

Round 2 :

5 inc (10)

Round 3-4 :

sc in each st (10)

Info :

Finish with slip stitch and cut yarn leaving long tail to sew paws to body

โ€” Tail :

Step 1 :

Make 12 chains

Step 2 :

Skip last and second-to-last chain, make 3 sc in next chain

Step 3 :

Move to next chain and make 3 sc

Step 4 :

Make 6 sc in a row (one in each chain) leaving last 2 chains free

Step 5 :

In each of those 2 chains make 3 sc

Info :

Finish with slip stitch, cut yarn and use same thread to sew tail to body

Assembly Instructions

  • Sew the ears to the top of the head, positioning them symmetrically on either side for a balanced appearance.
  • Attach the completed head to the body using the long yarn tail, making sure the face is centered and secure.
  • Position and sew the front paws to the sides of the body at an appropriate height for a natural sitting pose.
  • Attach the back paws to the bottom of the body, angling them slightly forward so the kitten sits properly.
  • Sew the tail to the back of the body at the desired angle, ensuring it's firmly attached.
  • Weave in all remaining yarn ends securely inside the pieces to keep the finished kitten neat and tidy.

Important Notes

  • ๐Ÿ’กUse stitch markers to track your place in each round and avoid losing count of stitches
  • ๐Ÿ’กLeave long yarn tails when finishing each piece to make assembly easier and more secure
  • ๐Ÿ’กPlace safety eyes between rounds 8-10 of the head before closing, spacing them about 6-8 stitches apart
  • ๐Ÿ’กStuff the head and body firmly but not overly tight to maintain good shape without distorting stitches
  • ๐Ÿ’กPractice the embroidery technique on a test piece first if you're new to embroidering on crochet
  • ๐Ÿ’กPin all pieces in place before sewing to ensure proper positioning and symmetry of the finished kitten

This charming kitten pattern combines straightforward techniques with delightful results, perfect for creating your own adorable feline friend! The simple construction makes it ideal for beginners, while the embroidered face details add that special handmade touch that brings personality to every piece. Whether you're crafting for yourself or making a heartfelt gift for a cat lover, this pattern delivers pure cuteness in every stitch. ๐Ÿงถ Happy crocheting! ๐Ÿฑโœจ

You ask,

we answer.

FAQs

What yarn weight works best for this kitten pattern?

The pattern calls for 80 grams of cotton yarn or 3-strand cotton thread. A DK or light worsted weight yarn works perfectly, giving you a kitten that's approximately 4-5 inches tall when finished.

Can I make the kitten in different sizes?

Absolutely! Use a larger hook and thicker yarn for a bigger kitten, or a smaller hook and finer yarn for a tiny version. Just make sure to adjust your safety eye size accordingly to keep proportions balanced.

How do I embroider the nose if I've never done it before?

The pattern includes detailed step-by-step embroidery instructions. Start by marking where you want the nose, then follow the wrapping technique described. Practice on a test swatch first if you're nervous!

What size safety eyes should I use?

The pattern specifies size 6 safety eyes, which are perfect for this kitten's proportions. You can also use size 6-8mm eyes depending on the look you prefer.

Can I skip the tail or modify the limbs?

Yes! Feel free to customize your kitten. You can make the tail longer, create different paw styles, or even add stripes by changing colors. Let your creativity guide you!