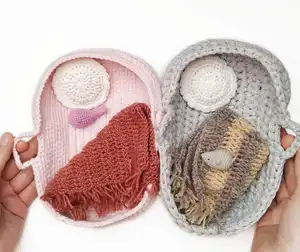
Create an adorable miniature nursery set perfect for doll play or decorative displays. This comprehensive pattern includes instructions for crafting a cozy baby bed in two sizes (gray and pink), a soft pillow, a warm blanket with fringe details, and two sweet amigurumi companions - a charming mouse and an adorable whale. Each piece is designed with love and attention to detail, featuring practical handles on the beds and delightful embroidered features on the toys. Perfect for gift-giving or creating a complete nursery scene for your little one's dolls.
Progress Tracker
0% Complete
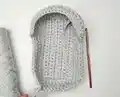
— GRAY BED :
Round 2 :
Sc in each of next 20 ch, ch, turn
Rounds 3-10 (8 rows) :
Sc in each of next 20 sts, ch, turn
Round 11 :
Sc in each of next 20 sts, ch, turn, 2 ch, turn, then crochet in around
Round 12 :
Hdc in each of next 20 sts, 9 hdc on the side, 20 hdc, 9 hdc on the side = 58 hdc, sl st in the first hdc, 2 ch
Round 13 :
58 hdc around, sl st in the first hdc, 2 ch
Round 14 :
In this row crochet a small visor: hdc in each of next 36 sts, ch, turn. Sc in next st, hdc in each of next 21 sts, ch, turn. Sc in next st, hdc in each of next 20 sts, sc in next st, 2 sc st on the side visor, then crochet along the main part - hdc in each of next 22 sts, sl st in the first hdc, 2 ch
Round 15 :
Hdc in each of next 10 sts, 8 ch (or more if you want longer handles), skip 3 sts, hdc in next st, 2 sc st on the side visor, sc in each of next 24 sts, hdc in next st, 8 ch, skip 3 sts, hdc in each of next 18 sts, sl st in the first hdc. Cut the thread, fasten, hide.
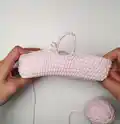
— PINK BED :
Info :
Crochet in the same way as the gray bed, but with a different number of loops
Round 2 :
Sc in each of next 32 ch, ch, turn
Rounds 3-20 (18 rows) :
Sc in each of next 32 sts = 32 sts, ch, turn
Round 21 :
Sc in each of next 32 sts = 32 sts, 2 ch, turn, then crochet in around
Round 22 :
Hdc in each of next 32 sts + hdc in each of next 19 sts on the side + hdc in each of next 32 sts + hdc in each of next 19 sts on the side, sl st in the first hdc, 2 ch = 102 sts
Rounds 23-24 (2 rows) :
hdc in each of next 102 sts, sl st in the first hdc, 2 ch
Round 25 :
dec, hdc in each of next 28 sts, dec, hdc in each of next 19 sts, dec, hdc in each of next 28 sts, dec, hdc in each of next 19 sts = 98 sts, sl st in the first hdc, 2 ch
Round 26 :
In this row crochet a small visor: hdc in each of next 63 sts, ch, turn, sc in next st, hdc in each of next 43 sts, ch, turn, sc in next st, hdc in each of next 42 sts, sc in next st, 2 sc on the side visor, hdc in each of next 35 sts, sl st in the first hdc, 2 ch
Round 27 :
Hdc in each of next 14 sts, 20 ch, skip 4 sts, hdc in next st, 2 sc on the side visor, sc in each of next 44 sts, 2 sc on the side, hdc in next st, 20 ch, skip 4 sts, hdc in each of next 30 sts, sl st in the first hdc. Cut the thread, fasten, hide.
— BLANKET :
Round 1 :
Crochet 37 ch, turn
Round 2 :
Dc in each of next 35 ch, 2 ch, turn
Rounds 3-18 (16 rows) :
Dc in each of next 35 sts, 2 ch, turn
Info :
Cut the thread, make a fringe around the edges
— PILLOW :
Round 1 :
Start 10 hdc in a magic ring, sl st in the first hdc, 2 ch
Round 2 :
2 hdc in each of next 10 sts = 20 sts, sl st in the first hdc, 2 ch
Round 3 :
(inc + hdc in next st) rep to the end = 30 sts, sl st in the first hdc, ch
Round 4 :
(sc in each of next 2 sts + inc) rep to the end = 40 sts, sl st in the first hdc, ch
Info :
Cut the thread, crochet the second part of the same (do not cut the thread) and then crochet through the two halves, connecting them: sc in next st, 3 sc in next st (or hdc) - rep to the end, lightly fill the pillow with filler.
— MOUSE :
Round 1 :
Start 6 sc in a magic ring
Round 2 :
Work 2 sc in each st around [12]
Round 3 :
(inc, sc in next st) rep 6 times [18]
Round 4 :
(Sc in each of next 2 sts, inc) rep 6 times [24]
Rounds 5-9 (5 rows) :
Sc in each st around [24]
Round 10 :
2 dec, sc in each of next 18 sts, dec [21]
Round 11 :
(dec + sc in next st) rep 2 times, sc in each of next 12 sts, dec, sc in next st [18]
Round 12 :
Sc in each st around [18]
Round 13 :
(Sc in each of next 4 sts + dec) rep 3 times [15]
Round 14 :
(Sc in each of next 3 sts + dec) rep 3 times [12]
Round 15 :
(Sc in each of next 2 sts + dec) rep 3 times [9]
Round 16 :
(Sc in next st + dec) rep 3 times [6]. Cut the thread, close the hole
— MOUSE EARS :
Round 1 :
Start 6 sc in a magic ring. Cut the thread, leaving for sewing
Infos :
Sew on ears, on both sides, on row 9 from the beginning of crochet. For the tail: attach a thread between the first and second row and crochet 6 ch. Cut the thread. On the last row, embroider the nose with black sewing threads, and step back 5 rows from it, embroider the eyes on both sides.
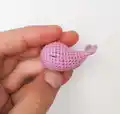
— WHALE :
Round 1 :
Start 6 sc in a magic ring
Round 2 :
Work 2 sc in each st around [12]
Round 3 :
(inc, sc in next st) rep 6 times [18]
Round 4 :
(Sc in each of next 2 sts, inc) rep 6 times [24]
Rounds 5-9 (5 rows) :
Sc in each st around [24]
Round 10 :
2 dec, sc in each of next 18 sts, dec [21]
Round 11 :
(dec + sc in next st) rep 2 times, sc in each of next 12 sts, dec, sc in next st [18]
Round 12 :
Sc in each st around [18]
Round 13 :
(Sc in each of next 4 sts + dec) rep 3 times [15]
Round 14 :
(Sc in each of next 3 sts + dec) rep 3 times [12]
Round 15 :
Sc in each st around [12]
Round 16 :
(Sc in each of next 2 sts + dec) rep 3 times [9]
Round 17 :
Sc in each st around [9]
Round 18 :
(Sc in next st + dec) rep 3 times [6]
Round 19 :
ch, crochet a tail through two sides: hdc + dc + hdc in next st, sc in next st, hdc + dc + hdc in next st + sl st. Cut the thread.
Info :
Embroider eyes on rows 6-7 from the beginning of crochet
This enchanting Baby Bed Set pattern brings together everything you need to create a complete miniature nursery filled with love and handmade charm. From the practical beds with their sweet visors and carrying handles to the cozy accessories and adorable amigurumi companions, each piece is designed to spark joy and imagination. Whether you're crafting for a child's doll collection, creating nursery décor, or making a treasured gift, this pattern offers endless possibilities for customization and creativity. The combination of different textures, colors, and techniques makes this a rewarding project that results in a truly special handmade ensemble. 🧶 Happy crocheting! 🧵✨