๐Ÿงถ Beautiful โœจ Detailed ๐Ÿ’ Adorable

Ballerina Doll Amigurumi Pattern

Ballerina Doll Amigurumi Pattern
4.8โ˜… Rating
8-10 Hours Time Needed
3.1K Made This
โœ‚๏ธ

Intermediate Level

Ideal for those with basic knitting experience, featuring slightly more advanced stitches and techniques to expand your skills.

โฑ๏ธ

All-Day Adventure

Requires 8-10 hours, ideal for a full day of immersive knitting.

๐Ÿงธ

Cute Companion

An adorable friend to cherish, handcrafted with love to bring comfort and joy for years to come.

About This Ballerina Doll Amigurumi Pattern

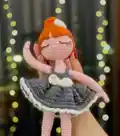
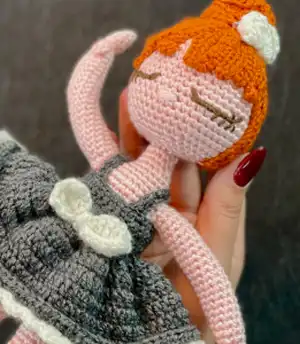
This enchanting ballerina doll pattern combines classic amigurumi techniques with elegant details to create a truly special handmade treasure. The pattern includes step-by-step instructions for crafting a graceful dancer complete with layered hair, an embroidered sleeping face, a detailed tutu dress with ruffled layers, and tiny ballet shoes. Working in continuous rounds with color changes, you'll build each component separately before assembling them into a beautiful keepsake doll that captures the magic of ballet.

Ballerina Doll Amigurumi Pattern crochet pattern - detailed view of completed project

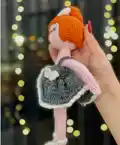
Standing at about 20 cm in circumference and 10 cm in length when completed, this ballerina features poseable limbs, intricate hair styling with multiple strand layers, and a beautifully structured dress with bow and hanger details. The pattern uses light pink as the main body color with contrasting black, gray, and mustard accents.

Why You'll Love This Ballerina Doll Amigurumi Pattern

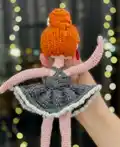
I absolutely love this ballerina pattern because it brings together so many beautiful details in one adorable project! The layered hair technique creates gorgeous texture and movement, while the ruffled tutu dress adds an elegant touch that makes this doll truly special. I find the color combination of soft pink with vibrant orange hair and gray dress incredibly charming and eye-catching. What really makes this pattern shine is how each component comes together - from the sweet embroidered sleeping face to the tiny ballet shoes - creating a keepsake that captures the grace and beauty of ballet. It's a rewarding project that results in a doll you'll be proud to display or gift to someone special!

Ballerina Doll Amigurumi Pattern step 1 - construction progress Ballerina Doll Amigurumi Pattern step 2 - assembly progress Ballerina Doll Amigurumi Pattern step 3 - details and accessories Ballerina Doll Amigurumi Pattern step 4 - final assembly and finishing

Switch Things Up

I love experimenting with different variations of this ballerina pattern to create unique versions! One of my favorite modifications is changing up the hair colors - try pastel pink or lavender for a softer fairy-tale look, or go bold with bright rainbow colors for a modern twist. You can also adjust the hair length by adding more chains to each strand, creating a long-haired version that's absolutely stunning.

For the dress, I enjoy playing with different color combinations - a white tutu with gold accents creates an elegant swan lake vibe, while black and red gives her a dramatic Spanish dancer feel. You could even add small beads or sequins to the dress for extra sparkle and glamour. The flower buckle on the sleeve can be replaced with other embellishments like tiny roses, butterflies, or even a small pearl button for different styles.

Another fun variation is adjusting the leg positioning - instead of straight legs, you can pose them in different ballet positions before final assembly. Some makers add wire to the legs and arms for poseable limbs, which opens up endless display possibilities. I've also seen beautiful versions where crafters create multiple outfits, including tutus in different colors, casual practice wear, or even seasonal costumes.

The facial expression can completely change the doll's personality too! While the pattern shows peaceful closed eyes, you can embroider open eyes with different expressions, add rosy cheeks with pink yarn or fabric paint, or even create a smile. Each small change makes your ballerina truly one-of-a-kind and personal to your creative vision!

Common Mistakes & How to Fix Them

โœ— Not using stitch markers when working in continuous rounds can cause you to lose track of where rounds begin and end, leading to uneven shaping throughout the project โœ— Overstuffing or understuffing the body parts will affect the doll's proportions and posture, so fill each piece firmly but gently to maintain the elegant ballerina shape โœ— Skipping the color change instructions or not securing yarn ends properly when switching colors will create messy transitions that are visible on the finished doll โœ— Rushing through the hair assembly without properly arranging and securing each strand layer will result in uneven or sparse-looking hair that lacks the pattern's signature volume and texture

Ballerina Doll Amigurumi Pattern

Create your own elegant ballerina doll with this charming amigurumi pattern! This delightful design features a graceful dancer with beautiful orange hair, a classic gray tutu dress with white trim, and dainty ballet shoes. Perfect for dancers, ballet lovers, or anyone who appreciates handmade dolls, this pattern guides you through creating a poseable figure that stands approximately 20 cm tall. The detailed instructions cover everything from the expressive embroidered face to the layered hair strands and the ruffled tutu dress that gives this ballerina her signature charm.

Intermediate 8-10 Hours

Materials Needed for Ballerina Doll Amigurumi Pattern

โ€” Main Fabric

  • 01
    Yarn in light pink (main body color)
  • 02
    Yarn in black color
  • 03
    Yarn in gray color
  • 04
    Yarn in mustard/orange color (for hair)
  • 05
    2.5 mm hook size or size that fits your yarn

โ€” Tools Required

  • 01
    Crochet hook 2.5 mm
  • 02
    Scissors
  • 03
    Stuffing material
  • 04
    Tapestry needle for sewing
  • 05
    Needle for embroidery
  • 06
    Pins for assembly

Progress Tracker

0% Complete

โ€” LEGS :

Rnd 6-7 :

sc into sc(6 sc dec)7 sc into sc(14)

Rnd 7-5 :

sc into sc(4 sc dec)3 sc into sc(10)

Rnd 8-4 :

sc into sc(2 sc dec)4 sc into sc(8)

Rnd 9-16 :

(8 ring)sc into sc(8)

Rnd 17-2 :

sc inc(10)

Rnd 18-21 :

(4 ring)sc into sc(10)

Rnd 22-2 :

sc inc(12)

Rnd 23-30 :

(8 ring)sc into sc(12)

Rnd 31-2 :

sc inc(14)

Rnd 32-35 :

(4 ring)sc into sc(14)fo.

Info :

Bring the legs together. make 2 ch between

Rnd 36-14 :

sc into sc 2ch into sc 14 sc into sc(30 sc)

Rnd 37-45 :

(7 ring)sc into sc(30 sc)

Rnd 44 :

(6 times)3 sc into sc next dec(24)

Rnd 45 :

sc into sc(24)

Rnd 46 :

(6 times)3 sc into sc next inc(30)

Info :

Fill the body. Keep filling as you go.

Rnd 47-53 :

(7 ring)sc into sc(30)

Rnd 54-5 :

sc into sc sc join the first arm (5 sc)10 sc into sc

Info :

join the second arm (5 sc)5 sc into sc(30 sc)

Rnd 55 :

(6 times)3 sc into sc next dec(24)

Rnd 56 :

(6 times)2 sc into sc next dec(18)

Rnd 57 :

sc into sc(18)

Rnd 58 :

(6 times)1sc into sc next dec(12)

Rnd 59-62 :

(4 ring)sc into sc(12)fo.Leave a long thread to

Info :

sew on.

โ€” ARMS :

MAIN COLOR

Rnd 1-6 :

sc in a mr

Rnd 2-6 :

(5 ring)sc into sc (6)

Rnd 7-3 :

ch.turn.3ch into sc 6 sc into sc

Rnd 8 :

(4 times)sc inc(10 sc)

Rnd 9-28 :

(20 ring)sc into sc(10)fo. Fill the sleeves.

FLOWER BUCKLE :

Rnd 1-18 ch.

Rnd 2 :

(6 times)7 ch into 3 hdc 1 ch into sc

Rnd 3 :

(6 times)7 ch into 3 cr 1 ch into sc fo.

Info :

Leave a long thread to sew on.

โ€” DRESS :

B COLOR

Rnd 1-35 :

ch.

Rnd 2-35 :

ch into sc sc(35 sc)turn

Rnd 3-9 :

(7 ring)sc into sc(35)

Rnd 10-35 :

(times)1 sc into 3 cr(105 cr)

Rnd 11-15 :

(5 ring)cr into cr(105 cr)

Rnd 16 :

in blo cr into hdc(105 hdc)

Rnd 17 :

A COLOR - in flo along the ring 1

Info :

sc into sc 1 sc into 3 hdc fo.

โ€” BOW & HANGERS :

BOW - A color :

10 ch.

Rnd 2 :

(2 ring)10 ch into cr fo.Wrap it in the

Info :

middle. sew it to the waist of the dress.

HANGER - MAKE 2

Rnd 1-21 :

ch.

Rnd 2-21 :

ch into sc fo.

Info :

Leave a long thread to sew on.

โ€” HEAD :

MAIN COLOR

Rnd 1-6 :

sc in a mr

Rnd 2-6 :

sc inc(12)

Rnd 3 :

(6 times)1 sc into sc next inc(18)

Rnd 4 :

(6 times)2 sc into sc next inc(24)

Rnd 5 :

(6 times)3 sc into sc next inc(30)

Rnd 6 :

(6 times)4 sc into sc next inc(36)

Rnd 7-16 :

(6 times)5 sc into sc next inc(42)

Rnd 8-17 :

(10 ring)sc into sc(42)

Rnd 18 :

(6 times)5 sc into sc next dec(36)

Rnd 19 :

(6 times)4 sc into sc next dec(30)

Rnd 20 :

(6 times)3 sc into sc next dec(24)

Rnd 21 :

(6 times)2 sc into sc next dec(18)

Rnd 22 :

(6 times)1 sc into sc next dec(12)

Rnd 23-6 :

sc dec (6 sc)fo.

Info :

Leave a long thread to sew on.

โ€” HAIRS :

C COLOR

Rnd 1-6 :

sc in a mr

Rnd 2-6 :

sc inc(12)

Rnd 3-1 :

sc into sc next inc(18)

Rnd 4 :

+First Layer 20 ch.ch into sc(20 sc)(12 hair strands)

Info :

13 ch.ch into sc(10 hair strands)

Info :

Top Layer=50 ch.ch into sc(5 hair strands)

Info :

Gather strands of hair. wrap and sew.

โ€” SHOES :

SHOES -A color

Rnd 1-12 :

ch.

Rnd 2-12 :

ch into inc(24 sc)

Rnd 3-6 :

(4 ring)sc into sc (24)

Rnd 7-8 :

sc into sc(4 sc dec)8 sc into sc(20)

Rnd 8-2 :

sc into sc 14 ch.Turn 14 ch into sc(14 sc)

Rnd 9-14 :

sc into sc 14 ch.Turn ch into sc fo.

Info :

Leave a long thread to sew on.

Assembly Instructions

  • Attach the completed head to the neck opening of the body, ensuring it's centered and secure by sewing through the final rounds of both pieces.
  • Pin the arms in position on either side of the body where indicated in rounds 54-55, then sew them securely in place using the long yarn tails.
  • Dress the ballerina by wrapping the completed dress around the body and securing it at the back or side with small stitches.
  • Attach the flower buckle to the sleeve as shown in the pattern images, positioning it decoratively on one arm.
  • Sew the bow to the waist of the dress at the back to create a decorative accent and define the waistline.
  • Attach both hangers to the shoulders of the dress, connecting them at the back of the neck area to create adjustable straps.
  • Position and sew the shoes onto the bottom of each leg, ensuring they're aligned and facing forward for a natural stance.

Important Notes

  • ๐Ÿ’กWork in continuous rounds without joining unless specified, and use a stitch marker to track the beginning of each round
  • ๐Ÿ’กStuff all body parts as you go rather than waiting until the end, filling firmly but not too tightly to maintain proper shaping
  • ๐Ÿ’กWhen creating the layered hair, arrange each strand layer carefully before securing to achieve the voluminous look shown in the photos
  • ๐Ÿ’กPay close attention to color changes and secure all yarn ends properly by weaving them in to prevent unraveling during assembly
  • ๐Ÿ’กPin all pieces in their correct positions before permanently sewing them to ensure proper proportions and alignment of the final doll

This beautiful ballerina doll pattern brings grace and elegance to your crochet collection! Designed with careful attention to detail, from the flowing layered hair to the ruffled tutu dress, this pattern creates a timeless keepsake that captures the magic of ballet. The combination of simple techniques and thoughtful embellishments makes it a rewarding project that results in a truly special handmade treasure. Whether you're creating her for yourself, as a gift for a dance lover, or to inspire a little ballerina, this charming doll is sure to be cherished for years to come. ๐Ÿงถ Happy crocheting! ๐Ÿฉฐโœจ

You ask,

we answer.

FAQs

What size will the finished ballerina doll be?

The completed ballerina doll measures approximately 20 cm in circumference and about 10 cm in length, making her a perfect pocket-sized companion or display piece.

Can I use different colors for the dress and hair?

Absolutely! Feel free to customize the color scheme to your preference. The pattern works beautifully with any color combination - try pastels for a soft look or bright colors for a more vibrant ballerina.

How do I create the layered hair effect shown in the photos?

The pattern includes three distinct layers: the first layer with 20-chain strands (12 strands total), a middle layer with 13-chain strands (10 strands), and a top layer with 50-chain strands (5 strands). Work each layer into the base, then gather and arrange all strands together before wrapping and securing.

Is the dress removable or sewn onto the doll?

The dress is sewn onto the doll for a secure fit. However, you can modify the pattern to make it removable by adding closures like snaps or Velcro at the back if you prefer interchangeable outfits.

Do I need to embroider the face or can I use safety eyes?

The pattern shows an embroidered sleeping face with closed eyes and eyelashes, which gives the ballerina her serene expression. You can embroider the features using black thread, or substitute with safety eyes if you prefer an awake look.