🧶 Beautiful ✨ Detailed 💝 Adorable

Bobby the Bighorn Sheep Amigurumi Pattern

Bobby the Bighorn Sheep Amigurumi Pattern
4.6★ Rating
3-4 Hours Time Needed
3.5K Made This
✂️

Intermediate Level

Ideal for those with basic knitting experience, featuring slightly more advanced stitches and techniques to expand your skills.

⏱️

Weekend Treat

Takes 5-7 hours, making it an enjoyable project to finish over a couple of days.

🐑

Charming Critter

Delightful animal designs with sweet details that capture the essence of your favorite woodland and farmyard friends.

About This Bobby the Bighorn Sheep Amigurumi Pattern

Bobby the Bighorn Sheep Amigurumi Pattern crochet pattern - detailed view of completed project

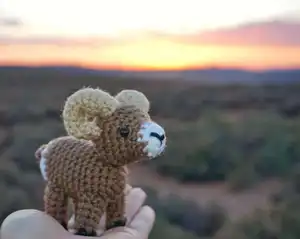
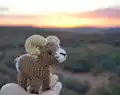
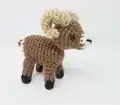
This pattern includes detailed instructions for creating all parts of Bobby, including his head with safety eyes and embroidered nose, sturdy body, four legs with black hooves, a tiny tail, and of course, those impressive curved horns. Each component is carefully designed to create a sheep that can stand independently and display beautifully.

Why You'll Love This Bobby the Bighorn Sheep Amigurumi Pattern

I absolutely love this pattern because it creates such a characterful little sheep with personality! The curved horns are my favorite detail—they start out looking silly when first attached, but once you roll them backward and secure them properly, they transform into these impressive spirals that really capture the bighorn sheep's signature look. I also appreciate how the pattern includes a penny weight in the body to help Bobby stand on his own four legs without tipping over. The combination of brown and white yarn creates a natural, realistic appearance, and the small size makes it a quick and satisfying project. There's something so rewarding about watching all the pieces come together during assembly, especially when you see those horns curl back and suddenly your little sheep looks like a miniature version of the real thing!

Bobby the Bighorn Sheep Amigurumi Pattern step 1 - construction progress Bobby the Bighorn Sheep Amigurumi Pattern step 2 - assembly progress Bobby the Bighorn Sheep Amigurumi Pattern step 3 - details and accessories Bobby the Bighorn Sheep Amigurumi Pattern step 4 - final assembly and finishing

Switch Things Up

I love experimenting with this pattern to create different looks and personalities! You could easily change Bobby into a regular woolly sheep by making the entire body white or cream instead of brown, and perhaps make smaller, simpler horns or skip them entirely for a female sheep. For a more playful version, try using pastel colors like soft pink, baby blue, or lavender for the body—it gives Bobby a dreamy, nursery-friendly appearance that kids absolutely adore.

If you want to add extra texture, consider using a fluffy or boucle yarn for the body to create that authentic woolly sheep look, though you'll need to adjust your hook size accordingly. You could also embroider small flowers or patterns onto the white face portion for a folk-art inspired design. For a full flock, make multiple sheep in different sizes using various yarn weights—a mama sheep with babies creates an adorable display!

Another fun variation is adding a small bell around Bobby's neck using embroidery thread and a tiny jingle bell from the craft store, giving him that authentic farm animal charm. You could even make seasonal versions—add a tiny Santa hat for Christmas, a flower crown for spring, or a small scarf for winter displays. The possibilities are endless, and each variation helps you practice different techniques while creating unique characters!

Common Mistakes & How to Fix Them

✗ Forgetting to change yarn colors at the specified stitches—mark your pattern clearly and keep both colors ready during transition rounds to avoid confusion ✗ Understuffing the head and body which causes the sheep to lose its shape—stuff generously and firmly especially before closing to maintain structure ✗ Attaching the horns before rolling them backward which makes them stick straight out—follow assembly instructions carefully and curve horns before final attachment 
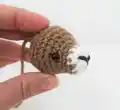
✗ Placing safety eyes incorrectly or too close together—measure 8 stitches apart between rows 5 and 6 before securing permanently for proper facial proportions ✗ Not adding the penny weight to the body which prevents the sheep from standing upright—insert the penny before stuffing completely in round 15

Bobby the Bighorn Sheep Amigurumi Pattern

Create your own adorable Bobby the Bighorn Sheep with this delightful amigurumi pattern! This charming woolly friend features distinctive curved horns, a sweet white face, and a sturdy brown body that stands proudly on its own four legs. Perfect for sheep lovers and wildlife enthusiasts, this pattern guides you through creating a cuddly companion with realistic details and a gentle personality. Whether you're making it as a gift or adding to your own collection, Bobby brings a touch of mountain charm to any space. The finished sheep is small enough to display anywhere yet detailed enough to impress with its handcrafted quality.

Intermediate 3-4 Hours

Materials Needed for Bobby the Bighorn Sheep Amigurumi Pattern

— Main Fabric

  • 01
    Worsted weight yarn in beige color for horns
  • 02
    Worsted weight yarn in brown color for body, head, legs, and tail
  • 03
    Worsted weight yarn in white color for face portion
  • 04
    Worsted weight yarn in black color for hooves and nose stitching

— Tools Required

  • 01
    3 mm crochet hook (for horns only)
  • 02
    3.5 mm crochet hook (for body and other parts)
  • 03
    6 mm black safety eyes
  • 04
    Fiber fill stuffing
  • 05
    Scissors
  • 06
    Sewing needle for assembly and embroidery
  • 07
    Stitch markers or stitch counter (optional but helpful)
  • 08
    One penny for weight

Progress Tracker

0% Complete

— Head :

Info :

Start using white yarn

Round 1 :

6 SC in MC (6)

Round 2 :

INC X 6 (12)

Info :

On the last stitch change color to brown, the remainder of the head will be made using brown yarn

Round 3-4 :

SC around (12)

Round 5 :

6 SC, 6 INC (18)

Round 6 :

SC around (18)

Round 7 :

(2SC, INC) X 6 (24)

Round 8 :

(3SC, INC) X 6 (30)

Info :

Stop and put eyes in and using your needle stitch in the nose

Round 9 :

SC around (30)

Round 10 :

(3SC, DEC) x 6 (24)

Round 11 :

(2SC, DEC) x 6 (18)

Info :

Stop and lightly stuff head

Round 12 :

(SC, DEC) x 6 (12)

Info :

Continue stuffing so head will stay nice and firm

Round 13 :

SC around (6)

Info :

SL, close up hole and leave long tail of yarn for sewing onto body

Infos :

Eyes should be placed in between rows 5 & 6 and be 8 stitches apart. The top of the nose should start between rows 2 and 3 and the bottom should be in the middle of the original magic circle

— Body :

Info :

Use brown yarn

Round 1 :

6 SC in MC (6)

Round 2 :

INC X 6 (12)

Round 3 :

(SC, INC) X 6 (18)

Round 4 :

(2SC, INC) x 6 (24)

Round 5-14 :

24 around (24)

Info :

On last stitch change to white yarn. At this point you lightly stuff and add a penny inside to weigh it down

Round 15 :

(2SC, DEC) x 6 (18)

Round 16 :

(SC, DEC) x 6 (12)

Info :

Stop and stuff generously so it will stay nice and firm

Round 17 :

DEC x 6 (6), SL and close up hole

— Legs (Make 4) :

Info :

Start off using black yarn

Round 1 :

5SC in MC (5)

Round 2 :

SC around in BLO (change to brown yarn in 5th stitch)

Round 3 :

INC, 4SC (6)

Round 4 :

SC around (6)

Round 5 :

(2 SC, INC) X 2 (8)

Round 6-7 :

SC around (8)

Info :

SL, stuff with fiber fill and leave long tail for sewing onto body

— Tail :

Info :

Use brown yarn

Instructions :

Chain 4, SC in 2nd chain from hook and next two stitches, SL in last stitch. Leave tail for sewing onto body

— Horns (Make 2) :

Info :

Use Beige Yarn & 3mm hook

Round 1 :

4SC in MC (4)

Round 2 :

3SC, INC (5)

Round 3 :

4SC, INC (6)

Round 4 :

6 around (6)

Round 5 :

(2 SC, INC) X 2 (8)

Round 6-7 :

SC around (8)

Round 8 :

(3SC, INC) X 2 (10)

Round 9 :

SC around (10)

Round 10 :

4SC, INC X 2 (12)

Round 11 :

12 around (12)

Round 12 :

(2 SC, DEC) X 3 (9)

Round 13 :

SC around (9)

Info :

Finish off and leave a long tail for sewing onto head. Lightly stuff your horns

Assembly Instructions

  • Attach head to body between rows 4 and 5 of the body using the long tail from the head
  • Sew the tail onto the back of the body 2 rows up from the bottom
  • Attach horns between rows 8 and 9 of the head—they will look silly at first pointing straight out
  • Take each horn and roll it backward in a curve, then secure the curved position by sewing it firmly to the head
  • Sew front legs between rows 4-6 of the body, spacing them evenly on the front
  • Attach back legs between rows 11-13 of the body, positioning them so Bobby can stand independently

Important Notes

  • 💡Use tight stitches throughout the pattern to prevent stuffing from showing through the fabric
  • 💡Change yarn colors carefully at the specified stitches to create clean color transitions without visible gaps
  • 💡The penny weight in the body is essential for stability—without it Bobby won't stand on his own
  • 💡Stuff the head and body generously but the horns and legs should be lightly stuffed to maintain their shape
  • 💡Pin all parts in position before sewing to ensure Bobby stands properly and looks balanced
  • 💡The horns must be rolled backward after initial attachment—this creates the characteristic bighorn sheep curve
  • 💡Use stitch markers to track your rounds especially during the body section with multiple rounds of the same count

This charming Bobby the Bighorn Sheep pattern was designed to capture the majestic beauty of mountain wildlife in an adorable, cuddly form! The pattern combines thoughtful construction techniques with realistic details like curved horns and color-blocked features to create a sheep with true personality. The weighted body and sturdy legs allow Bobby to stand proudly on display, making him perfect as a gift for nature lovers or as a special addition to your own amigurumi collection. 🐑 Happy crocheting! 🧶✨

You ask,

we answer.

FAQs

Why won't my bighorn sheep stand up on its own?

Make sure you've added the penny weight inside the body during round 15 as instructed. The penny provides necessary bottom weight for stability. Also ensure you've stuffed the body firmly and that all four legs are attached at the correct rows with even spacing.

How do I make the horns curl backward like a real bighorn sheep?

The horns will initially stick straight out when first attached between rows 8 and 9. After securing them in place, gently roll each horn backward in a curve and sew the curved portion to the head to hold the shape. This creates the signature spiral look.

Can I make Bobby larger or smaller?

Yes! The pattern notes that you can adjust the size by changing your yarn weight and hook size. Use a thicker yarn and larger hook for a bigger sheep, or thinner yarn and smaller hook for a miniature version. Just maintain the same proportions throughout.

What if I don't have beige yarn for the horns?

You can substitute tan, cream, light brown, or even gray yarn for the horns. Real bighorn sheep have horns in various earth tones, so feel free to use whatever neutral color you have available that contrasts nicely with the brown body.

Where exactly should I place the safety eyes?

Position the safety eyes between rows 5 and 6 of the head, with 8 stitches of space between them. Install them after completing round 8 but before stuffing, as indicated in the pattern. This placement gives Bobby a sweet, natural expression.