🧢 Beautiful ✨ Detailed πŸ’ Adorable

Bunny Garland Crochet Pattern

Bunny Garland Crochet Pattern
4.7β˜… Rating
3-4 Hours Time Needed
2.8K Made This
βœ‚οΈ

Beginner Friendly Level

Perfect for those just starting their sewing journey, with clear instructions and simple techniques

⏱️

Weekend Treat

Takes 5-7 hours, making it an enjoyable project to finish over a couple of days.

🐰

Whimsical Buddy

Playful characters full of personality, designed to spark imagination and become cherished playtime favorites.

About This Bunny Garland Crochet Pattern

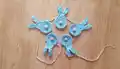
This bunny garland pattern creates adorable little rabbits that are approximately 11 cm (4.3 inches) tall and 5 cm (1.9 inches) wide. Each bunny is worked in rounds starting with a magic ring, building up a circular body before adding the distinctive head with seven treble crochets. The ears are crafted separately using chains and worked back down with single and double crochets for a perfect floppy ear look. Once you've mastered making one bunny, you can create as many as you like and connect them with a simple chain cord.

Bunny Garland Crochet Pattern crochet pattern - detailed view of completed project

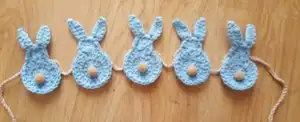
The finished garland showcased in this pattern features five bunnies connected with chains and measures 95 cm (37.4 inches) in total length. You can easily adjust the spacing between bunnies and the cord length on either end to fit your specific decorating needs.

Why You'll Love This Bunny Garland Crochet Pattern

I absolutely love this bunny garland pattern because it's one of those projects that looks impressive but comes together so quickly and easily. The magic ring technique creates a perfect foundation, and watching each little bunny take shape as you add the head and ears is genuinely delightful. I especially appreciate how customizable this pattern is - you can make your garland as long or short as you need, choose any color palette that matches your dΓ©cor, and even experiment with different pompom sizes for varied looks. The fact that it works up fast means you can create multiple garlands for gifts or different rooms without feeling overwhelmed. Plus, there's something so satisfying about seeing all your little bunnies lined up on their cord, ready to bring joy to any space!

Bunny Garland Crochet Pattern step 1 - construction progress Bunny Garland Crochet Pattern step 2 - assembly progress Bunny Garland Crochet Pattern step 3 - details and accessories Bunny Garland Crochet Pattern step 4 - final assembly and finishing

Switch Things Up

I love experimenting with this bunny garland pattern to create different looks and styles! One of my favorite variations is using variegated or ombre yarn to give each bunny a unique color gradient effect - it creates such a magical, whimsical feel without any extra effort. You could also try making bunnies in different sizes by using various yarn weights and hook sizes, then mixing them on one garland for an adorable family effect.

For a more sophisticated look, I sometimes work the bunnies in neutral tones like cream, soft grey, and taupe, then add metallic pompoms for a modern nursery aesthetic. During holidays, I go all out with seasonal colors - pastels for Easter, red and green for Christmas, or orange and black for a Halloween twist with little ghost bunnies!

Another fun variation is adding small ribbon bows between the ears or tiny bells to the pompom tails for extra texture and sound. You could even embroider simple faces on the bunnies using black embroidery floss - just two small French knots for eyes and a Y-shape for the nose and mouth. For a completely different take, try making the ears longer by adding more chains, or shorter and rounder for a different bunny personality. The chain spacing between bunnies can also be varied - closer together for a fuller look or farther apart for a more delicate, airy garland. I've even made mini versions with sport weight yarn and a 2.5mm hook for charm bracelets and bag decorations!

Common Mistakes & How to Fix Them

βœ— Pulling the magic ring too tight too soon can make it difficult to work your stitches into the ring evenly βœ— Forgetting to count your stitches in each round can throw off the shape of the bunny body and head βœ— Not positioning the ears correctly in the third and fifth treble crochet can make the bunny look unbalanced or asymmetrical βœ— Skipping the slip stitches on the back when positioning for the ears will place them in the wrong location βœ— Making the chain for the ears too loose or too tight affects how the ears hang and their final shape βœ— Not weaving in ends securely before attaching pompoms can cause them to work loose over time with handling

Bunny Garland Crochet Pattern

Create an adorable bunny garland perfect for decorating nurseries, children's rooms, or celebrating Easter with this charming crochet pattern. Each sweet bunny features a round body, cute ears, and a fluffy pompom tail that adds the perfect finishing touch. This delightful garland makes a wonderful handmade gift for baby showers or can brighten up any space with its playful charm. The pattern is straightforward and works up quickly, allowing you to customize your garland with any color combination you love.

Beginner Friendly 3-4 Hours

Materials Needed for Bunny Garland Crochet Pattern

β€” Main Fabric

  • 01
    Cotton yarn suitable for 3.5 mm crochet hook (approximately 5 grams per bunny in main color)
  • 02
    Soft brown yarn or any color of choice for garland cord (approximately 5 grams total)

β€” Tools Required

  • 01
    3.5 mm crochet hook
  • 02
    Small pompoms (1 cm diameter or store-bought/handmade)
  • 03
    Fabric or craft glue
  • 04
    Yarn needle for weaving in ends
  • 05
    Scissors

Progress Tracker

0% Complete

β€” Bunny Body :

Row 1 :

On a magic ring Ch 2 (counts as a double crochet) and then add 11 Dc into the ring (12 stitches in total). Pull the thread to close the ring and join with a Sst.

Row 2 :

Ch 2 (counts as a double crochet) and then add 1 Dc in the same stitch from Row 1. Continue adding two Dc over each of the stitches from Row 1 (24 stitches in total). Join with a Sst.

β€” Bunny Head :

Info :

Skip one stitch from previous row and in the next stitch add 7 Tc (into the same stitch). Skip one stitch and Sst in the following one.

β€” Bunny Ears :

Info :

The ears will be located in the 3rd and 5th Tc (from left to right) of the bunny head.

Step 1 :

Turn the back side of the bunny body towards you and Sst back from where you ended the bunny head to where you will start your first ear (3 Sst).

Step 2 :

Ch 7

Step 3 :

Skip the first chain and then Sc on the next two chains from hook and Dc in the following four chains (6 stitches in total over the chain). Sst in the same stitch from previous row (exactly where you started the chain).

Step 4 :

Sst over the next two stitches from previous row (effectively positioning your crochet hook in place to start the second ear).

Step 5 :

Make the second ear just as you made the first one.

Info :

Weave in ends and your bunny is finished! Glue the pompom over the center of the body of the bunny.

β€” Garland Assembly :

Step 1 :

Ch 50 and then Sst over the back of the first bunny, at the neck area.

Step 2 :

Ch 30 and attach to the next bunny in the same manner.

Step 3 :

Repeat until you have all the bunnies attached to the cord. Finish with a Ch 50 to match the initial chain.

Info :

You may or may not want to weave in the ends of the cord on either side. Adjust the number of chains for longer or shorter cord ends or different spacing between bunnies.

Assembly Instructions

  • Complete each bunny by weaving in all yarn ends securely before attaching decorations.
  • Apply fabric or craft glue to the back of each pompom and press firmly onto the center of each bunny body.
  • Allow glue to dry completely (follow glue manufacturer's instructions for drying time).
  • For the garland cord, chain 50 stitches using your cord color yarn.
  • Attach the first bunny by slip stitching through the back of the bunny at the neck area where the head meets the body.
  • Chain 30 stitches between each bunny and slip stitch to attach the next bunny at its neck area.
  • After attaching all bunnies, finish with a final chain of 50 stitches to create matching cord ends on both sides of the garland.

Important Notes

  • πŸ’‘Make sure to count your stitches carefully in each row to maintain the correct bunny shape and proportion.
  • πŸ’‘Keep consistent tension throughout your work for uniformly sized bunnies that look cohesive on the garland.
  • πŸ’‘When working the treble crochets for the head, work them all into the same stitch to create the fan shape.
  • πŸ’‘Position your ears carefully by counting to the 3rd and 5th treble crochet from left to right for symmetry.
  • πŸ’‘Test your pompom glue on a scrap piece first to ensure it doesn't soak through or discolor your yarn.
  • πŸ’‘Adjust chain counts between bunnies and on cord ends based on your desired garland length and spacing preferences.
  • πŸ’‘Consider using stitch markers to mark where you'll attach each bunny before you begin the garland cord for even spacing.

This charming Bunny Garland pattern brings a touch of handmade sweetness to any space, from nurseries to party decorations. The simple construction method makes it perfect for beginners while still creating an impressive finished piece that looks professionally crafted. With customizable colors, spacing, and length, you can create the perfect garland for any occasion or recipient. The addition of fluffy pompom tails gives each bunny extra personality and charm that will delight children and adults alike. 🐰🧢✨

You ask,

we answer.

FAQs

How many bunnies should I make for my garland?

The pattern shows a garland with 5 bunnies measuring 95 cm total, but you can make as many or as few as you like! Consider your space - 3 bunnies work great for a small window, while 7-10 create a dramatic statement for a longer wall or party backdrop.

Can I use different yarn weights for this pattern?

Yes, but you'll need to adjust your hook size accordingly and your finished bunnies will be larger or smaller. If using a different weight yarn, choose a hook size recommended for that yarn weight and make a test bunny first to ensure you're happy with the size.

What if I can't find pompoms in the right color?

You can easily make your own pompoms using matching yarn and a pompom maker or the traditional cardboard circle method. Alternatively, you could crochet small circles or balls to use as tails instead of pompoms for a completely crocheted look.

How do I keep my magic ring from coming undone?

After working all your stitches into the magic ring, pull the tail firmly to close the center completely, then weave the tail through several stitches on the wrong side before trimming. You can also add a small knot in the tail on the back for extra security.

Can I hang this garland outdoors?

If you use 100% acrylic yarn and weather-resistant glue for the pompoms, the garland can handle covered outdoor spaces. However, direct sun exposure will fade colors over time, and moisture can damage the glue bond, so it's best suited for indoor or protected outdoor use.