🧢 Beautiful ✨ Detailed πŸ’ Adorable

Bunny Pumpkin Amigurumi Pattern

Bunny Pumpkin Amigurumi Pattern
4.9β˜… Rating
3-4 Hours Time Needed
4.2K Made This
βœ‚οΈ

Intermediate Level

Ideal for those with basic knitting experience, featuring slightly more advanced stitches and techniques to expand your skills.

⏱️

Bite-Sized Project

Complete in under 2 hoursβ€”quick, fun, and perfect for a little creative escape.

πŸŽ„

Holiday Cheer

Festive fun for the season, bringing handmade magic to celebrations and creating new family traditions.

About This Bunny Pumpkin Amigurumi Pattern

This bunny pumpkin pattern is a delightful fusion of adorable bunny features and festive pumpkin charm. The design cleverly uses bobble stitches in contrasting colors to create the classic pumpkin stripes, while the brown chenille body gives your bunny a soft, huggable texture. The creative ruffled orange hat with its green pom-pom stem adds a whimsical touch that makes this pattern truly special for autumn decorating.

Bunny Pumpkin Amigurumi Pattern crochet pattern - detailed view of completed project

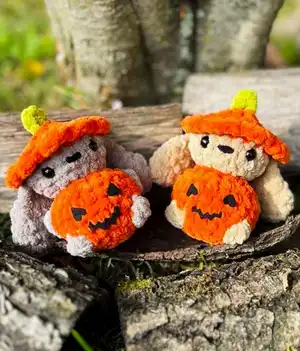
Perfect for seasonal home decor or as a handmade gift for Halloween enthusiasts. The combination of chenille yarn and creative color changes makes this project engaging and fun to complete.

Why You'll Love This Bunny Pumpkin Amigurumi Pattern

I absolutely love how this pattern brings together two beloved themes into one irresistible design. The way the bobble stitches create those distinctive pumpkin ridges while maintaining the soft, cuddly nature of an amigurumi bunny is pure magic. I find the color-changing techniques incredibly satisfying, and watching the pumpkin stripes emerge as you work is genuinely exciting. The creative hat detail with its ruffled edge adds so much personality, making each bunny unique. This pattern is perfect for building your amigurumi skills while creating something truly special for the fall season.

Bunny Pumpkin Amigurumi Pattern step 1 - construction progress Bunny Pumpkin Amigurumi Pattern step 2 - assembly progress Bunny Pumpkin Amigurumi Pattern step 3 - details and accessories Bunny Pumpkin Amigurumi Pattern step 4 - final assembly and finishing

Switch Things Up

I absolutely love how versatile this bunny pumpkin pattern can be with just a few creative tweaks. Instead of the classic orange and brown color scheme, I've experimented with pastel versions using soft pink and cream for a spring-themed bunny, or even lavender and white for a dreamy fairy-tale version. You could easily swap the pumpkin face for embroidered flowers to transform this into an all-season decoration.

For a more personalized touch, I sometimes add a tiny crocheted scarf around the bunny's neck or create miniature accessories like a small basket filled with felt carrots. The hat can be modified tooβ€”try making it in different colors or adding small embroidered details like stars or hearts instead of the pumpkin stem.

If you want to make a whole bunny family, varying the yarn weight creates different sizes while keeping the same pattern structure. I've also found that using sparkly or metallic yarn for the hat adds a festive touch perfect for holiday displays. The possibilities are truly endless, and each small modification makes your bunny pumpkin uniquely yours.

Common Mistakes & How to Fix Them

βœ— Forgetting to stretch the pumpkin body after stuffing can result in an uneven shape instead of the round pumpkin look βœ— Not placing bobble stitches symmetrically on opposite sides creates an unbalanced pumpkin stripe pattern that looks misaligned βœ— Stuffing too firmly before completing all decreases makes it difficult to close the head properly and shape βœ— Missing the back loop only instruction in round three causes the hat attachment point to disappear completely

Bunny Pumpkin Amigurumi Pattern

Create an adorable bunny pumpkin amigurumi perfect for fall decorating and Halloween festivities. This charming pattern combines the cuteness of a bunny with the festive spirit of a jack-o'-lantern pumpkin. Featuring a creative pumpkin-shaped body with bobble stitch details, an orange ruffled hat with a green stem, and sweet bunny ears, this design is both whimsical and seasonal. The pattern uses soft chenille yarn in autumn colors and includes options for creating expressive faces using felt or embroidery.

Intermediate 3-4 Hours

Materials Needed for Bunny Pumpkin Amigurumi Pattern

β€” Main Fabric

  • 01
    Chenille yarn in orange color for pumpkin body
  • 02
    Chenille yarn in brown or tan color for bunny head and face
  • 03
    Chenille yarn in green color for hat stem detail

β€” Tools Required

  • 01
    Crochet hook size 5mm
  • 02
    Yarn needle
  • 03
    Scissors
  • 04
    Stuffing
  • 05
    Plastic safety eyes
  • 06
    Black felt for face details (optional)
  • 07
    Fabric glue (if using felt)

Progress Tracker

0% Complete

β€” Head and Body :

Info :

Start with Color A (Orange)

Round 1 :

4 sc in MR (4)

Round 2 :

4 inc (8)

Round 3 :

BLO (sc, inc) x 4 (12)

Round 4 :

(2 sc, inc) x 4 (16)

Round 5 :

Do the BO in Color B: 4 sc, BO, 4 sc, BO, 6 sc (16)

Round 6 :

(3 sc, inc) x 4 (20)

Round 7 :

sc around (20)

Round 8 :

Do the BO in Color B: 4 sc, BO, 10 sc, BO, 4 sc (20)

Info :

Stretch your work to the sides make it rounder

Round 9 :

(2 sc, dec) x 5 (15)

Round 10 :

(sc, dec) x 5 (10)

Info :

Stretch, stuff, change to Color B (Brown)

Round 11 :

BLO (sc, inc) x 5 (15)

Round 12 :

(2 sc, inc) x 5 (20)

Round 13 :

sc around (20) - work 2 rounds

Info :

Change to Color A (Orange): sc around (20). Place safety eyes between R13-R14, 4 sc apart, stretch work

Round 14 :

BLO (2 sc, dec) x 5 (15)

Info :

Stretch your work, stuff

Round 15 :

(sc, dec) x 5 (10)

Round 16 :

5 dec (5)

Info :

FO, sew shut. Squish to make it chubbier. Embroider the nose between eyes

β€” Hat Sides :

Info :

Use Color A (Orange). Insert your hook in the front loops of R16

Round 1 :

(sc, ch, 2 dc in 1 sc, ch) do this all around R16

β€” Pumpkin Stem :

Info :

Insert the hook on the top of the head

Instructions :

Chain 3, start in the second chain from hook 2 hdc, slst in hat

Info :

You can make a cute/spooky face out of felt and glue it on the pumpkin or embroider it

β€” Ears (Make 2) :

Round 1 :

6 sc in MR (6)

Round 2 :

(2 inc, sc) x 2 (10)

Round 3 :

sc, 2 inc, 3 sc, 2 inc, 2 sc (14)

Round 4 :

sc, 2 dec, 3 sc, 2 dec, 2 sc (10)

Round 5 :

sc around (10)

Round 6 :

(dec, 3 sc) x 2 (8)

Info :

4 sc to close, chain 1, turn, 4 sc, FO leave a long tail and sew under the hat however you think looks best

Assembly Instructions

  • Ensure the pumpkin body (orange section) is firmly stuffed and shaped into a round ball before closing.
  • Stretch the pumpkin section sideways after rounds 8 and 10 to create the authentic pumpkin shape.
  • Attach safety eyes between rounds 13-14 of the head, spacing them 4 single crochets apart for proper positioning.
  • Sew the completed ears underneath the orange hat brim, positioning them symmetrically on both sides of the head.
  • Create the decorative hat ruffle by working into the front loops only of round 16 with the scalloped stitch pattern.
  • Add the green stem to the top center of the hat and secure it firmly with a slip stitch.
  • Embroider or attach felt features for the pumpkin face on the orange body section for character and charm.

Important Notes

  • πŸ’‘Chenille yarn creates a plush, velvety texture perfect for this cuddly design
  • πŸ’‘The bobble stitches (BO) in contrasting brown create the distinctive pumpkin stripe effect
  • πŸ’‘Remember to work in back loops only (BLO) where indicated to create texture changes and attachment points
  • πŸ’‘Stretching the work at specified rounds is crucial for achieving the proper pumpkin shape
  • πŸ’‘Color changes between orange and brown should be done smoothly for clean stripe definition
  • πŸ’‘The hat is created by working into front loops from round 16 after completing the head

This charming bunny pumpkin pattern brings together the sweetness of amigurumi bunnies with the festive spirit of autumn celebrations. The clever use of bobble stitches creates authentic pumpkin ridges, while the creative hat design with its ruffled edge and green stem adds delightful character. Perfect for Halloween decorating or as a unique handmade gift, this pattern combines intermediate techniques with beginner-friendly construction. Your finished bunny will be a treasured seasonal decoration year after year. πŸŽƒπŸ°πŸ§Ά

You ask,

we answer.

FAQs

Can I use regular yarn instead of chenille yarn?

Yes, you can substitute regular worsted weight yarn, but the finished bunny will have a different texture and may be slightly smaller. Chenille yarn gives that distinctive plush, velvety feel that makes this pattern extra huggable and special for the autumn season.

How do I create the bobble stitches for the pumpkin stripes?

Bobble stitches are created by working multiple incomplete double crochets in the same stitch, then pulling through all loops at once. This creates a raised, textured bump that forms the pumpkin ridges. The pattern specifies exactly where to place them for the striped effect.

What size will the finished bunny pumpkin be?

Using 5mm hook and chenille yarn, the finished bunny will be approximately 3-4 inches tall, making it a perfect palm-sized decoration. You can adjust the size by using a larger or smaller hook with appropriately weighted yarn.

Do I need to use felt for the pumpkin face?

No, felt is optional. You can embroider the jack-o'-lantern face directly onto the orange pumpkin body using black yarn, or you can cut shapes from black felt and glue them on. Both methods work beautifully depending on your preference and skill level.

Why does the pattern say to stretch the work?

Stretching the pumpkin section sideways after specific rounds helps create the authentic rounded pumpkin shape instead of a cylindrical body. This shaping technique is essential for achieving the proper proportions and that characteristic pumpkin silhouette.