🧢 Beautiful ✨ Detailed πŸ’ Adorable

Christmas Bells Amigurumi Pattern

Christmas Bells Amigurumi Pattern
4.6β˜… Rating
3-4 Hours Time Needed
2.1K Made This
βœ‚οΈ

Beginner Friendly Level

Perfect for those just starting their sewing journey, with clear instructions and simple techniques

⏱️

Weekend Treat

Takes 5-7 hours, making it an enjoyable project to finish over a couple of days.

πŸŽ„

Holiday Cheer

Festive fun for the season, bringing handmade magic to celebrations and creating new family traditions.

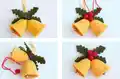
About This Christmas Bells Amigurumi Pattern

Christmas Bells Amigurumi Pattern crochet pattern - detailed view of completed project

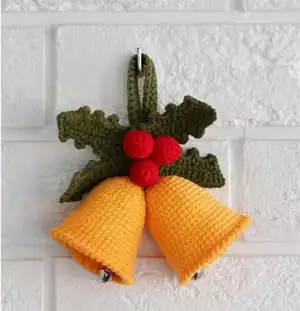
Perfect for decorating your home or gifting to loved ones, these bells combine traditional Christmas colors with charming handmade details. The finished piece measures around 4.7 by 5.1 inches and uses readily available DK weight yarn.

Why You'll Love This Christmas Bells Amigurumi Pattern

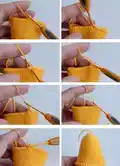
I absolutely love this pattern because it captures everything magical about Christmas in one adorable decoration. The combination of golden bells with rich green leaves and bright red berries creates such a classic holiday look that never goes out of style. I find the repetitive rounds incredibly relaxing to work through, and there's something so satisfying about watching each bell take shape. The finishing touches with the blue tongues and the way everything comes together in the assembly really makes this project feel special. Plus, knowing I can hang these bells year after year or give them as heartfelt handmade gifts makes every stitch worthwhile.

Christmas Bells Amigurumi Pattern step 1 - construction progress Christmas Bells Amigurumi Pattern step 2 - assembly progress Christmas Bells Amigurumi Pattern step 3 - details and accessories Christmas Bells Amigurumi Pattern step 4 - final assembly and finishing

Switch Things Up

I love personalizing these Christmas bells to match different dΓ©cor styles and color schemes. Instead of traditional yellow bells, I've experimented with silver metallic yarn for an elegant modern look, or even copper tones for a rustic farmhouse vibe. You could swap the red berries for white or gold ones to create a winter wonderland theme, or use burgundy and forest green for a more traditional Victorian Christmas aesthetic.

For the leaves, I sometimes add a bit of sparkle by working with a strand of thin metallic thread held together with the green yarn - it catches the light beautifully when hanging on the tree. You could also make the bells in graduating sizes to create a whole set that looks stunning displayed together. I've even made miniature versions using thinner yarn and a 1.5mm hook to use as gift package toppers or earrings.

If you want to make these bells more interactive for children, consider adding small jingle bells inside before closing (that's where those tambourines come in handy). Another fun variation is embroidering snowflakes or holly patterns onto the bell surfaces using white or contrasting colored thread. You could also experiment with the loop - try braiding multiple strands together or creating a twisted cord for a more decorative hanging option that adds extra visual interest to your finished piece.

Common Mistakes & How to Fix Them

βœ— Crocheting too loosely which allows stuffing to show through the holes - keep your tension tight and consistent throughout βœ— Forgetting to use stitch markers at the beginning of rounds leading to miscounts - mark your first stitch every round βœ— Not stuffing the berries firmly enough before closing which results in flat shapeless ornaments - pack fiberfill well before tightening βœ— Skipping the steam ironing step for leaves causing them to curl awkwardly - always steam press for professional looking flat leaves

Christmas Bells Amigurumi Pattern

Create a festive pair of Christmas bells perfect for holiday decorating. This charming pattern features two golden bells tied together with delicate green leaves and vibrant red berries. The bells include adorable blue tongues and come with a hanging loop, making them ideal for your Christmas tree, doorway, or as a handmade gift. Working with DK weight yarn and simple crochet techniques, you'll craft a decoration measuring approximately 4.7 by 5.1 inches that captures the magic of the holiday season.

Beginner Friendly 3-4 Hours

Materials Needed for Christmas Bells Amigurumi Pattern

β€” Main Fabric

  • 01
    DK weight yarn - Yarn Art Jeans (55% cotton/45% acrylic; 50 g/160 m)
  • 02
    Yarn Art Jeans No. 35 (yellow) for bells
  • 03
    Yarn Art Jeans No. 82 (dark green) for leaves and loop
  • 04
    Yarn Art Jeans No. 90 (red) for berries
  • 05
    Blue yarn for bell tongues

β€” Tools Required

  • 01
    2.25 mm crochet hook
  • 02
    Smaller crochet hook for bell tongue
  • 03
    Stuffing material (fiberfill/polyester)
  • 04
    Tapestry needle
  • 05
    Scissors
  • 06
    Stitch marker (or scrap of contrasting yarn)
  • 07
    2 tambourines
  • 08
    Damp cloth for steaming
  • 09
    Iron

Progress Tracker

0% Complete

β€” Bells (make 2) :

Yarn :

YarnArt Jeans No. 03 (yellow)

Rnd 1 :

6 into MR

Rnd 2 :

6 inc (12)

Rnd 3 :

(1 sc, inc)*6 (18)

Rnd 4 :

(2 sc, inc)*6 (24)

Rnd 5 :

(3 sc, inc)*6 (30)

Rnds 6-7 :

30 sc (2 rounds)

Rnd 8 :

(4 sc, inc)*6 (36)

Rnds 9-14 :

36 sc (6 rounds)

Rnd 15 :

(5 sc, inc)*6 (42)

Rnds 16-19 :

42 sc (4 rounds)

Info :

Crochet the next row with Crab (Reverse) stitch

Rnd 20 :

42 sc (Crab stitch), 1 sl st

Info :

Break yarn. Pull tightly. Hide the tail inside.

β€” Bell Language :

Info :

Chain 16 with blue yarn. Using a smaller hook, pull the thread into the eye of the bell to grab and pull the thread.

Info :

Start working in the second chain from hook 15 sc. Break yarn.

Info :

Attach the finished language to the bell. Tie all the threads. Tie both bells together.

β€” Leaf (make 4) :

Yarn :

YarnArt Jeans No. 82 (dark green)

Rnd 1 :

Chain 15, crochet to the chain foundation. Start working in the second chain from hook - 13 sc, 3 sc in 1 stitch. Continue crocheting on the other side of the chain foundation - 12 sc, 3 sc in 1 stitch.

Rnd 2 :

(3 sc, chain 3, 1 sc in the previous stitch)*4, 3 sc, chain 3, 1 sc in the previous stitch, (3 sc, chain 3, 1 sc in the previous stitch)*4, 2 sc, 2 sl st.

Info :

Break yarn, leaving a long tail for sewing.

Info :

Iron the part with steam if it is uneven. Put a damp cloth on top of a crochet garment and steam it off for a few seconds.

β€” Berries (make 3) :

Yarn :

YarnArt Jeans No. 90 (red)

Rnd 1 :

6 into MR

Rnd 2 :

6 inc (12)

Rnd 3-6 :

12 sc (4 rounds)

Info :

Complete stuffing with fiberfill. Tighten the hole using a tapestry needle.

β€” Loop :

Yarn :

YarnArt Jeans No. 82 (dark green)

Rnd 1 :

Chain 41, turn and continue crocheting on the other side of the chain.

Rnd 2 :

40 sc, 1 ср, turn

Rnd 3 :

40 sc

Info :

Cut off the long end of the thread. Use a needle to connect the ends.

Assembly Instructions

  • Sew four green leaves together at their base to create a cluster.
  • Using a tapestry needle, weave all the threads from the bells through to the back of the leaf cluster and tie them securely together.
  • Attach the three red berries to the leaf cluster, positioning them naturally among the leaves.
  • Connect the ends of the hanging loop using a needle and remaining thread.
  • Sew the completed loop to the back of the leaf cluster, hiding all protruding thread ends beneath it.

Important Notes

  • πŸ’‘Crochet with tight tension throughout the entire project to prevent stuffing from showing through the stitches
  • πŸ’‘Use stitch markers consistently to track the beginning of each round and avoid miscounting
  • πŸ’‘The toy is crocheted with V and X look single crochet technique (grab yarn over the hook first, then under for the second stitch)
  • πŸ’‘Steam iron the leaves with a damp cloth if they appear uneven for a professional flat appearance
  • πŸ’‘Leave long tails when finishing pieces that need to be sewn together for easier assembly
  • πŸ’‘Stuff the berries firmly before closing to maintain their round shape

These charming Christmas Bells bring warmth and tradition to your holiday dΓ©cor with their classic color palette and sweet handcrafted details. The pattern combines simple techniques with beautiful finishing touches to create an ornament you'll treasure for years to come. Whether adorning your tree or gifting to someone special, these bells ring in the season with handmade love. πŸŽ„ Happy crocheting! πŸ””βœ¨

You ask,

we answer.

FAQs

What size will my finished Christmas bells be?

Using the specified materials and a 2.25mm hook, your finished Christmas bells decoration will measure approximately 4.7 by 5.1 inches including the hanging loop.

Can I use different yarn weights for this pattern?

While you can experiment with different yarn weights, keep in mind this will change the final size of your bells. If using thicker yarn, go up a hook size and expect a larger finished product. Always maintain tight tension regardless of yarn choice.

What is the V and X look single crochet technique mentioned?

This technique creates a textured appearance by alternating how you grab the yarn - first over the hook for one stitch, then under the hook for the next stitch. This creates a distinctive V and X pattern in your fabric.

Do I need to use tambourines for this project?

The pattern lists 2 tambourines in the materials, which likely refers to small jingle bells or bell inserts that go inside the crocheted bells to make them actually ring. These are optional but add a lovely authentic sound.

How do I prevent my leaves from curling?

The pattern includes a steaming step specifically for the leaves. Place a damp cloth over your finished leaves and steam with an iron for a few seconds. This will help them lay flat and look more professional.

Can beginners successfully make this pattern?

Absolutely! This pattern uses basic stitches like single crochet and increases worked in continuous spirals. As long as you can maintain consistent tension and follow round-by-round instructions, you'll create beautiful Christmas bells.