๐Ÿงถ Beautiful โœจ Detailed ๐Ÿ’ Adorable

Christmas Minion Amigurumi Pattern

Christmas Minion Amigurumi Pattern
4.3โ˜… Rating
4-5 Hours Time Needed
2.6K Made This
โœ‚๏ธ

Intermediate Level

Ideal for those with basic knitting experience, featuring slightly more advanced stitches and techniques to expand your skills.

โฑ๏ธ

Weekend Treat

Takes 5-7 hours, making it an enjoyable project to finish over a couple of days.

๐Ÿงธ

Cute Companion

An adorable friend to cherish, handcrafted with love to bring comfort and joy for years to come.

About This Christmas Minion Amigurumi Pattern

Christmas Minion Amigurumi Pattern crochet pattern - detailed view of completed project

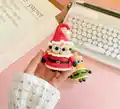
Working in continuous rounds with sport weight yarn, these minions stand approximately 3-4 inches tall, making them ideal ornaments, gift toppers, or desk decorations. The pattern uses simple color changes and basic shaping techniques to create instantly recognizable characters.

Why You'll Love This Christmas Minion Amigurumi Pattern

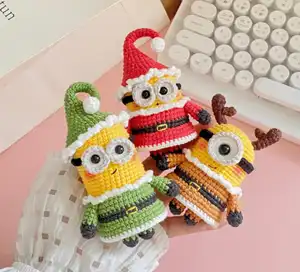
I absolutely love this pattern because it combines the beloved Minion characters with festive Christmas cheer in the most adorable way. Creating three different versions means you can display them as a set or gift them individually to fellow Minion fans. The color changes keep the project interesting without being overwhelming, and watching each character's personality emerge as you add their glasses and costumes is incredibly satisfying. The compact size means you can complete all three in a weekend, and they work up quickly enough to make multiple sets for gift-giving. Plus, there's something special about handcrafting holiday decorations that can be treasured year after year.

Christmas Minion Amigurumi Pattern step 1 - construction progress Christmas Minion Amigurumi Pattern step 2 - assembly progress Christmas Minion Amigurumi Pattern step 3 - details and accessories Christmas Minion Amigurumi Pattern step 4 - final assembly and finishing

Switch Things Up

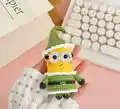
I love experimenting with different color combinations for these Christmas Minions! While the pattern calls for traditional red, green, and brown for the different costumes, you could create a whole rainbow of holiday minions by switching up the outfit colors. Try making Bob's Santa suit in blue and silver for a frosty winter theme, or give Kevin's elf costume a sparkly metallic yarn for extra holiday magic.

Another fun variation I enjoy is adjusting the size by using different yarn weights. Making micro versions with thin thread creates adorable Christmas tree ornaments, while chunky yarn produces larger desk buddies perfect for gift-giving. You could also add small jingle bells inside the stuffing for a gentle sound, or attach a loop of ribbon to the top of the hat for easy hanging.

I've experimented with adding embroidered details like snowflakes on the shirts or tiny buttons, and even tried making little accessories like miniature candy canes or presents for them to hold. The basic minion body is so versatile that once you master the pattern, you can really let your creativity shine by customizing each character's costume and accessories to match your personal holiday style or the recipient's favorite colors.

Common Mistakes & How to Fix Them

โœ— Forgetting to stuff the body firmly before decreasing rounds, which results in a floppy minion that won't stand properly on its own โœ— Not counting stitches carefully during color changes, leading to misaligned stripes that throw off the entire costume pattern โœ— Placing the safety eyes too close together or at wrong rounds, giving the minion an odd expression instead of its characteristic look โœ— Sewing the glasses or accessories before fully stuffing and shaping the body, making it difficult to position them correctly โœ— Using yarn that's too thin or thick for the recommended hook size, resulting in either visible stuffing or overly stiff fabric โœ— Not leaving long enough tails when cutting yarn between sections, making it challenging to securely attach arms and legs

Christmas Minion Amigurumi Pattern

Create your own festive Christmas Minions with this delightful amigurumi pattern featuring three adorable characters: Bob in his Santa suit, Kevin as a cheerful elf, and Stuart dressed as a reindeer. Each minion is perfectly sized for holiday decorating, gift-giving, or as charming desk companions. This pattern includes detailed instructions for creating all three versions with their unique costumes, glasses, and festive accessories that capture the playful spirit of the holidays.

Intermediate 4-5 Hours

Materials Needed for Christmas Minion Amigurumi Pattern

โ€” Main Fabric

  • 01
    Sport yarn size 1.5-2mm in yellow, red, green, brown, black, white, and gray colors
  • 02
    Gauge 9 single crochet and 9 rows yield a square with 1 inch sides for 2.0mm hook

โ€” Tools Required

  • 01
    Crochet hook 2.0mm - 2.5mm
  • 02
    Black safety eyes size 8-10mm (using 8mm eyes)
  • 03
    Black yarn or black embroidery thread for decorating
  • 04
    Fiberfill stuffing
  • 05
    Yarn needle
  • 06
    Stitch markers (if you need)
  • 07
    Scissors
  • 08
    White and gray yarn for glasses
  • 09
    Glue for attaching eyes to glasses

Progress Tracker

0% Complete

โ€” Bob's Body :

Info :

Start with yellow yarn

Rnd 1 :

7sc in MR (7)

Rnd 2 :

7-inc (14)

Rnd 3 :

(sc, inc) * 7 (21)

Rnd 4 :

(inc, 2sc) * 7 (28)

Rnd 5 :

(3sc, inc) * 7 (35)

Rnd 6-14 :

(9 rnds) 35sc (35)

Info :

Switch to red yarn

Rnd 15 :

BLO (4sc, inc) * 7 (42)

Rnd 16-17 :

(2 rnds) 42sc (42)

Info :

Switch to black yarn

Rnd 18-19 :

(2 rnds) 42sc (42)

Info :

Switch to red yarn

Rnd 20 :

BLO 42sc (42)

Rnd 21 :

42sc (42)

Rnd 22 :

(4sc, dec) * 7 (35)

Rnd 23 :

(3sc, dec) * 7 (28)

Info :

Stuff the body tight with fiberfill

Rnd 24 :

(2sc, dec) * 7 (21)

Rnd 25 :

(sc, dec) * 7 (14)

Rnd 26 :

7-dec (7)

Info :

Cut the yarn. Invisible fasten off. Thread a needle with your yarn tail and close the remaining gap.

โ€” Kevin's Body :

Info :

Start with yellow yarn

Rnd 1 :

7sc in MR (7)

Rnd 2 :

7-inc (14)

Rnd 3 :

(sc, inc) * 7 (21)

Rnd 4 :

(inc, 2sc) * 7 (28)

Rnd 5 :

(3sc, inc) * 7 (35)

Rnd 6-21 :

(16 rnds) 35sc (35)

Info :

Switch to green yarn

Rnd 22 :

BLO (4sc, inc) * 7 (42)

Rnd 23-24 :

(2 rnds) 42sc (42)

Info :

Switch to black yarn

Rnd 25-26 :

(2 rnds) 42sc (42)

Info :

Switch to green yarn

Rnd 27 :

BLO 42sc (42)

Rnd 28 :

42sc (42)

Rnd 29 :

(4sc, dec) * 7 (35)

Rnd 30 :

(3sc, dec) * 7 (28)

Info :

Stuff the body tight with fiberfill

Rnd 31 :

(2sc, dec) * 7 (21)

Rnd 32 :

(sc, dec) * 7 (14)

Rnd 33 :

7-dec (7)

Info :

Cut the yarn. Invisible fasten off. Thread a needle with your yarn tail and close the remaining gap.

โ€” Stuart's Body :

Info :

Start with yellow yarn

Rnd 1 :

7sc in MR (7)

Rnd 2 :

7-inc (14)

Rnd 3 :

(sc, inc) * 7 (21)

Rnd 4 :

(inc, 2sc) * 7 (28)

Rnd 5 :

(3sc, inc) * 7 (35)

Rnd 6-17 :

(12 rnds) 35sc (35)

Info :

Switch to brown yarn

Rnd 18 :

BLO (4sc, inc) * 7 (42)

Rnd 19-20 :

(2 rnds) 42sc (42)

Info :

Switch to black yarn

Rnd 21-22 :

(2 rnds) 42sc (42)

Info :

Switch to brown yarn

Rnd 23 :

BLO 42sc (42)

Rnd 24 :

42sc (42)

Rnd 25 :

(4sc, dec) * 7 (35)

Rnd 26 :

(3sc, dec) * 7 (28)

Info :

Stuff the body tight with fiberfill

Rnd 27 :

(2sc, dec) * 7 (21)

Rnd 28 :

(sc, dec) * 7 (14)

Rnd 29 :

7-dec (7)

Info :

Cut the yarn. Invisible fasten off. Thread a needle with your yarn tail and close the remaining gap.

โ€” Arms :

Info :

With black and minion shirt's yarn (make two)

Rnd 1 :

start with black 4sc in MR (4)

Rnd 2 :

4-inc (8)

Info :

Switch color

Rnd 3-8 :

(6 rnds) 8sc (8)

Info :

Cut the yarn. Leave a long tail. Thread a needle with your yarn tail and sew to the body at the round you switch to minion shirt's color yarn.

โ€” Legs :

Info :

With black and minion shirt's yarn.

Rnd 1 :

start with black 7sc in MR (7)

Rnd 2 :

inc, 6sc (8)

Info :

Switch color

Rnd 3-4 :

8sc (8)

Info :

Cut the yarn. Leave a long tail. Thread a needle with your yarn tail and sew the legs to bottom of the body.

โ€” Bob's and Kevin's Glasses :

Info :

With white and gray.

Rnd 1 :

start with white 7sc in MR (7)

Rnd 2 :

7-inc (14)

Info :

Switch to gray

Rnd 3 :

FLO 14sc, slst(14)

Info :

Cut the yarn. Leave a long tail. Thread a needle with your yarn tail and sew the glasses to the body. Place the eyes on glasses and use glue to stick them to the body.

Black trap for Bob and Kevin glasses :

Start with black yarn, ch32, 31-slst on chain. Cut the yarn. Leave a long tail. Thread a needle with your yarn tail and sew it to the body of minion.

โ€” Stuart's Glasses :

Info :

With white and gray.

Rnd 1 :

start with white 7sc in MR (7)

Rnd 2 :

7-inc (14)

Rnd 3 :

(sc, inc) * 7 (21)

Info :

Switch to gray

Rnd 4 :

FLO 21sc, slst (21)

Black trap for Stuart glasses :

Start with black yarn, ch37, 36sc on chain. Cut the yarn. Leave a long tail. Thread a needle with your yarn tail and sew it to the body of minion.

โ€” Piece of shirt :

Info :

With minion shirt's yarn. Insert your hook to FLO stitches of the second BLO round on the body.

Rnd 1 :

ch1, (5sc, inc) * 7, slst (49)

Rnd 2-3 :

(2 rnds) ch1, 49sc, slst (49)

Info :

Switch to white yarn

Rnd 4 :

49sc, slst (49)

Info :

Cut the yarn. Invisible fasten off. Hide your yarn tail.

โ€” Collar :

Info :

With white yarn. Insert your hook to FLO stitches of the first BLO round on the body, (ch 3, slst to the next stitch) * end round

Info :

Cut the yarn. Invisible fasten off. Hide your yarn tail.

โ€” Bob's and Kevin's hat :

Info :

With minion shirt's yarn

Rnd 1 :

4sc in MR (4)

Rnd 2-4 :

(3 rnds) 4sc (4)

Rnd 5 :

3sc, inc (5)

Rnd 6-8 :

(3 rnds) 5sc (5)

Rnd 9 :

4sc, inc (6)

Rnd 10-12 :

(3 rnds) 6sc (6)

Rnd 13 :

(sc, inc) * 3 (9)

Rnd 14 :

9sc (9)

Rnd 15 :

(2sc, inc) * 3 (12)

Rnd 16-17 :

(2 rnds) 12sc (12)

Rnd 18 :

(sc, inc) * 6 (18)

Rnd 19 :

18sc (18)

Rnd 20 :

(2sc, inc) * 6 (24)

Rnd 21 :

24sc (24)

Rnd 22 :

(3sc, inc) * 6 (30)

Rnd 23 :

(4sc, inc) * 6 (36)

Rnd 24 :

2sc, inc, (5sc, inc) * 5, 3sc (42)

Rnd 25 :

42sc (42)

Info :

Switch to white yarn

Rnd 26 :

42sc (42)

Rnd 27 :

(Ch 3, slst to the next stitch) * end round

Info :

Cut the yarn. Invisible fasten off. Hide your yarn tail.

โ€” Stuart's horn :

Info :

With dark brown yarn. Make two.

Big piece :

Rnd 1 :

6sc in MR (6)

Rnd 2 :

(2sc, inc) * 2 (8)

Rnd 3 :

8sc (8)

Rnd 4 :

2sc, 2-dec, 2sc (6)

Rnd 5 :

2sc, dec, 2sc (5)

Rnd 6-7 :

(2 rnds) 5sc (5)

Rnd 8 :

3sc, dec, slst (4)

Info :

Cut the yarn. Leave a long tail for sewing.

Small piece :

Rnd 1 :

4sc in MR (4)

Rnd 2-3 :

(2 rnds) 4sc (4)

Info :

Cut the yarn. Leave a long tail. Thread a needle with your yarn tail. Sew small piece to big piece spanning rounds 5&6.

Info :

Sew the horn to the top of minion spanning rounds 4&5

Assembly Instructions

  • Sew the arms to the body at the round where you switched to the minion shirt's color yarn, positioning them on either side.
  • Attach the legs to the bottom of the body, ensuring they are evenly spaced for stability.
  • For glasses, place the safety eyes onto the white/gray crocheted glasses and use glue to secure them to the body.
  • Thread the black strap through or around the glasses and sew it to the back of the minion's body to keep glasses secure.
  • Attach the piece of shirt by inserting your hook into the FLO stitches of the second BLO round on the body and following the pattern.
  • Sew the collar to the first BLO round on the body using the chain stitch method described.
  • For Bob and Kevin, attach the completed hat to the top of the head. For Stuart, sew both horn pieces (with small piece attached to big piece) to the top of the head spanning rounds 4-5.

Important Notes

  • ๐Ÿ’กUse stitch markers to keep track of rounds, especially during multiple color changes between body sections
  • ๐Ÿ’กStuff the body firmly but evenly to maintain the cylindrical minion shape before closing the final rounds
  • ๐Ÿ’กWhen switching yarn colors, carry the yarn along the inside if you'll be using it again soon to minimize ends to weave in
  • ๐Ÿ’กLeave long tails when cutting yarn for arms, legs, and accessories to make sewing easier and more secure
  • ๐Ÿ’กPin all pieces in place before sewing to ensure proper positioning and symmetry, especially for arms and glasses
  • ๐Ÿ’กThe BLO and FLO rounds create natural ridges for attaching the shirt pieces - don't skip these important stitch techniques

This adorable Christmas Minion pattern brings three beloved characters to life in festive holiday costumes. Bob's Santa suit, Kevin's elf outfit, and Stuart's reindeer transformation make them perfect for seasonal decorating or gift-giving. The pattern combines simple color changes with clever construction techniques to create instantly recognizable characters that capture the playful spirit of both Minions and Christmas. Whether displayed together as a festive trio or given as individual gifts, these mini companions are sure to bring smiles throughout the holiday season. Happy crocheting!

You ask,

we answer.

FAQs

What size will the finished minions be?

Each minion stands approximately 3-4 inches tall when made with sport weight yarn and a 2.0-2.5mm hook, making them perfect as ornaments, desk decorations, or gift toppers.

Can I make just one minion instead of all three?

Absolutely! Each minion has its own complete instructions. Choose your favorite character - Bob in his Santa suit, Kevin as an elf, or Stuart as a reindeer - and follow just that section of the pattern.

How do I keep track of all the color changes?

Use stitch markers at the beginning of each round and keep a notepad nearby to check off each round as you complete it. The color changes happen at specific rounds, so following the pattern carefully will help you stay on track.

What's the best way to attach the glasses so they stay secure?

First, glue the safety eyes to the crocheted glasses frames. Then sew the glasses to the body, and finally attach the black strap around the back of the head. This triple-attachment method keeps everything secure.

Can I use different yarn weights for a larger or smaller minion?

Yes! Using a heavier yarn with a larger hook will create bigger minions, while thinner yarn with a smaller hook makes tinier versions. Just maintain the same gauge ratio for best results.

Do I need to stuff the arms and legs?

No, the arms and legs are small enough that they don't require stuffing. Only the main body needs to be stuffed firmly with fiberfill to maintain the proper minion shape.