🧢 Beautiful ✨ Detailed πŸ’ Adorable

Christmas Tree Cat Amigurumi Pattern

Christmas Tree Cat Amigurumi Pattern
4.2β˜… Rating
4-5 Hours Time Needed
2.0K Made This
βœ‚οΈ

Intermediate Level

Ideal for those with basic knitting experience, featuring slightly more advanced stitches and techniques to expand your skills.

⏱️

Weekend Treat

Takes 5-7 hours, making it an enjoyable project to finish over a couple of days.

πŸŽ„

Holiday Cheer

Festive fun for the season, bringing handmade magic to celebrations and creating new family traditions.

About This Christmas Tree Cat Amigurumi Pattern

Christmas Tree Cat Amigurumi Pattern crochet pattern - detailed view of completed project

With expressive safety eyes, delicate embroidered whiskers and features, plus a posable wire-reinforced tail, this little companion brings personality and charm to your Christmas decor or makes a treasured handmade gift.

Why You'll Love This Christmas Tree Cat Amigurumi Pattern

I absolutely love this pattern because it combines two of my favorite things: adorable cats and festive holiday cheer! The clever construction technique using front and back loop only stitches creates those gorgeous textured layers without complex colorwork, making it achievable yet impressive. I'm obsessed with how the scalloped white edges mimic real tree garland, and the way the little pink ears peek out from under the tree hat is just precious. The finished piece is perfectly palm-sized and makes such a thoughtful handmade gift that friends and family treasure year after year. Plus, working on this pattern always puts me in the holiday spirit!

Christmas Tree Cat Amigurumi Pattern step 1 - construction progress Christmas Tree Cat Amigurumi Pattern step 2 - assembly progress Christmas Tree Cat Amigurumi Pattern step 3 - details and accessories Christmas Tree Cat Amigurumi Pattern step 4 - final assembly and finishing

Switch Things Up

I love experimenting with color variations on this adorable pattern! Instead of traditional green and white, try making a pink and white version for a whimsical candy cane tree cat, or go with red and white for a classic peppermint look. You could even create a whole family of tree cats in different color combinations to display together.

For a more elegant approach, consider using metallic or sparkly yarn for the tree portions - gold and white or silver and white creates a sophisticated holiday decoration perfect for adult spaces. I've also had success adding tiny jingle bells between the scalloped layers for an extra festive touch that makes a gentle sound.

If you want to personalize your cat, try different ear shapes - pointed ears instead of rounded, or even lynx-style tufted ears. You can also modify the facial expression by positioning the eyes differently or changing the embroidered mouth from a simple line to a smile or tongue-out expression.

For gifting purposes, I sometimes add a small loop of yarn at the top of the pompom so the cat can be hung as an ornament. You could also create a tiny scarf or bow tie accessory to dress up your tree cat even more, or embroider snowflakes onto the green tree portions for extra detail.

Common Mistakes & How to Fix Them

βœ— Not stuffing the head firmly enough before closing, which can result in a floppy or misshapen head that won't support the hat properly βœ— Forgetting to work in back loop only or front loop only where specified, which eliminates the textured layered effect that makes the tree costume special βœ— Placing safety eyes too close together or at the wrong height, affecting the cat's expression and overall cuteness factor significantly βœ— Skipping stitch markers when working the body rounds, leading to miscounts and uneven striping in the green and white pattern βœ— Pulling too tightly when embroidering facial features, which can distort the face shape and create puckering around the nose and whiskers βœ— Not leaving long enough yarn tails for sewing pieces together, making assembly difficult and potentially creating weak attachment points

Christmas Tree Cat Amigurumi Pattern

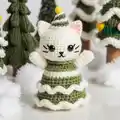
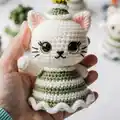
Create an enchanting festive feline friend with this delightful Christmas Tree Cat amigurumi pattern. This charming design features an adorable white cat dressed in a green and white striped Christmas tree costume, complete with a matching tree hat topped with a cheerful pompom. Perfect for holiday decorating, gift-giving, or adding seasonal charm to your handmade collection, this pattern combines simple crochet techniques with creative colorwork and embroidered details to bring this whimsical character to life.

Intermediate 4-5 Hours

Materials Needed for Christmas Tree Cat Amigurumi Pattern

β€” Main Fabric

  • 01
    Sport weight (fine) yarn in white, green, and pink colors
  • 02
    Approximately 50g white yarn for main body and head
  • 03
    Approximately 30g green yarn for tree costume and hat
  • 04
    Small amount of pink yarn for inner ears
  • 05
    Small amounts of black and yellow yarn for embroidery details

β€” Tools Required

  • 01
    2.5mm (C) crochet hook
  • 02
    Safety eyes 12-15mm
  • 03
    Stitch markers
  • 04
    Sewing needle (yarn needle)
  • 05
    Scissors
  • 06
    Hot glue gun
  • 07
    Fiberfill stuffing
  • 08
    10mm pompom for hat topper
  • 09
    Wire for posable tail (optional)

Progress Tracker

0% Complete

β€” HEAD :

Begin with White Yarn

Row 1 :

8 SC in an MR (8)

Row 2 :

8 INC (16)

Row 3 :

(SC, INC) 8 times (24)

Row 4 :

(2 SC, INC) 8 times (32)

Row 5 :

32 SC (32)

Row 6 :

(7 SC, INC) 4 times (36)

Row 7 :

(5 SC, INC) 6 times (42)

Row 8 :

(6 SC, INC) 6 times (48)

Row 9-17 :

48 SC (48)

Row 18 :

(4 SC, DEC) 8 times (40)

Row 19 :

(3 SC, DEC) 8 times (32)

Row 20 :

(2 SC, DEC) 8 times (24)

Info :

Cut the yarn, leaving a long tail for sewing. Stuffing

β€” EARS (MAKE 2) :

Begin with White Yarn

Change to pink yarn color when changing text color

Row 1 :

6 SC in an MR (6)

Row 2 :

(SC, INC) 3 times (9)

Row 3 :

2 SC, INC, 2 SC, INC, 2 SC, INC (12)

Row 4 :

3 SC, INC, 3 SC, INC, 3 SC, INC (15)

Row 5 :

4 SC, INC, 4 SC, INC, 4 SC, INC (18)

Info :

Cut the yarn, leaving a long tail for sewing

β€” HAT :

Begin with Green yarn

Row 1 :

6 SC in an MR (6)

Row 2 :

(SC, INC) 3 times (9)

Row 3 :

(2 SC, INC) 3 times (12)

Row 4 :

(3 SC, INC) 3 times (15)

Row 5 :

BLO, (4 SC, INC) 3 times (18)

Row 6 :

(5 SC, INC) 3 times (21)

Row 7 :

BLO, (6 SC, INC) 3 times (24)

Row 8 :

(7 SC, INC) 3 times (27)

Info :

Cut the yarn, leaving a long tail for sewing

β€” Hat Decorative Layers :

Begin with White yarn

Back to row 4 and crochet FLO :

(3 CH, Sk, Slst) 7 times, 3 Ch, Slst

Crochet FLO in row 6 :

(3 CH, Sk, Slst) 10 times, 3 Ch, Slst

Crochet FLO in row 8 :

(3 CH, Sk, Slst) 13 times, 3 Ch, Slst

Infos :

Sew BLO of hat between R3 and R4 of the head. Stuff it before sewing it closed. Sew the ears onto the head: from R4 to R10 of the head. Attach the eyes between R9 and R10, with a distance of 9 stitches between them. Use black yarn to embroider the nose, eyelid, and whiskers. Use yellow yarn to sew the eyebags

β€” BODY :

Begin with Green yarn

Row 1 :

8 SC in an MR (8)

Row 2 :

8 INC (16)

Row 3 :

(SC, INC) 8 times (24)

Row 4 :

(2 SC, INC) 8 times (32)

Row 5 :

(3 SC, INC) 8 times (40)

Row 6 :

(4 SC, INC) 8 times (48)

Row 7 :

BLO, 48 SC (48)

Row 8 :

(10 SC, DEC) 4 times (44)

Row 9 :

44 SC (44)

Row 10 :

BLO, (9 SC, DEC) 4 times (40)

Row 11 :

40 SC (40)

Row 12 :

(8 SC, DEC) 4 times (36)

Row 13 :

BLO, 36 SC (36)

Row 14 :

(7 SC, DEC) 4 times (32)

Row 15 :

32 SC (32)

Row 16 :

BLO, (6 SC, DEC) 4 times (28)

Row 17 :

28 SC (28)

Row 18 :

(5 SC, DEC) 4 times (24)

Row 19 :

BLO, 24 SC (24)

Info :

Cut the yarn, leaving a long tail for sewing

β€” Body Outer Layers :

Row 6 crochet FLO :

Row 1: 2 CH, 48 DC, Slst (green) - Row 2: (3 Ch, Sk, Slst) 24 times (white)

Row 9 crochet FLO :

Row 1: 2 CH, 44 DC, Slst (green) - Row 2: (3 Ch, Sk, Slst) 22 times (white)

Row 12 crochet FLO :

Row 1: 2 CH, 36 DC, Slst (green) - Row 2: (3 Ch, Sk, Slst) 18 times (white)

Row 15 crochet FLO :

Row 1: 2 Ch, 32 DC, Slst (green) - Row 2: (3 Ch, Sk, Slst) 16 times (white)

Row 18 crochet FLO :

Row 1: 2 Ch, 24 DC, Slst (green) - Row 2: (3 Ch, Sk, Slst) 12 times (white)

Info :

Stuffing

β€” HANDS (MAKE 2) :

Begin with White yarn

Row 1 :

6 SC in an MR (6)

Row 2 :

(SC, INC) 3 times (9)

Row 3-8 :

9 SC (15)

Info :

Cut the yarn, leaving a long tail for sewing

β€” LEGS (MAKE 2) :

Begin with White yarn

Row 1 :

6 SC in an MR (6)

Row 2 :

6 INC (12)

Row 3 :

(3 SC, INC) 3 times (15)

Row 4-5 :

15 SC (15)

Info :

Cut the yarn, leaving a long tail for sewing

β€” TAIL :

Begin with White yarn

Row 1 :

6 SC in an MR (6)

Row 2-15 :

6 SC (6)

Infos :

Cut the yarn, leaving a long tail for sewing. Use a long piece of wire, equal to the tail length, and thread it through

Assembly Instructions

  • Sew the back loop only edge of the hat to the head between rounds 3 and 4, making sure to stuff the hat before closing it completely.
  • Attach the ears to the head from row 4 to row 10, positioning them symmetrically on either side of the head.
  • Insert safety eyes between rounds 9 and 10 with a spacing of 9 stitches between them before stuffing the head.
  • Use black yarn to carefully embroider the nose, eyelids, and whiskers, and yellow yarn for eyebags to create facial expression.
  • Sew the completed body to the head securely, making sure the alignment is straight and centered.
  • Attach the arms (hands) to the body between rows 19 and 20 on both sides.
  • Sew the legs and tail to the bottom of the body, ensuring the cat can stand or sit properly. Thread wire through tail if desired for posability.
  • Attach a 10mm yarn pompom to the top of the Christmas tree hat using hot glue gun to complete the festive look.

Important Notes

  • πŸ’‘Use stitch markers consistently throughout the pattern to track rounds, especially when working BLO and FLO stitches for the layered tree effect.
  • πŸ’‘Stuff the head and body firmly but not overly tight to maintain the proper rounded shape and prevent lumps.
  • πŸ’‘When changing colors for the ears, make the transition smooth by following the text color indicators in the pattern exactly.
  • πŸ’‘The outer decorative layers on both the hat and body are created by going back to previous rows and working in the front loops only - don't skip this step.
  • πŸ’‘Position and secure all pieces with pins before final sewing to ensure proper placement and symmetry throughout assembly.
  • πŸ’‘If adding wire to the tail for posability, ensure the wire ends are tucked securely inside and won't poke through the fabric.
  • πŸ’‘When embroidering facial features, use gentle tension to avoid puckering the fabric or distorting the head shape.

This enchanting Christmas Tree Cat pattern brings together classic amigurumi charm with festive holiday magic to create a truly special seasonal decoration. The clever layering technique creates dimensional texture that mimics a real Christmas tree, while the sweet cat face with embroidered details adds personality and warmth. Whether displayed on a shelf, gifted to a cat-loving friend, or hung as a unique tree ornament, this little creation spreads joy throughout the holiday season. The combination of simple stitches and creative construction makes this an enjoyable and rewarding project that you'll treasure for years to come. πŸŽ„πŸ± Happy crocheting! 🧢✨

You ask,

we answer.

FAQs

What size will the finished Christmas Tree Cat be?

Based on the materials specified (sport weight yarn and 2.5mm hook), the finished cat will be approximately 4-5 inches tall, making it a perfect palm-sized decoration or ornament.

Can I use different yarn weights for this pattern?

Yes, you can use different yarn weights, but you'll need to adjust your hook size accordingly. Using thicker yarn will create a larger cat, while thinner yarn will make a smaller version. Just ensure your stitches are tight enough to prevent stuffing from showing through.

How do I work the BLO and FLO rows for the layered tree effect?

When you reach rows marked BLO (back loop only) in the main body, work your stitches through only the back loop of each stitch. Later, you'll return to those same rows and work in the FLO (front loop only) with different colored yarn to create the decorative scalloped layers.

Is the wire necessary for the tail?

No, the wire is optional. It adds posability so you can bend and shape the tail, but you can skip it if making this for young children or if you prefer a softer, non-posable tail.

What's the best way to attach the safety eyes securely?

Insert the eyes between rounds 9 and 10 with 9 stitches between them before you stuff the head. Push the eye post through from the outside, then firmly press the safety backing onto the post from inside the head. Stuff after securing the eyes.

Can I make this pattern without a hot glue gun?

Yes, you can sew the pompom onto the hat with matching thread or yarn instead of using hot glue. The glue gun is simply faster and creates a very secure attachment.