🧶 Beautiful ✨ Detailed 💝 Adorable

Cinta Bag Crochet Pattern

Cinta Bag Crochet Pattern
4.0★ Rating
8-10 Hours Time Needed
1.3K Made This
✂️

Advanced Level

Designed for experienced knitters, these patterns involve intricate designs and complex techniques to challenge and inspire.

⏱️

All-Day Adventure

Requires 8-10 hours, ideal for a full day of immersive knitting.

🏡

Cozy Accent

A warm touch for your space that transforms ordinary corners into inviting nooks filled with handmade charm.

About This Cinta Bag Crochet Pattern

The Cinta Bag pattern is a sophisticated project that showcases the beautiful Jacob's ladder stitch variation. This pattern starts from the bottom base and works its way up to create a structured, openwork design that's both decorative and functional. The bag features carefully crafted handles that taper elegantly, and the pattern includes detailed instructions for adding ribbon embellishments to personalize your creation. With clear stitch counts and helpful video references throughout, you'll be guided through every step of constructing this stunning accessory.

Cinta Bag Crochet Pattern crochet pattern - detailed view of completed project

This pattern uses medium weight cotton yarn and a 4.5mm hook to create a durable yet stylish bag. The openwork design allows for breathability while maintaining structure, and you have the option to add a lining if you prefer extra support for softer yarns.

Why You'll Love This Cinta Bag Crochet Pattern

I absolutely love this pattern because it strikes the perfect balance between challenge and reward! The Jacob's ladder stitch variation creates such a visually stunning effect that looks far more complex than it actually is once you get into the rhythm. I appreciate how the pattern is scalable—you can easily adjust the size by changing the stitch multiples, making it completely customizable to your needs. The addition of ribbon detailing gives you creative freedom to personalize each bag, and I find the construction method incredibly clever, building from the bottom up for maximum stability. Plus, there's something so satisfying about creating a functional, everyday item that's also beautiful enough to show off!

Cinta Bag Crochet Pattern step 1 - construction progress Cinta Bag Crochet Pattern step 2 - assembly progress Cinta Bag Crochet Pattern step 3 - details and accessories Cinta Bag Crochet Pattern step 4 - final assembly and finishing

Switch Things Up

I love how versatile this Cinta Bag pattern can be with just a few creative modifications! If you want to give your bag a completely different vibe, try experimenting with yarn weight—using a bulkier yarn creates a more rustic, bohemian look, while fine cotton gives an elegant, refined appearance perfect for dressy occasions.

Color blocking is another fantastic way to make this pattern your own. I've tried alternating colors every few rows in the body section, and the results are absolutely stunning! The openwork design really showcases color transitions beautifully. You could also work the bottom in one color, the body in another, and the handles in a third for a bold statement piece.

For a more structured bag, I recommend crocheting tighter than usual and definitely adding that lining. You could even insert a piece of plastic canvas in the bottom for extra stability when carrying groceries or books. If you're feeling adventurous, try adding embellishments like tassels to the bottom corners or weaving multiple ribbons in different colors through the openwork sections.

Don't be afraid to play with the handle length either—make them shorter for a handheld clutch style or longer to wear as a crossbody bag. The beauty of this pattern is that once you understand the basic construction, you can truly make it your own!

Common Mistakes & How to Fix Them

✗ Losing stitch count in the Jacob's ladder pattern—use a stitch marker at the beginning of each row to track your progress accurately ✗ Not maintaining the same column alignment for chain stitches throughout rows—mark your chain columns in the first pattern row to keep them consistent ✗ Pulling chains too tight when creating the loop sections—allow chains to have natural drape for proper openwork effect and structure ✗ Forgetting to crochet from the back to front through chain loops in Row 2—this technique is essential for the pattern's dimensional look ✗ Uneven handle decreases causing lopsided straps—count stitches carefully during decrease rows and ensure both handles match exactly before assembly

Cinta Bag Crochet Pattern

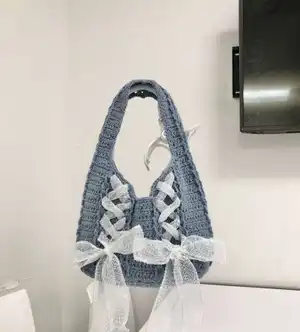
Create your own stylish and functional Cinta Bag with this detailed crochet pattern! This beautiful bag features the elegant Jacob's ladder stitch variation, creating an eye-catching openwork design perfect for everyday use. The pattern guides you through crafting a spacious bag with comfortable handles and decorative ribbon detailing. Whether you're heading to the market, beach, or simply need a chic accessory for daily errands, this handmade bag combines practicality with timeless style. The finished bag measures approximately 18cm x 29cm, making it the perfect size for all your essentials while showcasing your crochet skills.

Advanced 8-10 Hours

Materials Needed for Cinta Bag Crochet Pattern

— Main Fabric

  • 01
    Cotton yarn in Medium weight (size 4)
  • 02
    Sugar'n Cream cotton yarn, 232m/150.7g
  • 03
    Loops & threads Heathered Tweed yarn held double, 535m/210g

— Tools Required

  • 01
    Crochet hook 4.5mm
  • 02
    Stitch marker
  • 03
    Yarn needle for weaving ends
  • 04
    Scissors
  • 05
    Ribbon for decoration
  • 06
    Optional: Fabric for lining

Progress Tracker

0% Complete

— Bottom :

Foundation row :

Chain 15

Row 1 :

Dc in the 4th ch from your hook, dc 11, ch 3 and TO

Row 2 :

Dc 12 across the row, ch 3 and TO

Rows 3-16 :

Repeat Row 2 for 14 more times, for a total of 16 rows, and fasten off

Info :

Stitch count: 13 sts for each row (Including the ch 3). Size would be around 8 cm x 21.5 cm

— Body :

Starting :

Attach your yarn to the 2nd stitch at the top left corner with the right side facing up

Row 1 :

Insert your hook and make a chain, sc in the same stitch, then sc 4, *ch 10, sl st into the last sc (5th sc), sc 9*, repeat 8 more times for a total of 9 groups, ch 10, sl st into the last sc, sc 4, sl st, ch 3 and TO

Info :

Stitch count: 90 sts for each row of the body, with 10 groups of the stitch. As there are no stitches allocated along the long edges of the bottom panel, sc in the random holes on the side. To place the stitches evenly, sc 2 for each row

Row 2 :

Dc 89, sl st to the 3rd ch, ch 1 and TO

Rows 3-16 :

Repeat rows 1-2 for 7 times. Total of 8 groups of rows 1-2 (Increase or decrease the number of repeat to the desired height)

Info :

Make sure the stitches with the chains are crocheted in the same column

Row 17 :

Repeat row 1, but do not make the chains for 4 columns in the centre, sl st and fasten off. Written instruction: Sc 5, ch 10, sl st into the last sc, sc 27, *ch 10, sl st into the last sc, sc 9* repeat 2 more times for a total of 3, sc 18, ch 10, sl st into the last sc, sc 9, ch 10, sl st into the last sc, sc 4, sl st and fasten off

Info :

Size would be around 18 cm x 29 cm

— Handle :

Starting :

With the right side facing up, find the 3rd stitch in the same column with the chains counting from the left, then turn over and start with the wrong side facing up

Row 1 :

Insert your hook and ch 3, dc 36, ch 1 and TO (37)

Row 2 :

Sc3tog, sc 7, *ch 10, sl st into the last sc, sc 9*, repeat 1 more time, ch 10, sl st into the last sc, sc 6, sc3tog, ch 3 and TO (33)

Row 3 :

Dc3tog (ch 3 and 2 unfinished dc), dc 27, dc3tog, ch 1 and TO (29)

Row 4 :

Sc3tog, sc 3, *ch 10, sl st into the last sc, sc 9*, repeat 1 more time, ch 10, sl st into the last sc, sc 2, sc3tog, ch 3 and TO (25)

Row 5 :

Dc3tog, dc 19, dc3tog, ch 1 and TO (21)

Row 6 :

Sc3tog, sc 8, ch 10, sl st into the last sc, sc 7, sc3tog, ch 3 and TO (17)

Row 7 :

Dc3tog, dc 11, dc3tog, ch 1 and TO (13)

Row 8 :

Sc3tog, sc 4, ch 10, sl st into the last sc, sc 3, sc3tog, ch 3 and TO (9)

Row 9 :

Dc 8, ch 1 and TO (9)

Row 10 :

Sc 5, ch 10, sl st into the last sc, sc 4, ch 3 and TO (9)

Rows 11-24 :

Repeat rows 9-10 til your desired length of handle (Pattern repeats 7 times after rows 9-10)

Row 25 :

Dc 8, ch 3 and TO

Row 26 :

Dc 8 and fasten off

Info :

Repeat this handle part for the other side

— Assembly :

Step 1 :

After you finish 2 handles, roll up all the chains

Step 2 :

Sc/sl st/sew the handles together with wrong sides facing up. Include the last 2 chains from both handles when you connect the handles

Step 3 :

Do NOT cut off the yarn, ch 1, and sc across the edges for both sides. Remember to sc evenly

Step 4 :

After finishing one side, fasten off. Attach the yarn to the other side where the handles are connected, ch 1, sc across, and combine the chains

— Ribbon :

Final Touch :

Add ribbon to the bag! There are various types of ribbons in color, texture, and width. You can also use scrap fabric or laces. Have fun with the mix and match

Assembly Instructions

  • Complete both handles following the same pattern instructions to ensure they are identical in size and shape
  • Roll up all the chain loops on both handles to prepare them for joining together at the top
  • Connect the two handles at the top with wrong sides facing up using single crochet, slip stitch, or sewing method
  • Make sure to include the last 2 chains from both handles when connecting them to create a secure join
  • Without cutting yarn, chain 1 and single crochet evenly across both side edges of the handles for a clean finish
  • Fasten off the first side, then reattach yarn to the opposite side and repeat the edging process
  • Thread ribbon through the openwork design of the bag body, weaving it through the chain spaces for decorative detail

Important Notes

  • 💡Keep stitch count consistent throughout—90 stitches per body row with 10 groups total including the opening sections
  • 💡Chain 3 at the beginning of dc rows counts as your first stitch, so start actual dc stitches from the 2nd stitch
  • 💡When pushing hook through chains in Row 2, always insert from back to front through the middle of the loop for proper texture
  • 💡Maintain the same column alignment for all chain stitches throughout the body to create uniform openwork pattern
  • 💡Weave in loose ends as you work to save time and prevent unraveling during construction
  • 💡Consider adding a fabric lining if using soft yarn to prevent excessive stretching and maintain bag structure
  • 💡Watch all referenced videos for visual guidance on tricky techniques like the chain loop method and handle assembly

This stunning Cinta Bag pattern combines traditional crochet techniques with contemporary design to create a versatile accessory perfect for any occasion! The elegant Jacob's ladder stitch variation creates beautiful openwork that's both decorative and practical, while the ribbon detailing adds your personal creative touch. Whether you're crafting this bag for yourself or as a thoughtful handmade gift, you'll love the process of watching this stylish piece come together. The scalable design means you can customize the size to fit your exact needs. Happy crocheting and enjoy creating your beautiful Cinta Bag! 🧶✨

You ask,

we answer.

FAQs

Can I adjust the size of the Cinta Bag?

Yes! The pattern is designed to be scalable. To make a smaller bag, work with multiples of 7 stitches per group instead of 9, and adjust the bottom panel rows accordingly. For a larger bag, use multiples of 11 or higher odd numbers, with corresponding changes to the bottom dimensions.

What does it mean to crochet from back to front through the chain loops?

In Row 2 when working dc stitches on the chain loops, you yarn over, insert your hook from the back of the work to the front, go through the middle of the chain loop, then complete the double crochet as normal. This creates the distinctive dimensional look of the pattern.

Do I need to add a lining to the bag?

A lining is optional but recommended if you're using soft yarn that might stretch. The lining helps maintain the bag's shape and structure over time, especially when carrying heavier items.

How do I keep my chain columns aligned throughout the pattern?

Use a stitch marker to mark each chain column in your first pattern row. This will help you identify exactly where to place your chains in subsequent rows to maintain the uniform openwork design.

What type of ribbon works best for the finishing touch?

You can use any ribbon that complements your yarn color and suits your style! Options include satin ribbon, grosgrain ribbon, lace trim, or even fabric strips. The width can vary, but medium-width ribbons typically work best for weaving through the openwork design.