🧢 Beautiful ✨ Detailed πŸ’ Adorable

Citrus Tote Bag Crochet Pattern

Citrus Tote Bag Crochet Pattern
4.1β˜… Rating
8-10 Hours Time Needed
3.3K Made This
βœ‚οΈ

Intermediate Level

Ideal for those with basic knitting experience, featuring slightly more advanced stitches and techniques to expand your skills.

⏱️

All-Day Adventure

Requires 8-10 hours, ideal for a full day of immersive knitting.

🏑

Cozy Accent

A warm touch for your space that transforms ordinary corners into inviting nooks filled with handmade charm.

About This Citrus Tote Bag Crochet Pattern

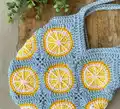
This citrus tote bag pattern combines the timeless granny square technique with a fresh, modern twist. You'll create 13 colorful granny squares that mimic sliced citrus fruits, then assemble them into a functional and eye-catching tote bag. The pattern includes detailed instructions for creating the fruit design with its distinctive segmented look, complete with embroidered white lines that bring the citrus effect to life. The finished bag features comfortable straps and is perfect for market trips, beach days, or everyday use.

Citrus Tote Bag Crochet Pattern crochet pattern - detailed view of completed project

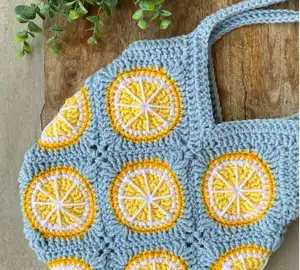
Each granny square starts with a magic circle and builds outward through five rounds, incorporating color changes to create the citrus effect. The assembly process is straightforward, guiding you through connecting the squares and adding sturdy crocheted straps that can handle daily wear.

Why You'll Love This Citrus Tote Bag Crochet Pattern

I absolutely love how this pattern transforms a classic granny square into something so fun and unexpected! The citrus design is perfect for adding a pop of color to any outfit, and I appreciate how versatile it is - you can make it in any citrus color combination you like. What really makes this pattern special is how the simple embroidery details bring the whole design together, creating that authentic sliced-fruit look. Plus, there's something so satisfying about watching all those individual squares come together into a functional, beautiful tote bag that always gets compliments!

Citrus Tote Bag Crochet Pattern step 1 - construction progress Citrus Tote Bag Crochet Pattern step 2 - assembly progress Citrus Tote Bag Crochet Pattern step 3 - details and accessories Citrus Tote Bag Crochet Pattern step 4 - final assembly and finishing

Switch Things Up

I love experimenting with this pattern by playing with different color combinations! Instead of the traditional citrus look, I've made versions using pastel colors for a soft spring aesthetic, or even bold jewel tones for a more sophisticated fall bag. You could also try making each granny square a different citrus fruit - imagine having lemons, limes, oranges, and grapefruits all on one bag for a fun fruit salad effect!

Another way I like to switch things up is by adding embellishments to the finished bag. I've sewn on small felt leaves at the top corners of some squares to make them look more realistic, or added a fun tassel or pom-pom to the bottom corners of the bag for extra flair. You could even embroider a cute phrase like 'Main Squeeze' or 'Citrus Vibes' on one of the plain background squares.

For a completely different look, I've experimented with making the background squares in variegated or ombre yarn, which creates a beautiful gradient effect that really makes the citrus design pop. You could also make this pattern larger by adding more granny squares, or smaller for a cute kid-sized version. The possibilities are truly endless, and that's what makes this pattern so fun to revisit again and again!

Common Mistakes & How to Fix Them

βœ— Not checking gauge with a test square first can result in squares that curl or wave instead of laying flat properly βœ— Forgetting to count the chain-1 corner spaces as stitches when creating straps leads to uneven or gapping strap connections βœ— Pulling embroidery yarn too tight when creating the citrus lines causes the square to pucker and distort the shape βœ— Skipping the step to weave in ends as you go makes final assembly more difficult and time-consuming to complete

Citrus Tote Bag Crochet Pattern

Brighten up your summer with this vibrant citrus granny square tote bag! This cheerful pattern features colorful granny squares designed to look like sliced citrus fruits - perfect for creating oranges, lemons, limes, or grapefruits. The bag is both functional and fun, with sturdy straps and plenty of room for all your essentials. Customize it with your favorite citrus colors to match your personal style and make a statement wherever you go!

Intermediate 8-10 Hours

Materials Needed for Citrus Tote Bag Crochet Pattern

β€” Main Fabric

  • 01
    Medium weight yarn (4) in light yellow, white, dark yellow, and light blue
  • 02
    Impeccable yarn by Loops and Threads recommended for all colors

β€” Tools Required

  • 01
    4.5mm crochet hook
  • 02
    Yarn needle
  • 03
    Tapestry needle for weaving in ends
  • 04
    Scissors

Progress Tracker

0% Complete

β€” Citrus Granny Square (Make 13) :

Round 1 :

Color - light yellow. Begin with a magic circle, ch 2 (this counts as first dc). Dc 11 in magic circle. Pull tight. Sl st to join round with original ch 2. (12 stitches total)

Round 2 :

Ch 2 then 1 dc in the same stitch. Make 2 dc in each dc of the previous round until you reach the beginning. After the final stitch, use a sl st to join with the first ch 2 in the round. (24 stitches total). Cut yellow yarn leaving a 6 inch tail to sew in. Pull the end through the slip stitch and pull tight.

Round 3 :

New color - white. Create a slip knot and place it on the crochet hook. Join on the last stitch in round 2 with a sl st, then ch 1. Make 2 sc in the next stitch. In the next stitch, make 1 sc. Continue alternating between 2 sc and 1 sc per stitch all the way around. Join with a sl st to first ch 1 in the round. (36 stitches total). Cut white yarn leaving a 6 inch tail to sew in. Pull the end through the slip stitch and pull tight.

Round 4 :

New color - dark yellow. Create a slip knot and place it on the crochet hook. Join on the last stitch in round 3 with a sl st, then ch 1. Make 1 sc in each st all the way around. Finish the round with a sl st to first ch 1 in the round. (36 stitches total). Cut dark yellow yarn leaving a 6 inch tail to sew in. Pull the end through the slip stitch and pull tight.

Round 5 :

Color - light blue. Create a slip knot and place it on the crochet hook. Join on the last stitch in round 4 with a sl st, then ch 2. Make 1 dc in the next stitch. Make hdc in the next four stitches, then dc in the next two stitches. To make the corner, in the next stitch make 2 edc, ch 1, then 2 edc. Make dc in the next 2 stitches, hdc in the next 4 stitches, then dc in the next 2 stitches. Make another corner in the next stitch with 2 edc, ch 2, then 2 edc. Repeat these steps 2 more times creating 4 corners. Finish the round with a sl st to the first ch 2 in the round. Cut light blue yarn leaving a 6 inch tail to sew in. Pull the end through the slip stitch and pull tight.

β€” Embroidery :

Info :

To make the lines, cut a piece of white yarn about 14 inches long. Tie off one end on the wrong side of square near the center. Using the yarn needle, pull the white yarn through the center of the square and push it back through between the white and dark yellow rounds. Continue weaving the white yarn through the square in between the white and dark yellow rounds and coming up through the middle at the four corners, top, bottom, and sides. Tie off the white yarn on the wrong side when done. To finish the square, weave in the tails using the yarn needle.

β€” Assemble the Bag :

Info :

Position two squares together with the right side facing each other. Create a slip knot and place it on the hook. Insert the crochet hook through the corners of both squares, make a sl st, and ch 1. Make a sc in each stitch along the side of the square, inserting the hook through stitches in both squares each time. Attach 11 squares in the configuration shown in diagram. Once all the squares are attached, fold it in half to align the top and the bottom. The remaining two squares will be the sides of the bag. Stitch along the sides to complete the main bag body.

β€” Straps Part One :

Row 1 :

Create a slip knot and place it on the crochet hook. Lay bag flat with right side out. Join using a slip stitch onto the corner (made by the ch 1) on the right side. Make one double crochet in the next 10 st. Next, dc6tog including the ch 1 that creates the corner of each square (you will be inserting your hook in the 2 edc and ch 1 from the first granny square and then the ch 1 and 2 edc in the next granny square). Continue up the next granny square making a dc in each of the next 11 st (the last dc will be in the ch 1 creating the corner). Ch 2 and turn work.

Row 2 :

Skip the first st (ch 2 counts as first dc in this row) and make dc in the next 8 st. Next, dc5tog. Make one dc in the next 9 st. To finish the row, ch 1, cut yarn leaving 6 in to weave in, and pull the end through the loop and pull tight. Flip over and repeat part one on the other side.

β€” Straps Part Two :

Round 1 :

Create a slip knot and place it on the crochet hook. Lay bag flat with side A facing up. Join using a slip stitch onto the ch 1 space of the top corner of granny square 1. Make one double crochet in the next 10 st. Next, dc6tog (including the ch 1 forming corners). You are now working on side B. On granny square 4 make one dc in the next 11 st (ending in the ch 1 space in the corner). Make 2 dc in each row from part one (4 total). Ch 60. Make 2 dc in each row from part one (4 total) on granny square 3. Make one dc in the next 11 st (the first will be the ch 1 forming the first corner of granny square 3). Next, dc6tog (including the ch 1 forming corners). You have now returned to side A. On granny square 2 make one dc in the next 11 st (ending in the ch 1 space in the corner). Make 2 dc in each row from part one (4 total). Ch 60. Make 2 dc in each row from part one on square 1. Use a slip st to join the round. Ch 2.

Round 2 :

Skip the first st (ch 2 counts as first dc in this row) and make dc in the next 8 st. Next, dc5tog. Make one dc in the next 13 st. Continue with one dc in each ch creating the strap (60). Make one dc in the next 13 st. Repeat these steps one more time across the second strap. Finish the row with one dc in the next 4 stitches, then use a sl st to join the round. Cut the yarn leaving 6 in to weave in, pull the end through the loop and pull tight.

β€” Finishing :

Info :

Turn the bag inside out and weave in all the ends using a tapestry needle.

Assembly Instructions

  • Position two granny squares with right sides facing each other and single crochet along the edges to join them together.
  • Attach 11 squares following the pattern diagram configuration, working along the red line then the blue line.
  • Fold the assembled square strip in half to align the top and bottom edges of the bag.
  • The remaining two squares on the ends will form the sides of the bag when folded.
  • Stitch along the side seams to close the bag and create the main body structure.
  • Complete the embroidery on each square before assembly for easier handling and better results.
  • Weave in all yarn tails on the inside of the bag using a tapestry needle for a clean finish.

Important Notes

  • πŸ’‘Always complete a test granny square first to check your gauge and adjust hook size if needed
  • πŸ’‘Wavy edges mean you should decrease hook size, while curling edges mean increase hook size
  • πŸ’‘Count the ch-1 corner spaces as stitches when creating straps to avoid gaps in your work
  • πŸ’‘Change colors by completing the last yarn over of the previous round with the new color
  • πŸ’‘Weave in ends as you complete each square rather than waiting until the end
  • πŸ’‘The slight bowling of squares is normal and will flatten when stretched during assembly

This vibrant citrus tote bag pattern is perfect for anyone who loves colorful, functional crochet projects! The cheerful granny squares come together to create a bag that's as practical as it is eye-catching. Whether you're heading to the farmer's market or the beach, this handmade tote will brighten your day and turn heads wherever you go. The pattern is easily customizable with different citrus colors, making each bag uniquely yours. Happy crocheting and enjoy your sunny new accessory! 🍊🧢✨

You ask,

we answer.

FAQs

Can I use different yarn weights for this pattern?

While the pattern calls for medium weight yarn (4), you can use different weights as long as you adjust your hook size accordingly and complete a test square first. Lighter yarns will create a smaller, more delicate bag, while heavier yarns will make a larger, sturdier tote.

How do I customize this to make different citrus fruits?

Simply change the color scheme! Use yellow and white for lemons, green and white for limes, orange and white for oranges, or pink and white for grapefruits. The pattern structure remains the same regardless of which citrus you choose.

Why are my granny squares curling or waving at the edges?

If your squares are waving, your hook is too large - try going down a size. If they're curling up into a bowl shape, your hook is too small - try going up a size. A test square will help you find the right hook size before making all 13 squares.

How sturdy are the straps on this bag?

The straps are quite sturdy because they're worked with double crochet stitches and include decrease stitches that create extra thickness. The pattern also instructs you to work multiple stitches into the rows from part one, which reinforces the connection points.

Do I need to line this bag?

The pattern doesn't include lining instructions, but you can add a fabric lining if desired for extra stability and to prevent items from poking through. This is especially helpful if you plan to carry heavy items regularly.