🧢 Beautiful ✨ Detailed πŸ’ Adorable

Classic Baby Boots Crochet Pattern

Classic Baby Boots Crochet Pattern
4.4β˜… Rating
3-4 Hours Time Needed
3.3K Made This
βœ‚οΈ

Intermediate Level

Ideal for those with basic knitting experience, featuring slightly more advanced stitches and techniques to expand your skills.

⏱️

Bite-Sized Project

Complete in under 2 hoursβ€”quick, fun, and perfect for a little creative escape.

🧸

Cute Companion

An adorable friend to cherish, handcrafted with love to bring comfort and joy for years to come.

About This Classic Baby Boots Crochet Pattern

This Classic Baby Boots pattern is designed to create timeless footwear for the tiniest toes in your life. With options for three different sizes and yarn weights, you can craft the perfect fit for newborns up to 6-month-old babies. The ribbed cuff adds a charming vintage touch while keeping little feet warm and cozy.

Classic Baby Boots Crochet Pattern crochet pattern - detailed view of completed project

The pattern features clear round-by-round instructions with helpful photo guides throughout. Choose between a short cuff or a longer fold-over style to match your preference and create truly personalized baby booties.

Why You'll Love This Classic Baby Boots Crochet Pattern

I absolutely love this pattern because it combines classic style with practical versatility. The ability to work in three different yarn weights means you can use whatever you have in your stash, and the sizing options ensure these boots will fit perfectly whether you're making them for a newborn or a growing baby. The ribbed cuff technique is satisfying to work and creates a professional finish that looks store-bought. These boots work up quickly enough for last-minute gifts but look so special that new parents will treasure them. Plus, the detailed photo instructions make even the trickier parts feel manageable and rewarding.

Classic Baby Boots Crochet Pattern step 1 - construction progress Classic Baby Boots Crochet Pattern step 2 - assembly progress Classic Baby Boots Crochet Pattern step 3 - details and accessories Classic Baby Boots Crochet Pattern step 4 - final assembly and finishing

Switch Things Up

I love how versatile this pattern is for personalizing your baby booties. Try working with variegated or self-striping yarns to create automatic color changes without weaving in multiple ends - it gives such a playful, modern look to these classic boots.

For a special touch, I sometimes add a small ribbon bow or crochet flower to the front of the cuff. You could also experiment with a contrasting color for the cuff to create a two-tone effect that really makes the ribbing pop.

If you want to make these booties extra secure for active babies, consider adding a simple button and loop closure or a small tie made from a braided chain. This helps keep them on tiny feet during all that kicking and wiggling.

I've also had success making these in cotton yarn for warmer months and soft wool blends for winter babies. Each fiber gives a completely different feel while the classic silhouette remains timeless.

Common Mistakes & How to Fix Them

βœ— Miscounting stitches during the sole construction can throw off the entire bootie shape - use stitch markers to track your progress βœ— Working back post half double crochets too tightly in Round 4 makes it difficult to continue - keep your tension loose on this round βœ— Forgetting to carry the starting tail through the first rounds leaves loose ends visible on the inside of the bootie βœ— Losing track of which stitch to work into during the rib cuff joining process - always mark your working stitch with a stitch marker

Classic Baby Boots Crochet Pattern

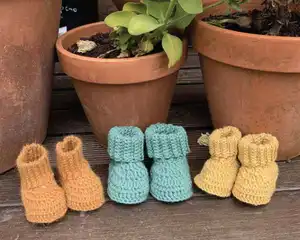
Create adorable handmade baby booties with this versatile crochet pattern available in three sizes. Perfect for newborns through 6-month-old babies, these classic boots feature a comfortable ribbed cuff that can be made short or long to fold over. The pattern includes detailed instructions for 4ply, 8ply, and 10ply yarn weights, making it easy to customize the perfect pair of cozy booties for your little one or as a thoughtful handmade gift.

Intermediate 3-4 Hours

Materials Needed for Classic Baby Boots Crochet Pattern

β€” Main Fabric

  • 01
    4ply/Fingering weight yarn - 50g for newborn size
  • 02
    8ply/DK weight yarn - 50g for newborn or 1-3 months size
  • 03
    10ply/Worsted/Aran weight yarn - 50g for 4-6 months size

β€” Tools Required

  • 01
    Crochet hook size 3.25mm (for 4ply yarn)
  • 02
    Crochet hook size 3.5mm (for 8ply newborn)
  • 03
    Crochet hook size 4mm (for 8ply 1-3 months)
  • 04
    Crochet hook size 4.5mm (for 10ply yarn)
  • 05
    Scissors
  • 06
    Darning needle
  • 07
    Tape measure
  • 08
    Stitch markers

Progress Tracker

0% Complete

β€” Size 2, 3, 4 (8ply and 10ply) :

Chain :

11

Round 1 :

2hdc into 2nd chain from your hook, then hdc in next 8st, 5hdc into last stitch, hdc into each of the 8 lower loops of the ch, 3hdc in last st, join with sl st into 1st hdc (26 st)

Round 2 :

ch1 and 2hdc in same stitch, 2hdc in next, hdc in next 9sts, 2hdc into the next 5sts, hdc in next 9sts, 2hdc into the next 2sts, join with sl st into first hdc (36 st)

Round 3 :

ch1 and 1hdc in same stitch, 2hdc in next st, 1hdc, 2hdc, hdc in next 8st, 1dc, *2dc, 1dc, 2dc, 1dc, 2dc* repeat, 1dc, hdc in next 8st, *2hdc, 1hdc* repeat x1, finishing in the last st, sl st into 1st hdc (46 st)

Round 4 :

ch1 keep loose: Back Post hdc (BPhdc) into each stitch of Round 3, join with sl st into first hdc (46st)

Round 5 :

ch1, sc into same st as ch1, sc in next 45sts, join with sl st into first sc (46st)

Round 6 :

ch1, sc into same st as ch1, sc in next 10sts, hdc in next 2st, dc2tog 10x, hdc in next 2sts, sc in next 11sts, join with sl st into first sc (36st)

Round 7 :

ch1, sc into same st as ch1, sc in next 9st, hdc in next 2st, dc2tog 6x, hdc in next 2st, sc in next 10st, join with sl st into first sc (30st)

Round 8 :

ch1, sc into same st as ch1, sc in next 11sts, dc2tog 3x, sc in next 12sts, join with sl st into first sc (27st)

β€” The Cuff :

Chain :

ch15 for fold down cuff, ch9 for shorter cuff

Row 1 :

sc in 2nd ch from hook, sc in each ch, (back to bootie). Working on RS, pick up a loop from very first st of Round 8, and pick up a loop from next 2sts of Rnd 8, (4 loops on hook) yo and pull through all 4 loops 14st rib (8st rib)

Row 2 :

turn, sc in BLO of each of the 14(8)sts, ch1 14st rib (8st rib)

Row 3 :

turn, sc in BLO of each of the 14(8)sts, ch1, (back to bootie), pick up a loop (from same st of Round 8 where last loop was picked up from), and pick up a loop from next 2sts of Rnd 8, (4 loops on hook) yo and pull through all 4 loops 14st rib (8st rib)

Row 4 :

turn, sc in BLO of each of the 14(8)sts, ch1

Repeat :

Repeat Row 3,4 11x (to Row26)

Row 27 :

turn, and place a SM in the back loop of the first stitch you will work into for the next row, now turn boot inside out, count the unused loops of the chain, down to the boot and mark the 13th (7th) one with another SM, sc through first loop AND back loop of first st of Row 26, sc through [ch loop and Row 26 BLO] for 12 (6) more sts, working last sc into the 13th (7th) loop with the SM. Cut a tail, and sew it into boot. Secure and trim off loose end.

β€” Size 1 (4ply Fingering) :

Chain :

13

Round 1 :

2dc into 2nd chain from your hook, then dc into next 10sts, 5dc into last st, dc into each of the 10 lower loops of the chs, 3dc in last st, join with sl st into ch before first dc (30st)

Round 2 :

ch1 and 2hdc in same st, 2hdc in next, hdc in next 10sts, 2hdc into the next 5sts, hdc in next 11sts, 2hdc into the next 2sts, join with sl st into first hdc (39 st)

Round 3 :

ch1 and 1hdc in same st, 2hdc in next st, 1hdc, 2hdc in the next st, hdc in next 10sts, 1dc, *2dc, 1dc, 2dc, 1dc, 2dc* repeat from *to* x 1, 1dc, hdc in next 10sts, 2hdc, 1hdc, 2hdc, 1hdc into sl st join of previous round, sl st into first hdc (50st)

Round 4 :

ch1, Back Post hdc (BPhdc) into each st of Round 3, join with sl st into first hdc (50st)

Round 5 :

ch1, hdc in same st as ch1, hdc into each stitch, join with sl st into 1st hdc (50st)

Round 6 :

ch1, sc into same st as ch1, sc in next 11sts, hdc in next 2sts, dc2tog 11x, hdc in next 2sts, sc in next 13sts, join with sl st into first sc (40st)

Round 7 :

ch1, sc into same st as ch1, sc in next 10sts, hdc in next 3sts, dc2tog 6x, hdc in next 3sts, sc in next 11sts, join with sl st into first sc (34st)

Round 8 :

ch1, sc into same st as ch1, sc in next 11sts, hdc in next 2sts, dc2tog 3x, hdc in next 2sts, sc in next 12sts, join with sl st into first sc (31st)

β€” The Cuff (Size 1) :

Chain :

ch15 for fold down cuff, ch9 for shorter cuff

Row 1 :

sc in 2nd ch from hook, sc in each ch, (back to bootie). Working on RS, pick up a loop from very first st of Rnd 8, and pick up a loop from next 2sts of Rnd 8, (4 loops on hook) yo and pull through all 4 loops 14st rib (8st rib)

Row 2 :

turn, sc in BLO of each of the 14(8)sts, ch1 14 st rib (8 st rib)

Row 3 :

turn, sc in BLO of each of the 14(8)sts, ch1, (back to bootie), pick up a loop (from same st of Rnd 8 where last loop of Row 1 join was picked up) and pick up a loop from next 2sts of Rnd 8, (4 loops on hook) yo and pull through all 4 loops 14st rib (8st rib)

Repeat :

Repeat Row 3,4 13x (to row30)

Row 31 :

turn, and place a SM in the back loop of the first stitch you will work into for the next row, now turn boot inside out, count the back loops of the chain, down from the top and mark the 13th (7th) one with a SM, sc through first loop AND back loop of first st of Row 30, sc through [ch loop and corresponding Row 30 BLO] for 12(6) more sts back to boot, working last sc into the 13th (7th) loop with the SM. Cut a tail, and sew it into boot. Secure and trim off loose end.

Assembly Instructions

  • Ensure the cuff is properly joined by sewing the final tail securely into the bootie to act as the last stitch
  • Weave in all loose ends on the inside of the bootie for a clean, professional finish
  • Make a second bootie using the same instructions to complete the pair
  • For fold-over cuffs, gently fold down the ribbed section and adjust to desired length
  • Check that both booties are mirror images and the same size before finishing

Important Notes

  • πŸ’‘Yarn and hook sizes vary and will affect gauge - always check your gauge before starting
  • πŸ’‘Use stitch markers throughout to keep track of rounds and key stitches, especially during color changes and cuff construction
  • πŸ’‘The first back post half double crochet stitch in Round 4 is quite tricky to pull through, but the rest are much easier
  • πŸ’‘Take the starting tail with you through the first rounds to neatly conceal it on the inside
  • πŸ’‘The 14th (or 8th) stitch in the final cuff row is very hard to find - cutting a tail and sewing it in works just as well

These Classic Baby Boots bring timeless charm and cozy comfort to the littlest feet in your life. With detailed instructions across three sizes and yarn weights, you can create the perfect pair for any baby from newborn to 6 months. The ribbed cuff adds vintage appeal while the clear photo guides make even advanced techniques feel achievable. Whether you're crafting for your own little one or making a heartfelt handmade gift, these booties will be treasured for years to come. 🧢 Happy crocheting! 🧡✨

You ask,

we answer.

FAQs

Can I use different yarn weights than specified?

While the pattern is designed for 4ply, 8ply, and 10ply yarns with specific hook sizes, you can experiment with other weights. Just be sure to adjust your hook size accordingly and check your gauge to ensure the booties will fit properly.

How do I know which cuff length to choose?

The pattern offers two options: ch15 for a fold-down cuff or ch9 for a shorter cuff. The fold-down style is more traditional and adjustable, while the shorter cuff is quicker to make and stays put better on active babies.

What does BPhdc mean and is it difficult?

BPhdc stands for Back Post Half Double Crochet. It creates the ridge that separates the sole from the upper part of the bootie. The first stitch can be tricky, but the rest become easier. There's a helpful YouTube tutorial link included in the pattern.

Can I make these booties in larger sizes for older babies?

This pattern goes up to 4-6 months size. For larger sizes, you would need to scale up the pattern by adding more rounds to the sole and adjusting the upper portion accordingly, which requires some pattern modification experience.

How do I join the cuff at the end?

The final row joins the cuff by working through both the unused chain loops from Row 1 and the back loops of the final row. The pattern includes detailed photo instructions for this step, and you'll use stitch markers to keep track of where to work.