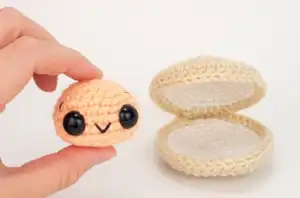
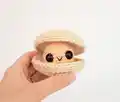
Create your own adorable ocean friend with this charming clam amigurumi pattern! Cleo is a shy but friendly little clam who's ready to break out of his shell and greet the world with a cheerful smile. This delightful pattern features a hinged clamshell design with a sweet peach-colored clam nestled inside, complete with safety eyes and an embroidered smile. Perfect for ocean lovers, beach-themed decor, or as a unique handmade gift, this project combines simple techniques with creative assembly to bring this underwater character to life in miniature form.
Progress Tracker
0% Complete
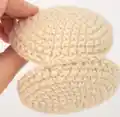
— Outer Shell :
Round 1 :
Ch 2, 6 sc in first ch (6 sts)
Round 2 :
2 sc in each st around (12 sts)
Round 3 :
(Sc 1, 2 sc in next st), 6 times (18 sts)
Round 4 :
(Sc 2, 2 sc in next st), 6 times (24 sts)
Round 5 :
(Sc 3, 2 sc in next st), 6 times (30 sts)
Round 6 :
(Sc 4, 2 sc in next st), 6 times (36 sts)
Round 7 :
(Sc 17, 2 sc in next st), 2 times (38 sts)
Info :
Wait to fasten off until you have made the inner shell pieces
— Inner Shell (make 2) :
Round 1 :
Ch 2, 6 sc in first ch (6 sts)
Round 2 :
2 sc in each st around (12 sts)
Round 3 :
(Sc 1, 2 sc in next st), 6 times (18 sts)
Round 4 :
(Sc 2, 2 sc in next st), 6 times (24 sts)
Round 5 :
(Sc 3, 2 sc in next st), 6 times (30 sts)
Round 6 :
(Sc 4, 2 sc in next st), 6 times (36 sts)
Round 7 :
(Sc 17, 2 sc in next st), 2 times (38 sts)
Info :
Fasten off, leaving a yarn tail for weaving in
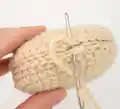
Infos :
Insert your crochet hook back into the outer shell right where you left off at the end of Round 8. Then insert your hook through a stitch of the outer shell and a stitch of the inner shell. Single crochet all the way around the 2 shell pieces to join them. Fasten off, leaving a yarn tail for sewing. Weave in the white yarn tail ends.
Info :
Now crochet the 2nd outer shell, wait to fasten off as before, and repeat the above steps to crochet the outer and inner shell pieces together
Info :
Using the yarn tail you have saved, sew the 2 shell pieces together. Match up the 2 spots on the top and bottom shell where you fastened off so that seam will be hidden when you stitch them together. Make approximately 6-7 whip stitches to sew the top and bottom shell together.
— The Clam (Option 1 - with light/light worsted yarn) :
Round 1 :
Ch 2, 6 sc in first ch (6 sts)
Round 2 :
2 sc in each st around (12 sts)
Round 3 :
(Sc 3, 2 sc in next st), 3 times (15 sts)
Round 4 :
(Sc 4, 2 sc in next st), 3 times (18 sts)
Round 5 :
(Sc 5, 2 sc in next st), 3 times (21 sts)
Round 6-7 :
Sc 21 (2 total rounds)
Round 8 :
(Sc 6, 2 sc in next st), 3 times (24 sts)
Round 10 :
(Sc 2, dec 1), 6 times (18 sts)
Round 11 :
(Sc 1, dec 1), 6 times (12 sts)
Infos :
Begin stuffing the clam. Insert the safety eyes between Round 8-9, with 3 sts in between. Firmly press the backs onto the eyes. Cut a strand of black embroidery floss, thread it onto your yarn needle, and insert it through the opening at the bottom of the clam. Sew a horizontal stitch on the middle st between the eyes, then bring your yarn needle up one round lower, grab the previous stitch and insert your needle back into the exact same spot to create a V smile. Tie the 2 ends of the embroidery floss in a knot on the inside of the shell's body so the smile cannot be pulled out.
Round 12 :
Dec 6 times (6 sts)
Info :
Fasten off, leaving a yarn tail for sewing
— The Clam (Option 2 - with medium/medium worsted yarn) :
Round 1 :
Ch 2, 6 sc in first ch (6 sts)
Round 2 :
2 sc in each st around (12 sts)
Round 3 :
(Sc 3, 2 sc in next st), 3 times (15 sts)
Round 4 :
(Sc 4, 2 sc in next st), 3 times (18 sts)
Round 5-7 :
Sc 18 (3 total rounds)
Round 8 :
(Sc 1, dec 1), 6 times (12 sts)
Info :
Insert the eyes between Round 7-8, with 3 sts in between. Then refer to the above instructions for stuffing and sewing on the smile and eyebrows.
Round 9 :
Dec 6 times (6 sts)
Info :
Fasten off, leaving a yarn tail for sewing
— Finishing :
Info :
Finish stuffing the body as needed. You want the body to hold its shape but still be squishy. Use the yarn tail and your yarn needle to weave through the 6 sts around the opening and pull tight to close. Secure with a knot and weave in your end. Place the clam inside his shell.
This adorable Cleo the Clam pattern brings an underwater friend to life with personality and charm! The clever hinged shell design makes this amigurumi interactive and fun, perfect for ocean lovers of all ages. With clear instructions and simple techniques, you'll create a sweet companion that's ready to break out of his shell and make new friends. The finished clam measures just 3 inches wide, making it an ideal pocket pal or decorative piece. Happy crocheting and welcome Cleo into your handmade collection! 🐚✨