๐Ÿงถ Beautiful โœจ Detailed ๐Ÿ’ Adorable

Colorful Granny Square Cushion Pattern

Colorful Granny Square Cushion Pattern
4.5โ˜… Rating
8-10 Hours Time Needed
3.0K Made This
โœ‚๏ธ

Intermediate Level

Ideal for those with basic knitting experience, featuring slightly more advanced stitches and techniques to expand your skills.

โฑ๏ธ

All-Day Adventure

Requires 8-10 hours, ideal for a full day of immersive knitting.

๐Ÿก

Cozy Accent

A warm touch for your space that transforms ordinary corners into inviting nooks filled with handmade charm.

About This Colorful Granny Square Cushion Pattern

This stunning granny square cushion pattern brings together the timeless beauty of traditional crochet with a burst of modern color. You'll create nine individual floral squares using a rainbow of cotton yarns, each one blooming with vibrant hues that catch the eye and warm the heart. The pattern features detailed instructions for both the decorative front panel and the coordinating back, ensuring your cushion looks beautiful from every angle.

Colorful Granny Square Cushion Pattern crochet pattern - detailed view of completed project

Designed to fit a standard 40cm cushion insert, this project is perfect for adding handmade charm to your sofa, chair, or bed. The pattern includes helpful notes on color changes and joining techniques to ensure professional-looking results.

Why You'll Love This Colorful Granny Square Cushion Pattern

I absolutely love this pattern because it's the perfect way to play with color without committing to a large blanket project! The granny squares work up relatively quickly, and watching each colorful flower bloom under my hook brings such joy. I find the repetitive nature of the squares incredibly soothing, yet the frequent color changes keep things exciting and prevent boredom. The finished cushion becomes an instant conversation piece and a cozy accent that makes any space feel more like home. Plus, it's a wonderful way to use up yarn scraps or experiment with color combinations you've been dreaming about!

Colorful Granny Square Cushion Pattern step 1 - construction progress Colorful Granny Square Cushion Pattern step 2 - assembly progress Colorful Granny Square Cushion Pattern step 3 - details and accessories Colorful Granny Square Cushion Pattern step 4 - final assembly and finishing

Switch Things Up

I love experimenting with this pattern by playing with different color schemes to match various rooms or seasons! For a boho vibe, try earthy terracotta, mustard yellow, and sage green combinations. If you're feeling festive, swap in reds and greens for Christmas or pastels for spring celebrations.

You can also modify the size easily - I've made smaller versions using just four squares for adorable throw pillows, and larger ones with sixteen squares for statement floor cushions. The granny square technique is so forgiving that you can truly make it your own.

For a modern twist, I sometimes work the pattern in monochromatic shades, graduating from light to dark within the same color family. Or try a scrappy version using up all those leftover yarn bits from other projects - each square becomes a unique surprise! The back panel can also be customized; instead of the single large square, you could create it from smaller squares matching the front for a fully reversible cushion.

Common Mistakes & How to Fix Them

โœ— Not counting stitches carefully in each round can throw off the square shape and make joining difficult later on โœ— Forgetting to change colors at the specified points results in less dramatic floral patterns and diminishes the overall visual impact โœ— Skipping the slip stitch joins between rounds creates gaps and loose edges that affect the finished square's appearance and durability โœ— Joining squares with uneven tension causes puckering and warping, so maintain consistent tension throughout your joining row for professional results

Colorful Granny Square Cushion Pattern

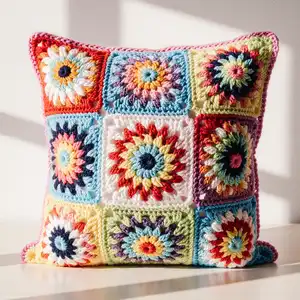
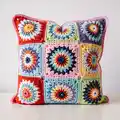
Transform your living space with this vibrant granny square cushion pattern featuring cheerful floral motifs in rainbow colors. This delightful home decor project combines traditional granny square techniques with modern colorwork to create a stunning 40cm cushion cover. Perfect for adding a handmade pop of color to any room, this pattern guides you through creating nine beautiful squares for the front and one large square for the back, all joined together with a charming edging.

Intermediate 8-10 Hours

Materials Needed for Colorful Granny Square Cushion Pattern

โ€” Main Fabric

  • 01
    Cotton yarn suitable for 2.50mm crochet hook in white (Yarn A)
  • 02
    Cotton yarn in various colors including soft pink, hot pink, red, and purple (Yarn B)
  • 03
    Catania Cotton or Phildar Coton 3 recommended for best results

โ€” Tools Required

  • 01
    Crochet hook size 2.50mm
  • 02
    Sewing needle
  • 03
    Scissors
  • 04
    40cm x 40cm cushion insert

Progress Tracker

0% Complete

โ€” The Squares of the Front :

Round 1 :

CH 6, 1 SLST in the first CH to form a ring

Round 2 :

CH 3 (counts as DC), 11 DC into ring

Round 3 :

SS to top of beginning CH-3, change colour

Round 4 :

1SC in between the next two DC, CH 2 (counts as DC). 1 DC in between the same two DC. *2 DC in between the next two DC.* Repeat from * around

Round 5 :

SS to top of beginning CH-2. Change colour

Round 6 :

SS to top of next DC, 1SC in between the next two DC, CH 2 (counts as DC). 2 DC in between the same two DC. *3 DC in between the next two DC. Repeat from * around

Round 7 :

SS to top of beginning CH-2. Change colour

Round 8 :

SS to top of next 2 DC, 1SC in between the next two DC. CH 2, 3 DC in between the same space. *CH 2, 4 DC in between the next set of three DC, 4DC in between the next set of three DC, 4DC in between the next set of three DC.* Repeat around

Round 9 :

Slip stitch to top of beginning CH-2. Change colour

Round 10 :

CH 3, 2 DC in between two DC. below

Round 11 :

*CH 1, 3 DC in between next set of four DC, CH 3, 3 DC in the same opening. CH 1, 3 DC in between the next set of four, CH 1, 3 DC in the next set of four.* Repeat from * until you've gone round. Slip stitch top top of CH-3

Round 12 :

Do 1 SC in every DC, and 1 SC in every ch-1-space. In every corner: 1SC, 1 CH, 1SC

Info :

Make 9 squares using the method above

โ€” How to Join the Squares :

Joining Method :

Join the squares by doing 1 SC in every SC

โ€” Edging :

Round 1 :

Do 1 SC in every SC around. End with a SS in the first SC and change colour

Info :

On each side of a square you have to count 17 SC, so you have 51 SC on every side of the cushion

Round 2 :

CH 3, 2 DC in the corner. *Skip 2 SC, 3DC in the next SC. Repeat from * until you reach the corner. In every corner: 3 DC, CH 3, 3 DC. Repeat from *. End with 3 DC in the corner, CH 3, do a slip stitch in the beginning CH-3

โ€” The Back of the Cushion :

Info :

Change colour after every row

Round 1 :

Ch4 and join into a ring with a SS

Round 2 :

Ch3 (counts as 1DC), 2DC into ring, (ch2, 3DC in ring) 3 times, ch2, join with SS to top of beg CH-3 to join

Round 3 :

Ch4 (counts as 1DC, CH1), *(3DC, ch2, 3DC) into CH-2 sp, CH1; rep from * 2 more times. 3DC, ch2, 2DC, SS in 3rd of begin ch-4 to join

Round 4 :

CH5 (counts as 1DC, ch2), 3DC into same CH-SP, CH1, *3DC into next CH-SP, CH1, (3DC, ch2 3DC) into CH-2 sp, CH1; rep from * 2 more times, 3DC into next CH-SP, CH1, 2 DC into corner CH-2 sp at start of round, SS in 3rd of begin CH-5 to join

Round 5 :

CH5 (count as 1DC, ch2), 3DC into same CH-SP, CH1, *(3DC into next CH-SP, CH1) twice, (3DC, ch2, 3DC) into CH-2 sp, CH1; rep from * 2 more times, (3DC into next CH-SP, CH1) twice, 2DC into corner CH-2 sp at start of round, SS in 3rd of begin CH-5 to join

Round 6 :

CH5 (count as 1DC, ch2), 3DC into same CH-SP, CH1, *(3DC into next CH-SP, CH1) three times, (3DC, ch2, 3DC) into CH-2 sp, CH1; rep from * 2 more times, (3DC into next CH-SP, CH1) three times, 2DC into corner CH-2 sp at start of round, SS in 3rd of begin CH-5 to join

Info :

Grow your square using the method above until your square has 18 rows. For the last row, use the same colour as the colour in the last row of the front

โ€” How to Join Front and Back :

Assembly :

Sew the front to the back or make an edging doing 1 SC in every SC

Assembly Instructions

  • Create all nine colorful squares for the front panel, making sure not to use the same color in the same position as previously made squares
  • Join the nine squares together using single crochet stitches in every stitch to form a three-by-three grid
  • Work the edging around the joined front panel, ensuring you have exactly 51 single crochet stitches on each side
  • Create the back panel by working in continuous rounds until you have 18 rows total, matching the final row color to the front panel
  • Insert the 40cm cushion form and join the front to the back either by sewing with a needle or by crocheting single crochet stitches around three sides
  • Complete the final side closure after inserting the cushion form to secure it inside

Important Notes

  • ๐Ÿ’กChange colors frequently as indicated in the pattern to achieve the vibrant floral effect in each square
  • ๐Ÿ’กCount your stitches carefully, especially ensuring you have 17 SC on each side of individual squares and 51 SC per side after joining
  • ๐Ÿ’กMaintain consistent tension throughout to ensure all squares are the same size and join together neatly without puckering
  • ๐Ÿ’กBlock your finished squares before joining them together for the most professional-looking results
  • ๐Ÿ’กUse the same yarn weight and hook size throughout the project to maintain even gauge
  • ๐Ÿ’กFor best results, use high-quality cotton yarn like Catania Cotton or Phildar Coton 3 as recommended

This delightful granny square cushion pattern was designed to bring cheerful, handmade warmth into your home with vibrant colors and classic crochet techniques. The combination of traditional granny squares and modern rainbow hues creates a timeless piece that works beautifully in both contemporary and vintage-inspired spaces. Whether you're crafting for your own home or creating a thoughtful handmade gift, this cushion will brighten any room it graces. ๐Ÿงถ Happy crocheting! ๐ŸŒˆโœจ

You ask,

we answer.

FAQs

Can I use different colors than those mentioned in the pattern?

Absolutely! The pattern is very flexible with color choices. The designer used soft pink, hot pink, red, and purple, but you can choose any color combination that matches your decor. Just make sure to use white for Yarn A and vary your colors for Yarn B to create the floral effect.

What size cushion insert do I need for this pattern?

This pattern is designed to fit a 40cm x 40cm (approximately 16 inches square) cushion insert. Make sure to purchase your insert before starting so you can check your gauge matches.

How do I prevent my squares from being different sizes?

Maintaining consistent tension is key. Block each square after completing it, and measure to ensure they're all the same size before joining. If some squares are slightly different, gentle blocking with steam can help even them out.

Can I make this cushion larger or smaller?

Yes! For a larger cushion, you can make more squares (4x4 instead of 3x3) or add more rounds to each square. For a smaller version, reduce the number of squares or stop at fewer rounds. Just adjust your cushion insert size accordingly.

Do I need to know how to change colors for this pattern?

Yes, color changing is an essential technique for this pattern. The designer provides a helpful link in the pattern to a tutorial on how to change colors properly. Practice this technique before starting for the best results.