🧢 Beautiful ✨ Detailed πŸ’ Adorable

First Aid Kit Zippered Pouch Pattern

First Aid Kit Zippered Pouch Pattern
4.9β˜… Rating
4-5 Hours Time Needed
4.0K Made This
βœ‚οΈ

Intermediate Level

Ideal for those with basic knitting experience, featuring slightly more advanced stitches and techniques to expand your skills.

⏱️

Weekend Treat

Takes 5-7 hours, making it an enjoyable project to finish over a couple of days.

🏑

Cozy Accent

A warm touch for your space that transforms ordinary corners into inviting nooks filled with handmade charm.

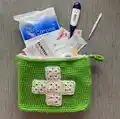
About This First Aid Kit Zippered Pouch Pattern

First Aid Kit Zippered Pouch Pattern crochet pattern - detailed view of completed project

The pattern includes detailed instructions for attaching a zipper, creating a custom zipper pull tab, and constructing five granny squares that form the recognizable medical cross symbol. You'll learn techniques for working in the round, transitioning from flat to circular construction, and finishing with professional details.

Why You'll Love This First Aid Kit Zippered Pouch Pattern

I absolutely love this pattern because it combines practicality with creativity in the most satisfying way! Being able to customize the size means I can make different pouches for different purposes - a small one for my purse, a medium one for car trips, and a larger one for camping adventures. The granny square medical cross is such a clever touch that makes it instantly recognizable as a first aid kit, and I find the construction method really enjoyable to work. There's something so rewarding about making something that's not only beautiful but genuinely useful in everyday life. Plus, these make fantastic handmade gifts for friends and family who love to travel!

First Aid Kit Zippered Pouch Pattern step 1 - construction progress First Aid Kit Zippered Pouch Pattern step 2 - assembly progress First Aid Kit Zippered Pouch Pattern step 3 - details and accessories First Aid Kit Zippered Pouch Pattern step 4 - final assembly and finishing

Switch Things Up

I love experimenting with this pattern to create pouches for different purposes beyond just first aid supplies! Instead of the medical cross emblem, you could make different granny square designs - maybe a heart for a makeup bag, a star for a child's treasure pouch, or initials for a personalized gift. The customizable sizing makes it perfect for so many uses.

You could create a whole set of coordinating pouches in different sizes for organizing your luggage - one for toiletries, one for electronics, one for snacks. I've made versions in bright, cheerful colors for kids' travel kits and elegant neutral tones for sophisticated cosmetic bags. The pattern works beautifully with cotton yarn for a crisp, structured look, or try soft acrylic for a more flexible, squishy pouch.

For a fun twist, consider using variegated or self-striping yarn for the main pouch body to add visual interest without any extra effort. You could also embellish the granny square emblem with embroidered details or add a fabric lining to the inside for extra durability. I've even experimented with making larger versions as project bags for my crochet supplies - the zippered top keeps everything secure and the clear labeling (using different symbols) helps me grab the right bag quickly. The possibilities are truly endless with this versatile pattern!

Common Mistakes & How to Fix Them

βœ— Forgetting to mark the beginning of rounds when working the sides, which can cause the pouch to become misshapen and uneven throughout construction βœ— Not checking zipper length against the actual opening before purchasing, resulting in a zipper that's too short or requires extensive trimming and adjustment βœ— Pulling stitches too tightly when working around the rectangular bottom corners, creating puckering that affects the pouch's ability to stand properly when filled βœ— Skipping the blocking step for granny squares before assembling the cross emblem, which can result in uneven squares that don't align properly when sewn together

First Aid Kit Zippered Pouch Pattern

Create your own customizable first aid kit pouch with this versatile crochet pattern! This practical zippered pouch features a charming granny square medical cross emblem on the front, making it perfect for travel adventures or everyday preparedness. The pattern allows you to adjust the size to fit your specific needs, whether you want a compact kit for quick trips or a larger pouch for extended travels. With clear instructions for creating the rectangular base, working in the round, and adding a functional zipper, you'll have a handmade first aid kit that's both beautiful and useful.

Intermediate 4-5 Hours

Materials Needed for First Aid Kit Zippered Pouch Pattern

β€” Main Fabric

  • 01
    Approximately 160 yards worsted weight yarn in main color (acrylic, cotton, or wool)
  • 02
    Approximately 60 yards sport or light worsted weight yarn in contrasting color for granny square emblem (acrylic, cotton, or wool)
  • 03
    Red Heart Super Saver in Spring Green (optional - as shown in sample)
  • 04
    Patons Grace in Natural (optional - as shown in sample)

β€” Tools Required

  • 01
    US G (4.0mm) crochet hook for pouch
  • 02
    US D (3.25mm) crochet hook for granny squares
  • 03
    Yarn needle
  • 04
    Removable stitch markers
  • 05
    Non-separating zipper (size depends on pouch dimensions)
  • 06
    Sewing needle and thread
  • 07
    Scissors
  • 08
    Pins for blocking and assembly

Progress Tracker

0% Complete

β€” Rectangular Bottom :

Starting Chain :

With MC and larger hook, ch 31

Row 1 :

Beginning with the 2nd ch from hook and working into the bottom of the chain, 1 SC into each st (30 SC)

Rows 2-10 :

Ch 1 (turning ch does not count as a st), turn, 1 SC in each st across. Do not turn after working the last row. Do not fasten off

β€” Sides :

Set-Up Round :

Ch 1 (does not count as a stitch), rotate work 90 degrees to stitch along row-ends. Use a stitch marker to divide the side edge into two equal sections. 5 SC into each of the two sections along row-ends to next corner, place stitch marker in first st to keep track of first st of round, rotate work 90 degrees to stitch along opposite edge of foundation chain, placing one SC into each of the 30 sts across edge, rotate work 90 degrees to stitch along row ends, 5 SC into each of the two sections along row-ends, rotate work 90 degrees and work 1 SC into each st across ending at marked stitch, do not join, but continue to work in the round (80 SC around)

Rounds 1-28 :

SC into each stitch around. On last round fasten off at side edge of bag with a sl st (fold bag flat along top opening to find side edge). Work more stitches after last round if needed to end at side edge

β€” Zipper Tab :

Starting Chain :

With larger hook and MC, ch 13

Row 1 :

Beginning with the 2nd ch from hook and working into the bottom of the chain, 1 sl st in next st, SC in each of next 10 sts, 1 sl st in last st (2 sl st, 10 SC)

Row 2 :

Ch 1 (turning ch does not count as a st), turn, 1 sl st in next st, 1 SC in each of next 10 sts, 1 sl st in last st. Fasten off leaving long tail for sewing

β€” Granny Square Emblem (Make 5) :

Set-up Round :

With CC and smaller hook, ch 4, sl st in first ch to join into a ring

Round 1 :

Ch 3 (counts as the first DC of rnd), 2 DC in center of ring, [ch 2, 3 DC in ring] 3 times, HDC into top of the ch-3 at beginning of rnd (this HDC counts as the last ch-2 sp of rnd as well as a join)

Round 2 :

Ch 3 (counts as first DC of rnd), 2 DC in same sp, skip next 3 DC, [3 DC, ch 2, 3 DC] in next ch-2 sp, repeat from * twice more, skip next 3 DC, 3 DC into first ch-2 sp, HDC into top of ch-3 to join (HDC counts as a ch-2 sp as well as the join)

Round 3 :

Ch 3 (counts as first DC of rnd), 2 DC in same ch-2 sp, skip next 3 DC, 3 DC into sp before next set of 3 DC sts, skip next 3 DC, [3 DC, ch 2, 3 DC] in next ch-2 sp, repeat from * twice more, skip next 3 DC, 3 DC into sp before next set of 3 DC sts, skip next 3 DC, [3 DC, ch 2] into first ch-2 sp, sl st into top of ch-3 to join. Fasten off leaving long tail for sewing

Assembly Instructions

  • Block all pieces including the pouch and all five granny squares before assembly to ensure proper sizing and shape
  • Check measurement of zipper against the opening. If zipper is longer, shorten it from the bottom by stitching around the zipper teeth several times with needle and thread, then trim excess below the stitching line
  • Pin zipper into the opening at top of pouch, placing zipper tape to inside of crocheted fabric with teeth far enough away to prevent snagging
  • Using sewing needle and thread, stitch zipper in place from the right side just below the v's along the top edge using a back stitch
  • Feed one end of zipper tab through the opening in zipper pull. Using yarn needle and yarn tails, stitch short ends of zipper tab together
  • Position the narrow section of zipper tab within the hole in zipper pull, then stitch tab in place just above opening to keep it secure
  • Arrange all five granny squares in cross formation on table. Whip stitch edges together to make the plus symbol, weaving in beginning tails but leaving ending tails for sewing
  • Pin the completed cross symbol to the front of the bag. Use yarn needle and yarn tails to sew symbol in place using a back stitch around all edges

Important Notes

  • πŸ’‘Gauge is important for this project - 16 stitches and 20 rows should equal 4 inches over single crochet when blocked
  • πŸ’‘Turning chains in the rectangular bottom do not count as a stitch throughout the pattern
  • πŸ’‘Use a locking stitch marker to note the beginning of each round when working the sides
  • πŸ’‘If making a smaller pouch than the sample, consider using fingering weight yarn or thin crochet thread for the granny squares so the emblem fits properly
  • πŸ’‘To alter the width, add or subtract 4 stitches for each inch in the foundation chain
  • πŸ’‘To alter the front-to-back measurement, add or subtract 5 rows in the rectangular bottom section
  • πŸ’‘Purchase your zipper after making the pouch to ensure you get the correct size for your specific measurements

This versatile First Aid Kit Zippered Pouch pattern is perfect for anyone who loves combining functionality with handmade charm! Whether you're preparing for travel adventures, organizing your home, or creating thoughtful gifts for loved ones, this customizable design allows you to crochet exactly what you need. The professional-looking granny square medical cross emblem makes it instantly recognizable, while the sturdy construction ensures it will hold up to regular use. I hope you enjoy making your own personalized first aid kit that's as practical as it is beautiful! 🧢✨

You ask,

we answer.

FAQs

Can I make this pouch larger or smaller than the sample shown?

Absolutely! This pattern is designed to be fully customizable. To change the width, add or subtract 4 stitches from the foundation chain for each inch. To adjust the depth, add or subtract 5 rows in the rectangular bottom section. For height, simply work more or fewer rounds in the sides section. Just remember that if you make a significantly smaller pouch, you may need to use thinner yarn for the granny squares so the emblem fits properly on the front.

What type of zipper should I use for this project?

You'll need a non-separating zipper for this pouch. The sample uses a 9-inch zipper, but your size will depend on your pouch dimensions. It's best to purchase the zipper after you've completed the pouch so you can measure the opening accurately. Don't worry if the zipper is slightly too long - the pattern includes instructions for shortening it by stitching around the teeth and trimming the excess.

Do I need to know how to sew to attach the zipper?

Basic hand-sewing skills are helpful for attaching the zipper, but you don't need to be an expert! The pattern recommends using a simple back stitch to secure the zipper from the right side. If you're uncomfortable with sewing, you could alternatively use fabric glue designed for textiles, though stitching provides the most secure and durable attachment.

Can I use different yarn weights for this pattern?

Yes, but you'll need to adjust your hook size accordingly and be aware that your finished measurements will differ from the sample. The pattern calls for worsted weight yarn for the pouch and sport or light worsted weight for the granny squares. If you use bulkier yarn, your pouch will be larger; if you use finer yarn, it will be smaller. Just make sure to check your gauge and adjust the pattern dimensions as needed.

How do I make sure my granny squares are all the same size?

Consistency is key! Try to maintain even tension throughout each square, and most importantly, block all five granny squares before assembling them into the cross emblem. Blocking helps even out any irregularities in your stitches and ensures all squares are uniform in size and shape, making them much easier to stitch together neatly.