🧢 Beautiful ✨ Detailed πŸ’ Adorable

Fox Hand Puppet Amigurumi Pattern

Fox Hand Puppet Amigurumi Pattern
4.3β˜… Rating
4-5 Hours Time Needed
1.9K Made This
βœ‚οΈ

Intermediate Level

Ideal for those with basic knitting experience, featuring slightly more advanced stitches and techniques to expand your skills.

⏱️

Weekend Treat

Takes 5-7 hours, making it an enjoyable project to finish over a couple of days.

🐰

Whimsical Buddy

Playful characters full of personality, designed to spark imagination and become cherished playtime favorites.

About This Fox Hand Puppet Amigurumi Pattern

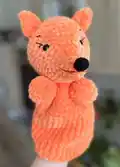
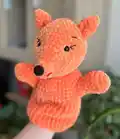
This charming fox hand puppet pattern combines the magic of amigurumi with interactive play possibilities. Crafted using soft plush yarn and featuring adorable embroidered facial details, this puppet fits perfectly over your hand for storytelling adventures. The pattern includes detailed instructions for creating the fox's distinctive pointed snout, perky ears, and cute paw-like arms that add character and charm to every performance.

Fox Hand Puppet Amigurumi Pattern crochet pattern - detailed view of completed project

The hollow body design allows comfortable hand insertion while maintaining the puppet's adorable fox shape. Perfect for puppet theaters, bedtime stories, or imaginative play sessions with little ones.

Why You'll Love This Fox Hand Puppet Amigurumi Pattern

I absolutely love this pattern because it transforms traditional amigurumi into an interactive toy that brings stories to life. There's something magical about watching a handmade creation become a character with personality and voice. The combination of plush texture and embroidered details creates a professional-looking puppet that feels wonderful to hold and manipulate. I find it incredibly rewarding to see children's faces light up when this fox puppet comes alive during playtime, making all the careful stitching worthwhile.

Fox Hand Puppet Amigurumi Pattern step 1 - construction progress Fox Hand Puppet Amigurumi Pattern step 2 - assembly progress Fox Hand Puppet Amigurumi Pattern step 3 - details and accessories Fox Hand Puppet Amigurumi Pattern step 4 - final assembly and finishing

Switch Things Up

I love experimenting with this fox puppet pattern by playing with colors and personalities! Instead of traditional orange, I've created arctic foxes in pure white with grey accents, or even fantasy foxes in blues and purples that look absolutely magical. The embroidered expression is where you can really get creativeβ€”try different eyebrow angles to create surprised, sleepy, or mischievous looks that completely change your fox's character.

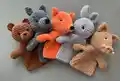
I sometimes add little felt accessories like bow ties, scarves, or tiny vests to give each puppet its own costume and personality. You could even create a whole forest family by adapting the pattern slightly for different sizesβ€”a papa fox, mama fox, and baby fox set would be absolutely adorable for storytelling!

For a more rustic woodland look, I occasionally use natural fiber yarns in earthy tones and add texture with different stitch patterns on the body. The embroidered details are where I really let my imagination run wildβ€”sometimes I add whisker lines, freckles, or even tiny embroidered flowers around the ears for a whimsical garden fox character that children absolutely adore during puppet shows.

Common Mistakes & How to Fix Them

βœ— Forgetting to leave the opening unstuffed at the bottom of the body will prevent your hand from fitting inside the puppet properly βœ— Not securing plastic eyes firmly enough before stuffing can cause them to become loose or fall out during play βœ— Skipping the sc2tog decreases where arms attach to body creates unsightly gaps and holes in the puppet structure βœ— Embroidering facial features too tightly can distort the head shape and create puckering in the plush fabric

Fox Hand Puppet Amigurumi Pattern

Create an enchanting fox hand puppet that brings storytelling and imaginative play to life. This delightful amigurumi pattern features a lovable orange fox character with expressive embroidered details, perfect for entertaining children or adding a handmade touch to puppet shows. The pattern combines plush yarn textures with cotton embroidery accents to create a soft, huggable puppet that fits comfortably over your hand. With clear round-by-round instructions and helpful photo guides, you'll craft a charming forest friend that sparks creativity and becomes a treasured playtime companion for years to come.

Intermediate 4-5 Hours

Materials Needed for Fox Hand Puppet Amigurumi Pattern

β€” Main Fabric

  • 01
    Super bulky yarn - Himalaya Dolphin Baby (120m/100g) in orange color (1 skein, #80316)
  • 02
    Sport cotton yarn - Yarn Art Jeans (160m/50g) in black for nose and eyebrows (#53)
  • 03
    Sport cotton yarn - Yarn Art Jeans (160m/50g) in red for mouth (#90)

β€” Tools Required

  • 01
    Crochet hook 4.5 mm
  • 02
    Crochet hook 2.0 mm
  • 03
    Plastic safety eyes (2 pieces, 7mm diameter)
  • 04
    Fiber filler/stuffing
  • 05
    Large tapestry needle
  • 06
    Knitting markers/stitch markers
  • 07
    Scissors

Progress Tracker

0% Complete

β€” HEAD

Info :

Use the orange plush yarn, hook 4.5 mm

Round 1 :

6 sc in MR (6)

Round 2 :

6 sc

Round 3 :

(1 sc, inc) * 3 (9)

Round 4 :

9 sc

Round 5 :

(1 sc, inc) * 3, 3 sc (12)

Round 6 :

(2 sc, inc) * 3, 3 sc (15)

Round 7 :

(3 sc, inc) * 3, 3 sc (18)

Round 8 :

(1 sc, inc) * 8, 2 sc (26)

Round 9 :

26 sc

Round 10 :

(2 sc, inc) * 8, 2 sc (34)

Round 11 :

34 sc

Round 12 :

(3 sc, inc) * 8, 2 sc (42)

Round 13-17 :

42 sc (5 rounds)

Round 18 :

(5 sc, dec) * 6 (36)

Round 19 :

(4 sc, dec) * 6 (30)

Round 20 :

(3 sc, dec) * 6 (24)

Infos :

Insert safe plastic eyes. Fix eyes between 10 and 11 rounds from MR on the nose. The distance between the eyes is 11 sc. Stuff the head with fiber filler.

Round 21 :

(2 sc, dec) * 6 (18)

Round 22 :

(1 sc, dec) * 6 (12)

Round 23 :

dec * 6 (6)

Info :

Draw the yarn through 6 front loops and tighten. Cut and secure the yarn.

β€” NOSE

Info :

Use the black cotton yarn and hook 2 mm

Round 1 :

6 sc in MR (6)

Round 2 :

(1 sc, inc) * 3 (9)

Round 3 :

9 sc

Round 4 :

(2 sc, inc) * 3 (12)

Round 5 :

(2 sc, dec) * 3 (9)

Info :

Leave 20 cm for sewing, cut the thread. Stuff the piece with fiber filler. Sew nose over the muzzle.

β€” EARS (2 pieces)

Info :

Use the orange plush yarn, hook 4.5 mm

Round 1 :

4 sc in MR (4)

Round 2 :

4 inc (8)

Round 3 :

(1 sc, inc) * 4 (12)

Round 4 :

12 sc

Round 5 :

(2 sc, inc) * 4, make sl st (16)

Info :

Leave 20 cm for sewing. Cut the thread. Sew ears between 15-17 rounds from the MR on the nose. Distance 9 st.

β€” EMBROIDERY EYEBROWS and EYELASHES

Info :

Use the black cotton yarn and a large needle. Embroider eyebrows and eyelashes.

β€” EMBROIDERY MOUTH

Info :

Use the red cotton yarn and a large needle. Embroider mouth and tongue.

β€” ARMS

Info :

Use the orange plush yarn. Crochet hook 4.5 mm.

Round 1 :

6 sc in MR (6)

Round 2 :

inc * 6 (12)

Round 3 :

(2 sc, inc) * 4 (16)

Round 4-5 :

16 sc (2 rounds)

Round 6 :

(2 sc, dec) * 4 (12)

Round 7-9 :

12 sc (3 rounds)

Info :

Make sl st, cut the yarn. Don't stuff. Make 2 pieces.

β€” BODY

Info :

Use the orange plush yarn. Crochet hook 4.5 mm. Leave the tail for sewing, begin crochet without sl st. Make 24 ch, sl st in the first loop. Make a circle.

Round 1 :

24 sc

Round 2 :

(3 sc, inc) * 6 (30)

Round 3 :

(4 sc, inc) * 6 (36)

Round 4 :

(5 sc, inc) * 6 (42)

Round 5 :

Crochet together with arm - 7 sc, 13 sc only on the body, 7 sc together with another arm, 15 sc only on the body (42)

Info :

Crochet sc2tog on both sleeves sides to avoid holes.

Round 6 :

sc2tog, crochet only on the arm - 4 sc, sc2tog, 12 sc only on the body, sc2tog, 4 sc only on the another arm, sc2tog, 14 sc only on the body (38)

Round 7 :

dec, 2 sc, dec, 12 sc, dec, 2 sc, dec, 14 sc (34)

Round 8 :

34 sc, ch

Round 9-14 :

34 dc (6 rounds)

Info :

Sew the body to the head as shown in the photos

Assembly Instructions

  • Attach the stuffed nose piece to the front of the head's pointed muzzle area using the 20cm tail and whip stitch around the edges
  • Position and sew the ears between rounds 15-17 from the magic ring on the nose, spacing them 9 stitches apart for proper placement
  • Embroider the eyebrows above each eye and add small eyelashes using black cotton yarn and straight stitches
  • Embroider the mouth smile and tongue detail using red cotton yarn following the natural contours of the fox's face
  • Align the body opening with the bottom of the head and sew securely around the neck area using whip stitch
  • Ensure the arms are positioned symmetrically on both sides of the body and that all sc2tog closures are neat without visible gaps

Important Notes

  • πŸ’‘Use stitch markers to track your rounds especially during the head shaping and body construction phases
  • πŸ’‘Do not stuff the arms or body as this is a hand puppet that requires an open cavity for hand insertion
  • πŸ’‘Secure plastic eyes very firmly with washers before stuffing the head to prevent choking hazards for young children
  • πŸ’‘Leave sufficient tail length (20cm) when finishing pieces to ensure you have enough yarn for secure assembly
  • πŸ’‘The body bottom should remain completely open and unstuffed to allow comfortable hand access during puppet play
  • πŸ’‘Embroider facial features after assembly for better positioning and to avoid yarn tails inside the stuffed head

This adorable Fox Hand Puppet pattern brings woodland charm straight to your fingertips! Combining plush velvet-soft yarn with delicate cotton embroidery details, this interactive amigurumi transforms storytelling into magical moments. The pattern walks you through creating expressive features, from the characteristic pointed snout to perky triangular ears that give this fox its distinctive personality. Perfect for puppet shows, bedtime stories, or imaginative play sessions that spark creativity and joy. 🦊🧢✨

You ask,

we answer.

FAQs

Can I use regular worsted weight yarn instead of plush yarn?

Yes, you can substitute regular worsted weight yarn with a 4.0mm hook, though the texture will be different and the puppet may be smaller than the 28cm size specified in the pattern.

Is this pattern suitable for beginners?

This pattern is better suited for intermediate crocheters as it involves attaching arms while crocheting the body, working sc2tog decreases, and embroidering facial details that require some experience.

Do I need to stuff the entire puppet?

No! Only the head and nose should be stuffed. The body and arms must remain unstuffed and hollow so your hand can fit inside to operate the puppet.

What age group is this hand puppet appropriate for?

With securely attached safety eyes and proper construction, this puppet is suitable for children ages 3 and up under adult supervision during play.

Can I make other animals using this same pattern structure?

Absolutely! You can adapt the colors, ear shapes, and facial embroidery to create wolves, dogs, cats, or other woodland creatures using this hand puppet base pattern.