🧢 Beautiful ✨ Detailed πŸ’ Adorable

Frog Prince Amigurumi Pattern

Frog Prince Amigurumi Pattern
4.2β˜… Rating
8-10 Hours Time Needed
1.5K Made This
βœ‚οΈ

Intermediate Level

Ideal for those with basic knitting experience, featuring slightly more advanced stitches and techniques to expand your skills.

⏱️

All-Day Adventure

Requires 8-10 hours, ideal for a full day of immersive knitting.

🐸

Whimsical Buddy

Playful characters full of personality, designed to spark imagination and become cherished playtime favorites.

About This Frog Prince Amigurumi Pattern

This enchanting Frog Prince pattern brings storybook magic to life in crochet form! Standing at 17 inches tall, this charming amphibian features detailed white eyes with carefully crafted green eyelids, a golden crown fit for royalty, and long, poseable limbs perfect for sitting displays. The pattern includes options for adding a cape to complete the princely transformation, making this project as fun to create as it is to display.

Frog Prince Amigurumi Pattern crochet pattern - detailed view of completed project

Using worsted weight yarn and straightforward increases and decreases, you'll build each component separately before bringing your Frog Prince together through careful assembly. The result is a huggable companion with genuine fairy tale charm.

Why You'll Love This Frog Prince Amigurumi Pattern

I absolutely love this pattern because it combines classic fairy tale nostalgia with modern amigurumi techniques! The oversized eyes give this frog such personality and charm, while the crown adds that perfect touch of whimsy. I appreciate how the pattern breaks down into manageable piecesβ€”the head, body, limbs, eyes, and crownβ€”making it approachable even for intermediate crocheters. The finished size is wonderfully huggable, and there's something magical about watching those distinctive bulging eyes come together as you attach the white spheres to the green face. Plus, you can customize with or without the cape depending on your vision!

Frog Prince Amigurumi Pattern step 1 - construction progress Frog Prince Amigurumi Pattern step 2 - assembly progress Frog Prince Amigurumi Pattern step 3 - details and accessories Frog Prince Amigurumi Pattern step 4 - final assembly and finishing

Switch Things Up

I absolutely love experimenting with color combinations when making this Frog Prince! While the classic green is adorable, I've had wonderful results creating a blue 'Ice Prince' frog or even a pink version for a fun twist on the fairy tale theme.

For a more realistic look, I sometimes use variegated green yarn that creates natural depth and dimension without any effort. You could also try adding embroidered details like rosy cheeks with pink embroidery thread or little spots on the back for extra character.

I've discovered that changing the crown color can completely transform the lookβ€”try silver metallic yarn for an elegant touch, or even rose gold for something truly unique. Some crafters add a tiny fabric flower bouquet to the frog's hand, which makes for an absolutely charming gift presentation.

For younger children, I recommend skipping the safety eyes and embroidering eyes instead for safety, using black yarn and satin stitch to create secure, child-safe features. You can also make the cape from felt instead of fabric for a sturdier, no-fray option that's easier to attach.

I've seen beautiful variations where crafters add little wire armatures inside the arms and legs to make them poseable, which is perfect for photography and display. Just make sure to cap any wire ends securely with hot glue or tape if making this for children.

Common Mistakes & How to Fix Them

βœ— Not using stitch markers consistently when working in continuous spirals can cause you to lose your place and create uneven rounds throughout the pattern. βœ— Stuffing too loosely will result in a floppy frog that doesn't hold its shape well, while overstuffing can stretch stitches and distort proportions. βœ— Placing the safety eyes incorrectly or forgetting to position them between rounds 5 and 6 of the white eye pieces before closing can ruin the expression. βœ— Rushing the assembly process without pinning pieces first often leads to crooked limbs, an off-center crown, or misaligned features that affect the overall appearance.

Frog Prince Amigurumi Pattern

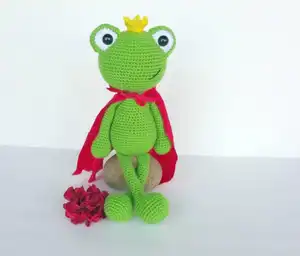
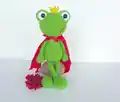
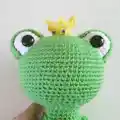
Create your very own adorable Frog Prince with this charming amigurumi pattern! This delightful 17-inch companion features expressive white eyes with green eyelids, a cheerful golden crown, and an optional regal cape. Perfect for fairy tale enthusiasts and anyone who loves whimsical handmade toys, this pattern guides you through crafting a huggable friend with personality and charm that will bring smiles for years to come.

Intermediate 8-10 Hours

Materials Needed for Frog Prince Amigurumi Pattern

β€” Main Fabric

  • 01
    Worsted Weight #4 yarn in green (approximately 150g)
  • 02
    Worsted Weight #4 yarn in white (approximately 50g for eyes)
  • 03
    Worsted Weight #4 yarn in yellow (for crown)

β€” Tools Required

  • 01
    Crochet hook size F or 3.75mm
  • 02
    18mm safety eyes
  • 03
    Scissors
  • 04
    Sewing needle
  • 05
    Stitch marker
  • 06
    Fiberfill stuffing
  • 07
    Black embroidery thread

Progress Tracker

0% Complete

β€” Head :

Round 1 :

Make 6 sc into a magic ring (6)

Round 2 :

Increase in each st around (12)

Round 3 :

(sc, inc) x 6 (18)

Round 4 :

sc, inc, (2 sc, inc) x 5, sc (24)

Round 5 :

(3 sc, inc) x 6 (30)

Round 6 :

2 sc, inc, (4 sc, inc) x 5, 2 sc (36)

Round 7 :

(5 sc, inc) x 6 (42)

Round 8 :

3 sc, inc, (6 sc, inc) x 5, 4 sc (48)

Round 9 :

(7 sc, inc) x 6 (54)

Round 10 :

4 sc, inc, (8 sc, inc) x 5, 4 sc (60)

Round 11 :

(9 sc, inc) x 6 (66)

Round 12-19 :

sc in each st around (66)

Round 20 :

(9 sc, dec) x 6 (60)

Round 21 :

4 sc, dec, (8 sc, dec) x 5, 4 sc (54)

Round 22 :

(7 sc, dec) x 6 (48)

Round 23 :

3 sc, dec, (6 sc, dec) x 5, 3 sc (42)

Round 24 :

(5 sc, dec) x 6 (36)

Round 25 :

2 sc, dec, (4 sc, dec) x 5, 2 sc (30)

Round 26 :

(3 sc, dec) x 6 (24)

Round 27 :

(2 sc, dec) x 6 (18)

Info :

F/O

β€” Body :

Round 1 :

Make 6 sc into a magic ring (6)

Round 2 :

Increase in each st around (12)

Round 3 :

(sc, inc) x 6 (18)

Round 4 :

(2 sc, inc) x 6 (24)

Round 5 :

(3 sc, inc) x 6 (30)

Round 6 :

(4 sc, inc) x 6 (36)

Round 7 :

(5 sc, inc) x 6 (42)

Round 8 :

(6 sc, inc) x 6 (48)

Round 9-15 :

Sc in each st around (48)

Round 16 :

(6 sc, dec) x 6 (42)

Round 17-18 :

Sc in each st around (42)

Info :

Start stuffing the body

Round 19 :

(5 sc, dec) x 6 (36)

Round 20-21 :

Sc in each st around (36)

Round 22 :

(4 sc, dec) x 6 (30)

Round 23-25 :

Sc in each st around (30)

Round 26 :

(3 sc, dec) x 6 (24)

Round 27-29 :

Sc in each st around (24)

Round 30 :

(2 sc, dec) x 6 (18)

Round 31-32 :

Sc in each st around (18)

Info :

F/O and leave a long tail for sewing

β€” Eyes (Make 2) :

Round 1 :

Make 6 sc into a magic ring (6)

Round 2 :

Increase in each st around (12)

Round 3 :

(sc, inc) x 6 (18)

Round 4-6 :

sc in each st around (18)

Info :

Place the safety eyes between rounds 5 and 6. F/O and leave a long tail for sewing

β€” Eyelids (Make 2) :

Round 1 :

Make 6 sc into a magic ring (6)

Round 2 :

Increase in each st around (12)

Round 3 :

(sc, inc) x 6 (18)

Round 4 :

(2 sc, inc) x 6 (24)

Round 5 :

(3 sc, inc) x 6 (30)

Round 6-9 :

Sc in each st around (30)

Info :

Fold the eyelid in half and sc it closed. F/O and leave a long tail for sewing

β€” Arms (Make 2) :

Round 1 :

Make 6 sc into a magic ring (6)

Round 2 :

Increase in each st around (12)

Round 3 :

(sc, inc) x 6 (18)

Round 4-6 :

sc in each st around (18)

Info :

Start stuffing the arms

Round 7 :

(4 sc, dec) x 3 (15)

Round 8 :

(3 sc, dec) x 3 (12)

Round 9 :

(2 sc, dec) x 3 (9)

Info :

Stop stuffing the legs

Round 10-27 :

sc in each st around (9)

Info :

Fold the arms in half and sc the opening closed. F/O and leave a long tail for sewing

β€” Legs (Make 2) :

Round 1 :

Make 6 sc into a magic ring (6)

Round 2 :

Increase in each st around (12)

Round 3 :

(sc, inc) x 6 (18)

Round 4 :

(2 sc, inc) x 6 (24)

Round 5 :

(3 sc, inc) x 6 (30)

Round 6-9 :

Sc in each st around (30)

Info :

Start stuffing the legs

Round 10 :

(2 sc, dec) x 4, 14 sc (26)

Round 11 :

(sc, dec) x 4, 14 sc (22)

Round 12 :

Dec x 4, 14 sc (18)

Round 13 :

(sc, dec) x 6 (12)

Round 14 :

(2 sc, dec) x 3 (9)

Info :

Stop stuffing the legs

Round 15-35 :

sc in each st around (9)

Info :

Fold the legs in half and sc the opening closed. F/O and leave a long tail for sewing

β€” Crown :

Info :

Ch 12

Round 1 :

sl to to 1st ch to make a ring

Round 2-3 :

sc in each st around (12)

Round 4 :

ch 3, sl st in 2nd ch from hook, sc in next chain, sc in next st on crown. Repeat 5 more times to have 6 points

Info :

F/O and leave a long tail for sewing

Assembly Instructions

  • Sew the white eyes onto the head, ensuring they are positioned symmetrically with safety eyes already inserted between rounds 5 and 6.
  • Carefully sew the green eyelids around each white eye piece to create the distinctive bulging eye appearance.
  • Attach the completed head securely to the top of the body using the long tail and whip stitch method.
  • Sew the arms onto the sides of the body, positioning them evenly for balance and ensuring they hang naturally.
  • Attach the legs to the bottom of the body, making sure they are positioned to allow the frog to sit upright.
  • Position the yellow crown between the eyes on top of the head and sew it securely in place.
  • Optional: Create and attach a no-sew cape following the tutorial link provided for the complete Frog Prince look.

Important Notes

  • πŸ’‘Use a stitch marker to mark the beginning of each round when working in continuous spirals to avoid losing your place
  • πŸ’‘Stuff the body and head firmly but not too tightly to maintain the proper rounded shape
  • πŸ’‘Install safety eyes between rounds 5 and 6 of the white eye pieces before completing them, as they cannot be added later
  • πŸ’‘Pin all pieces in their intended positions before sewing to ensure balanced proportions and proper alignment
  • πŸ’‘The eyelids should be folded in half and sewn closed before attaching them around the white eyes
  • πŸ’‘Stop stuffing arms and legs before the final rounds to keep them flexible and easier to fold for closing

This enchanting Frog Prince pattern was lovingly designed to bring fairy tale magic into your home through the art of crochet! With its oversized expressive eyes, golden crown, and optional regal cape, this charming amphibian captures all the whimsy of classic storybook illustrations. The pattern uses simple increases and decreases to create a huggable 17-inch companion that's perfect for display or cuddles. Whether you're creating a gift for a fairy tale lover or adding to your own collection of handmade treasures, this Frog Prince is sure to bring smiles and enchantment! πŸΈπŸ‘‘βœ¨

You ask,

we answer.

FAQs

What size will my finished Frog Prince be?

Using worsted weight #4 yarn and a 3.75mm (F) crochet hook, your finished Frog Prince will measure approximately 17 inches from bottom to top of head.

Can I use different yarn weights for this pattern?

While the pattern is written for worsted weight yarn, you can use different yarn weights with corresponding hook sizes. Just note that using lighter yarn will create a smaller frog, while heavier yarn will make a larger one.

Do I need to make the cape, or is it optional?

The cape is completely optional! The pattern provides a link to a no-sew cape tutorial, but your Frog Prince will be adorable with or without it. You can customize based on your preference.

When should I insert the safety eyes?

Insert the 18mm safety eyes between rounds 5 and 6 of the white eye pieces before you finish crocheting them. This is crucial because you cannot add them after the pieces are complete.

How much yarn do I need for this project?

You'll need approximately 150g of green worsted weight yarn for the main color, and about 50g total of white and yellow yarn for the eyes and crown.

Is this pattern suitable for beginners?

This pattern is rated intermediate level. While it uses basic crochet stitches, it requires patience and precision during assembly. Beginners with some amigurumi experience should be able to complete it successfully.