🧢 Beautiful ✨ Detailed πŸ’ Adorable

Giraffe Bookmark Amigurumi Pattern

Giraffe Bookmark Amigurumi Pattern
4.7β˜… Rating
3-4 Hours Time Needed
1.4K Made This
βœ‚οΈ

Intermediate Level

Ideal for those with basic knitting experience, featuring slightly more advanced stitches and techniques to expand your skills.

⏱️

Bite-Sized Project

Complete in under 2 hoursβ€”quick, fun, and perfect for a little creative escape.

🎁

Tiny Treasure

Small, sweet, and gift-worthy creations that fit perfectly in the palm of your hand with detailed charm.

About This Giraffe Bookmark Amigurumi Pattern

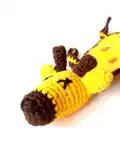
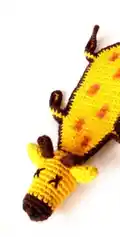
This charming giraffe bookmark pattern combines functionality with cuteness in one delightful project. The design features a sweet giraffe face with expressive embroidered eyes and nose, topped with tiny horns and ears. The elongated body transforms into a practical bookmark, complete with decorative curved legs at two points along the body. Using simple color changes between yellow and brown, this pattern creates visual interest while remaining accessible to intermediate crocheters.

Giraffe Bookmark Amigurumi Pattern crochet pattern - detailed view of completed project

Standing at 20cm tall, this bookmark is perfectly sized to peek out from your favorite novels. The silicone ball filling in the head gives it just the right weight and shape to stay securely in place between pages.

Why You'll Love This Giraffe Bookmark Amigurumi Pattern

I absolutely love this pattern because it transforms a functional item into something truly special and whimsical. There's something magical about creating a bookmark that makes you smile every time you open your book. I adore how the curved legs add personality and charm, making this giraffe feel alive and playful. The combination of practical use and adorable design means you'll actually use what you make, and it brings joy to everyday reading moments. Plus, the quick completion time means I can whip up several as gifts for all the book lovers in my life without spending weeks on each one!

Giraffe Bookmark Amigurumi Pattern step 1 - construction progress Giraffe Bookmark Amigurumi Pattern step 2 - assembly progress Giraffe Bookmark Amigurumi Pattern step 3 - details and accessories Giraffe Bookmark Amigurumi Pattern step 4 - final assembly and finishing

Switch Things Up

I love customizing this giraffe bookmark to reflect different personalities and preferences! One of my favorite modifications is changing the color scheme - instead of traditional yellow and brown, I've created pink and purple giraffes, blue and teal combinations, or even rainbow spotted versions using multiple colors for the body. You could also adjust the size of the horns to make them more prominent or create a baby giraffe by working fewer rounds in the body section.

For a more decorative touch, I sometimes add a small ribbon bow between the horns or attach a tiny crocheted flower near one ear. If you want to make it extra special for children, consider adding a small jingle bell inside the head (securely enclosed) so it makes a gentle sound. You can also experiment with the facial expression by varying the placement and style of the embroidered eyes - slightly closer together for a sweeter look or wider apart for a more surprised expression.

Another fun variation I enjoy is adding eyelashes using black embroidery thread for a more feminine touch, or creating textured spots instead of drawn ones by surface crocheting small circles in brown onto the yellow body. For book club gifts, I've personalized them by adding tiny embroidered initials on the back of the head. The curved legs can also be modified - make them longer for a more dramatic curl or shorter for a subtler effect. Feel free to let your creativity guide you and make this giraffe bookmark uniquely yours!

Common Mistakes & How to Fix Them

βœ— Not maintaining consistent tension when working the long body sections can create uneven bookmark width that looks unprofessional and affects functionality βœ— Forgetting to stuff the head firmly before closing rounds 17-18 results in a floppy, shapeless giraffe face that won't hold its form βœ— Skipping the chain stitches at the beginning of flat rows causes the edges to pull and curl instead of lying flat βœ— Placing eyes and nose embroidery incorrectly ruins the giraffe's expression; always mark placement with pins before stitching permanently βœ— Working the curved legs too tightly makes them stiff and prevents them from curving naturally around book pages as intended

Giraffe Bookmark Amigurumi Pattern

Create an adorable giraffe bookmark that brings charm to your reading time! This delightful pattern guides you through crafting a whimsical 20cm bookmark featuring a sweet giraffe face with curved legs. Perfect for marking your place in books while adding a handmade touch to your reading nook. Made with YarnArt Jeans yarn in cheerful yellow and brown tones, this functional yet decorative piece makes a thoughtful gift for book lovers and adds personality to any bookshelf.

Intermediate 3-4 Hours

Materials Needed for Giraffe Bookmark Amigurumi Pattern

β€” Main Fabric

  • 01
    YarnArt Jeans yarn in yellow color
  • 02
    YarnArt Jeans yarn in brown color
  • 03
    Black embroidery thread for facial features

β€” Tools Required

  • 01
    Crochet hook size 2.5mm
  • 02
    Silicone ball for stuffing head
  • 03
    Yarn needle for sewing and embroidery
  • 04
    Scissors
  • 05
    Brown crayon or marker for drawing spots
  • 06
    Stitch markers (optional but helpful)
  • 07
    Pins for positioning features

Progress Tracker

0% Complete

β€” Face :

Color brown

Start with brown yarn

Round 1 :

6 sc in MG (6)

Round 2 :

(inc) - repeat 6 times (12)

Round 3 :

(1 sc, inc) - repeat 6 times (18)

Round 4-5 :

18 sc (18) (2 rounds)

Info :

Change color to yellow

Round 6-8 :

18 sc (18) (3 rounds)

Round 9 :

(2 sc, inc) - repeat 6 times (24)

Round 10-16 :

24 sc (24) (7 rounds)

Round 17 :

(2 sc, dec) - repeat 6 times (18) stuff

Round 18 :

(1 sc, dec) - repeat 6 times (12)

Round 19 :

Fold head in half, join both edges: 1 ch, 6 sc (7)

Round 20 :

1 ch, inc, 5 sc, inc (9)

Round 21 :

1 ch, 9 sc (9)

Round 22 :

1 ch, inc, 7 sc, inc (11)

Round 23 :

1 ch, 11 sc (11)

Round 24 :

1 ch, inc, 9 sc, inc (13)

Round 25 :

1 ch, 13 sc (13)

Round 26 :

1 ch, inc, 11 sc, inc (15)

Round 27 :

1 ch, 15 sc (15)

Round 28 :

1 ch, 15 sc (15)

Info :

Here we make curved legs

Round 29-30 :

15 ch, turn, 14 sc along chain, 15 sc along body

Round 31-50 :

1 ch, 15 sc (15) (20 rounds)

Info :

Here we make curved legs again

Round 51-52 :

15 ch, turn, 14 sc along chain, 15 sc along body

Round 53-54 :

1 ch, 15 sc (15) (2 rounds)

Round 55 :

1 ch, dec, 11 sc, dec (13)

Round 56 :

1 ch, dec, 9 sc, dec (11)

Round 57 :

1 ch, dec, 7 sc, dec (9)

Round 58 :

1 ch, dec, 5 sc, dec (7)

Round 59 :

1 ch, dec, 3 sc, dec (5)

Info :

Edge body together with legs using brown yarn and single crochet

β€” Ears (Make 2) :

Color yellow

Start with yellow yarn

Round 1 :

4 sc in MG (4)

Round 2 :

(inc) - repeat 4 times (8)

Round 3-6 :

8 sc (8) (4 rounds)

β€” Horns (Make 2) :

Color brown

Start with brown yarn

Round 1 :

6 sc in MG (6)

Round 2 :

(inc) - repeat 6 times (12)

Round 3 :

(1 sc, inc) - repeat 6 times (18)

Round 4-5 :

18 sc (18)

Round 6 :

(1 sc, dec) - repeat 6 times (12)

Round 7 :

(2 sc, dec) - repeat 3 times (9)

Assembly Instructions

  • Sew ears to the top sides of the head using yellow yarn, positioning them symmetrically
  • Attach horns to the top of the head between the ears using brown yarn
  • Embroider eyes using cross stitches with black thread on the face area
  • Embroider nose using cross stitches with black thread below the eyes
  • Use brown crayon or marker to draw spots on the yellow body portions for authentic giraffe pattern
  • Ensure all loose ends are woven in securely so bookmark withstands regular use

Important Notes

  • πŸ’‘When folding the head in half at round 19, make sure both sides are aligned evenly for a symmetrical bookmark
  • πŸ’‘The curved legs are created by working chain stitches and then crocheting back along them - don't skip these rounds
  • πŸ’‘Maintain consistent tension throughout the flat body section to ensure the bookmark lies flat between book pages
  • πŸ’‘Use a silicone ball specifically for the head stuffing as it provides better weight and shape than fiberfill
  • πŸ’‘When drawing spots with brown crayon, test on a scrap piece first to ensure the color transfers well to your yarn
  • πŸ’‘The edging around the body and legs in brown yarn is important for a polished, finished appearance

This delightful giraffe bookmark pattern brings together practicality and whimsy in one charming design! Created by MartulandHandmade, this pattern transforms ordinary reading time into something special with its adorable curved legs and sweet embroidered face. Whether you're making it for yourself or as a heartfelt gift for a book-loving friend, this 20cm bookmark adds personality to every page. The clever construction technique creates a flat body perfect for marking your place while the stuffed head peeks out cheerfully from the top of your book. πŸ¦’πŸ“šβœ¨

You ask,

we answer.

FAQs

Can I use different yarn weights for this bookmark pattern?

While the pattern calls for YarnArt Jeans with a 2.5mm hook, you can use other DK or light worsted weight yarns. Just adjust your hook size accordingly to achieve a tight gauge that won't allow stuffing to show through. The finished size will vary depending on your yarn choice.

How do I keep the bookmark body flat instead of curling?

The key is to always start each flat row with 1 chain and maintain even tension throughout. Also, make sure you're working into both loops of each stitch unless the pattern specifies back loop only. Blocking the finished bookmark with steam can also help it lie completely flat.

What can I use instead of a silicone ball for stuffing the head?

You can use polyester fiberfill, but stuff it very firmly to help the head maintain its shape. Alternatively, you could use a small pompom or tightly rolled piece of fabric. The silicone ball is recommended because it provides consistent weight and shape.

How do I make the curved legs look natural?

Don't pull the chain stitches too tight when creating the legs in rounds 29-30 and 51-52. Allow them to curve naturally by keeping even, relaxed tension. You can also gently shape them with your fingers and use a little steam to help them hold their curved position.

Can I make this bookmark larger or smaller?

Yes! To make it larger, use a thicker yarn with a bigger hook and add more rounds to the body section (rounds 31-50). To make it smaller, use thinner yarn with a smaller hook and reduce the number of body rounds. Just maintain the proportions of the head and decorative elements.