🧢 Beautiful ✨ Detailed πŸ’ Adorable

Hammerhead Shark Friend Amigurumi Pattern

Hammerhead Shark Friend Amigurumi Pattern
4.7β˜… Rating
3-4 Hours Time Needed
3.9K Made This
βœ‚οΈ

Intermediate Level

Ideal for those with basic knitting experience, featuring slightly more advanced stitches and techniques to expand your skills.

⏱️

Bite-Sized Project

Complete in under 2 hoursβ€”quick, fun, and perfect for a little creative escape.

πŸ₯

Charming Critter

Delightful animal designs with sweet details that capture the essence of your favorite ocean friends.

About This Hammerhead Shark Friend Amigurumi Pattern

Hammerhead Shark Friend Amigurumi Pattern crochet pattern - detailed view of completed project

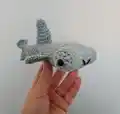
Perfect for ocean lovers and shark enthusiasts alike, this little guy makes an amazing gift or a cheerful addition to your own collection. His sweet embroidered smile will keep the blues away!

Why You'll Love This Hammerhead Shark Friend Amigurumi Pattern

I absolutely adore this pattern because it combines simplicity with such a unique result. There's something so satisfying about watching that hammerhead shape come together as you work. I love how the designer gives you flexibility with the fins, so you can make your shark as simple or detailed as you want. The finished size is just perfect for holding in your palm, and that little smile gets me every time. This is one of those projects that makes you proud to say you made it yourself!

Hammerhead Shark Friend Amigurumi Pattern step 1 - construction progress Hammerhead Shark Friend Amigurumi Pattern step 2 - assembly progress Hammerhead Shark Friend Amigurumi Pattern step 3 - details and accessories Hammerhead Shark Friend Amigurumi Pattern step 4 - final assembly and finishing

Switch Things Up

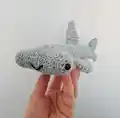
I find this hammerhead shark pattern absolutely delightful because it captures so much personality in such a compact little creature. The way the head transitions from rounds to rows creates that perfect hammer shape, and watching it take form under my hook always feels like a small miracle. I love that the designer encourages flexibility with the fins because it means I can make each shark a little different.

What really draws me to this project is how achievable it feels while still teaching valuable techniques. The combination of working in rounds, rows, and then back to rounds is something that expands your skills without overwhelming you. And that tail construction at the end? It's clever and creates such a beautiful flowing shape.

I think anyone who loves ocean creatures or wants a cheerful desk companion would adore making this pattern. There's something therapeutic about crocheting a smiling shark, knowing it's going to bring joy every time you look at it. Plus, the ability to customize the size by changing yarn weight means you can create a whole family of hammerhead friends!

Common Mistakes & How to Fix Them

βœ— Not placing decreases at the edges during the body section will throw off the shape, so use stitch markers to track your edge stitches carefully. βœ— Forgetting to switch between working in rounds and rows on the head can cause confusion, so read ahead before starting each section. βœ— Understuffing the body will make your shark look floppy and sad, so stuff firmly as you go for that perfect squishy shape. βœ— Placing safety eyes too close together or too far apart changes the expression dramatically, so test placement before securing them permanently. βœ— Using a hook that's too large will create visible gaps in your stitches where stuffing shows through, so size down your hook for tighter work.

Hammerhead Shark Friend Amigurumi Pattern

Get ready to dive into one of the most charming ocean creatures you'll ever hook! This adorable hammerhead shark is designed to bring smiles and chase away the blues with its happy little face. Whether you're crafting it as a gift for a shark-loving friend or keeping it as your own desk buddy, this cuddly companion is the perfect project to brighten your day. The unique hammer-shaped head gives this little guy so much personality, and the simple construction means you'll have a finished friend before you know it. Grab your grey yarn and let's make some waves together!

Intermediate 3-4 Hours

Materials Needed for Hammerhead Shark Friend Amigurumi Pattern

β€” Main Fabric

  • 01
    Grey cotton DK yarn (main color for entire shark)
  • 02
    Small amount of black yarn for embroidering the smile
  • 03
    Chunky yarn can be substituted for a larger, extra squishy version

β€” Tools Required

  • 01
    Crochet hook 4mm (or 3mm for smaller size, 5mm for chunky yarn)
  • 02
    2 safety eyes
  • 03
    Stuffing/fiberfill
  • 04
    Yarn needle
  • 05
    Scissors
  • 06
    Stitch markers
  • 07
    Craft glue (optional, for securing smile)

Progress Tracker

0% Complete

β€” Head :

Start :

Chain 2, 6 sc into second chain from hook

Round 1 :

*inc* x 6 (12)

Round 2 :

*BLO sc* (12)

Round 3-5 :

*sc* (12)

Info :

Begin working in rows, Ch1 & turn

Row 6-14 :

sc x 10, ch1, turn

Row 15 :

sc x 10, ch 2, do not turn, continue working in first st of row 15

Round 16 :

sc x 10 and in both ch spaces (12)

Round 17-18 :

*sc* (12)

Round 19 :

*BLO dec* x 6 (6)

Info :

FO. Insert safety eyes in beginning/end spaces.

β€” Body :

Info :

Join in fifth st from corner as shown in photo. For decreases, ensure they are in the edge stitches. If not decreasing at edges, adjust stitch arrangement to decrease once on each side.

Round 1 :

Sc in each row edge, corner and ch sp around (28)

Round 2 :

*sc* (28)

Round 3 :

8sc, dec, 12sc, dec, 4sc (26)

Round 4 :

8sc, dec, 11sc, dec, 3sc (24)

Round 5 :

7sc, dec, 10sc, dec, 3sc (22)

Round 6 :

7sc, dec, 9sc, dec, 2sc (20)

Round 7 :

7sc, dec, 8sc, dec, 1sc (18)

Info :

Start stuffing as you go

Round 8 :

*sc* (18)

Round 9 :

6sc, dec, 8sc, dec (16)

Round 10 :

*sc* (16)

Round 11 :

6sc, dec, 6sc, dec (14)

Round 12-15 :

*sc* (14)

Round 16 :

Dec, 5sc, dec, 5sc (12)

Round 17-18 :

*sc* (12)

Round 19 :

Dec, 4sc, dec, 4sc (10)

Round 20 :

*sc* (10)

Info :

Stuff firmly

Round 21 :

Sc closed (5)

Tail :

Ch1, turn. (Sc, hdc, dc, dc, tr, tr) in next st. Ch4, sc in next 2 stitches. (Sc, hdc, dc, dc) in next st, ch 2, sc in last st.

β€” Big Fin :

Info :

Make 1

Start :

Chain 2, 6 sc in second chain from hook

Round 1-2 :

*sc* (6)

Round 3 :

*sc, inc* x 3 (9)

Round 4 :

*sc* (9)

Round 5 :

*2 x sc, inc* x 3 (12)

Round 6 :

*sc* (12)

Finish :

Sc closed and fasten off

β€” Small Fin :

Info :

Make 2 to 5 depending on desired anatomical accuracy

Start :

Chain 2, 6 sc in second chain from hook

Round 1-2 :

*sc* (6)

Round 3 :

*sc, inc* x 3 (9)

Round 4-5 :

*sc* (9)

Finish :

Sc closed and fasten off

Assembly Instructions

  • Attach the big dorsal fin to the top center of the body, positioning it roughly where the body begins to taper.
  • Attach small fins to the sides of the body using the reference photos as a guide for placement.
  • If adding additional small fins for anatomical accuracy, position them along the underside and near the tail.
  • Use black yarn to embroider a curved smile on the underside of the head, near the front.
  • Apply a small amount of craft glue to the smile stitches if desired to keep them securely in place.
  • Weave in all remaining yarn ends and trim any excess.

Important Notes

  • πŸ’‘Use stitch markers to track your rounds, especially when transitioning between rounds and rows on the head
  • πŸ’‘Size down your hook 0.5mm to 1mm from recommended yarn size to ensure tight stitches without stuffing showing
  • πŸ’‘You can use DK yarn with a 3mm hook for a smaller shark or chunky yarn with a 5mm hook for a larger one
  • πŸ’‘The number of fins is flexible - use fewer for a simpler look or more for anatomical accuracy
  • πŸ’‘Stuff firmly but evenly for the best shape and a nice squishy feel

This sweet hammerhead shark was designed to be a cheerful little companion that chases away the blues. With his distinctive hammer-shaped head and happy embroidered smile, he's guaranteed to bring joy to whoever holds him. The pattern gives you creative freedom to add as many or as few fins as you like, making each shark uniquely yours. 🦈 Happy hooking and may your stitches be tight! 🧢✨

You ask,

we answer.

FAQs

Can I use a different yarn weight for this pattern?

Absolutely! The designer mentions using chunky yarn for an extra squishy pal. Just remember to adjust your hook size accordingly - size down 0.5mm to 1mm from the yarn's recommended hook to keep stitches tight.

How many fins should I make for my shark?

The pattern suggests making 1 big fin and 2-5 small fins. The designer notes that less is more for this little guy, but if you want anatomical accuracy, feel free to add more fins!

What size will the finished shark be?

Using DK yarn and a 4mm hook, your shark will be palm-sized. Using a 3mm hook creates a smaller shark, while chunky yarn with a 5mm hook makes a larger version.

Why does the pattern switch from rounds to rows on the head?

Working in rows creates the flat, elongated shape of the hammerhead. This technique gives the distinctive hammer shape that makes this shark so recognizable and cute!

Can I sell items made from this pattern?

Yes! The designer allows selling finished items but asks that you credit them as the designer and tag @manatee_squares on social media.