🧶 Beautiful ✨ Detailed 💝 Adorable

Heart Cat and Bunny Amigurumi Pattern

Heart Cat and Bunny Amigurumi Pattern
4.5★ Rating
5-6 Hours Time Needed
3.5K Made This
✂️

Intermediate Level

Ideal for those with basic knitting experience, featuring slightly more advanced stitches and techniques to expand your skills.

⏱️

Weekend Treat

Takes 5-7 hours, making it an enjoyable project to finish over a couple of days.

🧸

Cute Companion

An adorable friend to cherish, handcrafted with love to bring comfort and joy for years to come.

About This Heart Cat and Bunny Amigurumi Pattern

This delightful pattern combines a classic heart shape with adorable animal features to create two unique designs—a sweet bunny and a charming cat. Each character has its own personality with detailed muzzles, expressive safety eyes, and fun striped tails. The pattern uses plush yarn for an extra soft and cuddly finish that makes these perfect for children or as decorative pieces.

Heart Cat and Bunny Amigurumi Pattern crochet pattern - detailed view of completed project

Working in continuous rounds with color changes for the striped tail, this pattern offers great practice in shaping and assembly techniques while creating an absolutely heartwarming result.

Why You'll Love This Heart Cat and Bunny Amigurumi Pattern

I absolutely love this pattern because it gives you two adorable designs in one! The heart shape is so unique and perfect for expressing love and creativity. I enjoy how the plush yarn makes every stitch feel luxurious and creates such a soft, huggable texture. The striped tail detail adds visual interest, and watching these sweet creatures come to life as you assemble them is incredibly rewarding. Plus, they make wonderful gifts that recipients treasure forever!

Heart Cat and Bunny Amigurumi Pattern step 1 - construction progress Heart Cat and Bunny Amigurumi Pattern step 2 - assembly progress Heart Cat and Bunny Amigurumi Pattern step 3 - details and accessories Heart Cat and Bunny Amigurumi Pattern step 4 - final assembly and finishing

Switch Things Up

I love experimenting with color combinations for these heart characters! While the pattern calls for pink and white, I've discovered that pastel rainbow colors create an absolutely magical effect—imagine a lavender bunny with mint green accents or a peachy cat with cream details.

For a more sophisticated look, I sometimes work these in neutral tones like beige, gray, or even charcoal with white accents. They become elegant home décor pieces that appeal to adults too.

Another fun variation I enjoy is adding small accessories—a tiny crocheted bow between the bunny's ears or a little collar with a bell for the cat adds so much personality.

I've also experimented with different yarn weights. Using a lighter sport weight yarn with a smaller hook creates miniature versions perfect for keychains or ornaments, while chunky yarn makes giant cuddle pillows.

For the striped tail, I love playing with the color pattern—try three colors instead of two, or make thinner or wider stripes by adjusting how many rounds you work in each color.

Sometimes I embroider little details like closed sleepy eyes using black thread, or add rosy cheeks with pink embroidery or fabric paint for extra cuteness.

The heart shape also lends itself beautifully to seasonal themes—add tiny wings for Valentine's angels, or use autumn colors for fall décor.

I've found that making sets in graduating sizes creates adorable family groupings—mama, papa, and baby hearts are irresistible displayed together.

Don't be afraid to personalize these with different facial expressions—a wider smile, asymmetrical eyes for a playful wink, or even glasses made from wire add unique character.

These patterns are wonderfully versatile canvases for your creativity, so let your imagination guide you to create truly one-of-a-kind treasures!

Common Mistakes & How to Fix Them

✗ Forgetting to stuff the heart firmly enough before closing, which can result in a flat or misshapen appearance ✗ Not using stitch markers when joining the two heart pieces together, leading to uneven alignment and visible gaps ✗ Skipping the invisible decrease technique, which creates visible bumps and an unprofessional finish on the heart surface ✗ Stuffing the striped tail sections too firmly, making it stiff instead of flexible and naturally curved

Heart Cat and Bunny Amigurumi Pattern

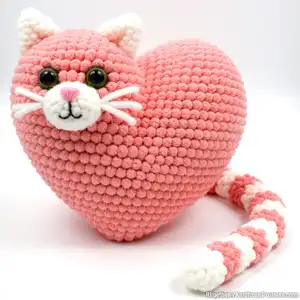
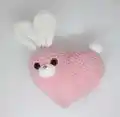
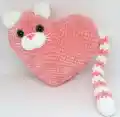
Create these adorable heart-shaped cat and bunny amigurumi friends that are perfect for gifting or decorating your space. This charming pattern features a heart-shaped body with sweet animal details including embroidered faces, cute ears, and striped tails. Made with soft plush yarn, these cuddly companions are ideal for Valentine's Day, nursery décor, or any occasion that calls for handmade love.

Intermediate 5-6 Hours

Materials Needed for Heart Cat and Bunny Amigurumi Pattern

— Main Fabric

  • 01
    Plush yarn Himalaya Dolphin Baby 100g/120m in pink and white colors
  • 02
    Alternative: Premier Parfait Chunky or similar super bulky weight plush yarn

— Tools Required

  • 01
    Crochet hook size 4.5mm (US 7)
  • 02
    Safety eyes 16mm (one pair)
  • 03
    Safety nose 16mm for cat
  • 04
    Safety nose 8mm for bunny
  • 05
    Scissors
  • 06
    Darning needle
  • 07
    Fiberfill stuffing
  • 08
    Strong thread for sewing parts
  • 09
    Stitch markers

Progress Tracker

0% Complete

— Heart :

Round 1 :

MR 6 [6]

Round 2 :

6 Inc [12]

Round 3 :

(Inc, 1 SC)×6 [18]

Round 4 :

(Inc, 2 SC)×6 [24]

Round 5 :

(Inc, 3 SC)×6 [30]

Round 6 :

(Inc, 4 SC)×6 [36]

Round 7 :

5 SC, (Inc, 11 SC)×2, Inc, 6 SC [39]

Round 8 :

(Inc, 12 SC)×3 [42]

Round 9 :

6 SC, (Inc, 13 SC)×2, Inc, 7 SC [45]

Round 10 :

SC around [45]

Round 11 :

(Inc, 14 SC)×3 [48]

Info :

Remove the loop from the hook. Cut the yarn with 8" yarn tail. Make another piece just like the previous one by repeating rounds 1-11. Do not cut the yarn as we will continue using the yarn of the second piece.

Round 12 :

Attach the pieces to each other, put the open loop of the first piece on the hook. Continue crocheting around the circle of the first piece and crochet 41 SC, go back to the second piece, skip 7 St and crochet on the second piece 41 SC [82]

Round 13 :

13 SC, (Dec, 25 SC)×2, Dec, 13 SC [79]

Round 14 :

Dec, 24 SC, Dec, 25 SC, Dec, 24 SC [76]

Round 15 :

12 SC, (Dec, 23 SC)×2, Dec, 12 SC [73]

Round 16 :

(Dec, 22 SC)×3, 1 SC [70]

Info :

Sew the hole between the pieces with the left tail of the thread from the first piece.

Round 17 :

11 SC, (Dec, 21 SC)×2, Dec, 11 SC [67]

Round 18 :

21 SC, (Dec, 20 SC)×2, Dec [64]

Round 19 :

7 SC, Dec, (14 SC, Dec)×3, 7 SC [60]

Round 20 :

(13 SC, Dec)×4 [56]

Info :

Attach the safety eyes (16 mm) on round 10/11 with 6 SC distance. Stuff with fiberfill all the way.

Round 25 :

5 SC, (Dec, 8 SC)×3, Dec, 3 SC [36]

Round 26 :

(4 SC, Dec)×6 [30]

Round 27 :

(3 SC, Dec)×6 [24]

Round 28 :

2 SC, (Dec, 4 SC)×3, Dec, 2 SC [20]

Round 29 :

(3 SC, Dec)×4 [16]

Round 30 :

(2 SC, Dec)×4 [12]

Round 31 :

(1 SC, Dec)×4 [8]

Round 32 :

(2 SC, Dec)×2 [6]

Info :

Fasten off, hide the end.

— Bunny Muzzle :

Round 1 :

Make an oval, work on both sides of the chain. Ch 5, start in the 2nd Ch from hook, 1 Inc, 2 SC, in last loop 3 SC, 3 SC [10]

Round 2 :

2 Inc, 2 SC, 3 Inc, 2 SC, Inc [16]

Info :

Sl St and fasten off. Attach the safety nose (8 mm) on round 1/2.

— Bunny Ears (make 2) :

Round 1 :

MR 6 [6]

Round 2 :

6 Inc [12]

Round 3 :

(1 SC, Inc)×6 [18]

Round 4 :

(8 SC, Inc)×2 [20]

Round 5-6 :

SC around (2 rounds) [20]

Round 7 :

(Dec, 8 SC)×2 [18]

Round 8 :

SC around [18]

Round 9 :

(Dec, 7 SC)×2 [16]

Round 10-11 :

SC around (2 rounds) [16]

Round 12 :

(Dec, 6 SC)×2 [14]

Round 13-14 :

SC around (2 rounds) [14]

Info :

Don't stuff.

Round 15 :

Fold the piece in half and crochet them both sides at once 7 SC [7]

Info :

Fasten off, hide the end. Make 2 ears.

— Bunny Tail :

Round 1 :

MR 6 [6]

Round 2 :

6 Inc [12]

Round 3-4 :

SC around (2 rounds) [12]

Info :

Stuff with fiberfill.

Round 4 :

6 Dec [6]

Info :

Fasten off, hide the end.

— Cat Tail :

Round 1 :

MR 6 [6]

Round 2 :

6 Inc [12]

Round 3-5 :

SC around (3 rounds) [12]

Round 6 :

Change color to pink. 12 SC [12]

Round 7 :

SC around [12]

Round 8 :

Change color to white. 12 SC [12]

Round 9 :

SC around [12]

Round 10 :

Change color to pink. 12 SC [12]

Round 11 :

(4 SC, Dec)×2 [10]

Info :

Stuff with fiberfill. Next part of the tail don't stuff.

Round 12 :

Change color to white. 10 SC [10]

Round 13 :

SC around [10]

Round 14 :

Change color to pink. 10 SC [10]

Round 15 :

(3 SC, Dec)×2 [8]

Round 16 :

Change color to white. 8 SC [8]

Round 17 :

SC around [8]

Round 18 :

Change color to pink. 8 SC [8]

Round 19 :

SC around [8]

Round 20 :

Change color to white. 8 SC [8]

Round 21 :

SC around [8]

Round 22 :

Change color to pink. 8 SC [8]

Round 23 :

SC around [8]

Round 24 :

Change color to white. 8 SC [8]

Round 25 :

SC around [8]

Round 26 :

Change color to pink. 8 SC [8]

Round 27 :

SC around [8]

Round 28 :

Change color to white. 8 SC [8]

Round 29 :

SC around [8]

Round 30 :

Fold the piece in half and crochet them both sides at once 4 SC [4]

Info :

Fasten off, hide the end.

— Cat Ears (make 2) :

Round 1 :

MR 6 [6]

Round 2 :

(1 SC, Inc)×3 [9]

Round 3 :

(2 SC, Inc)×3 [12]

Round 4 :

(3 SC, Inc)×3 [15]

Round 5 :

Short row. 6 SC, Sl St [7]

Info :

Fasten off, hide the end. Make 2 ears.

— Cat Muzzle :

Round 1 :

Make an oval, work on both sides of the chain. Ch 6, start in the 2nd Ch from hook, 1 Inc, 3 SC, in last loop 3 SC, 4 SC [12]

Round 2 :

2 Inc, 3 SC, 3 Inc, 3 SC, Inc [18]

Round 3 :

17 SC, Sl St [18]

Info :

Fasten off, hide the end. Attach the safety nose (16 mm) on round 2/3.

Assembly Instructions

  • Sew the muzzle to the heart at the appropriate level (cat muzzle at rows 12-15, bunny muzzle at rows 11-14), lightly stuffing the cat muzzle with fiberfill.
  • For the cat muzzle, embroider whiskers using strong thread and optionally pull the muzzle in the middle for dimension by inserting needle under nose and bringing it out below.
  • Sew the ears onto the heart, positioning them according to your preference. For cat ears, note the front and back orientation shown in the pattern photos.
  • For bunny ears, fold the bottom of each ear in half before sewing them onto the heart for proper positioning.
  • Attach the tail to the back of the heart (cat tail at rows 7-8, bunny tail at rows 1-2) using strong thread for secure attachment.

Important Notes

  • 💡Use stitch markers to track your rounds, especially when joining the two heart pieces together in round 12
  • 💡It's recommended to use strong thread rather than the main yarn when sewing on ears and tail for durability
  • 💡Stuff the heart firmly but evenly to maintain the proper heart shape throughout the body
  • 💡Don't stuff the bunny ears or the lower portion of the cat tail to maintain their natural floppy appearance
  • 💡Work in continuous rounds without joining unless specified, moving your stitch marker up with each round
  • 💡Take care when attaching the two heart halves to ensure even alignment and no gaps between pieces

These charming Heart Cat and Bunny patterns bring together the universal symbol of love with adorable animal companions. The unique heart-shaped body design makes them perfect for Valentine's Day, baby showers, or just showing someone you care. With soft plush yarn and sweet details like embroidered whiskers and striped tails, these cuties are sure to steal hearts wherever they go. Whether you choose the playful cat or the gentle bunny, you'll create a treasured keepsake that spreads joy and warmth.

You ask,

we answer.

FAQs

Can I use regular yarn instead of plush yarn for this pattern?

Yes, you can use regular worsted weight yarn, but you'll need to adjust your hook size accordingly (typically 3.5-4mm) and the finished size will be smaller. The plush yarn gives these characters their signature soft, cuddly texture.

How do I join the two heart pieces together without gaps?

Make sure to use stitch markers to count your stitches carefully when joining. Work slowly through round 12, ensuring you're crocheting through both loops of each piece. The 7 skipped stitches create the space between the heart lobes.

Should I stuff the entire cat tail or just part of it?

Only stuff the first wider section of the cat tail (through round 11). The striped portion should not be stuffed so it remains flexible and can curve naturally.

What's the best way to embroider the cat's whiskers?

Use strong embroidery thread or dental floss in white or coordinating color. Insert your needle from the back, bring it through near the nose, and create 3-4 straight stitches on each side, securing at the back.

Can I make these in different colors?

Absolutely! These patterns work beautifully in any color combination. Try blue and white for a boy-themed version, pastels for spring, or even rainbow colors for a fun twist.