🧢 Beautiful ✨ Detailed πŸ’ Adorable

Hungry Hamsters Amigurumi Pattern

Hungry Hamsters Amigurumi Pattern
4.6β˜… Rating
3-4 Hours Time Needed
4.0K Made This
βœ‚οΈ

Intermediate Level

Ideal for those with basic knitting experience, featuring slightly more advanced stitches and techniques to expand your skills.

⏱️

Bite-Sized Project

Complete in under 2 hoursβ€”quick, fun, and perfect for a little creative escape.

🧸

Cute Companion

An adorable friend to cherish, handcrafted with love to bring comfort and joy for years to come.

About This Hungry Hamsters Amigurumi Pattern

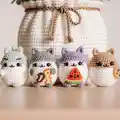
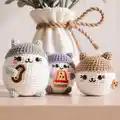
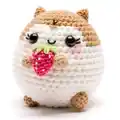
This delightful Hungry Hamsters pattern brings the sweetest little critters to life with their chubby cheeks and tiny paws clutching adorable miniature snacks. Each hamster stands approximately 6cm tall in the palm-sized version or a tiny 3cm in the mini version. The pattern includes detailed instructions for creating multiple food items including cookies, pizza slices, watermelon, strawberries, and acorns. With simple color changes and sweet embroidered details, these hamsters are bursting with personality and charm.

Hungry Hamsters Amigurumi Pattern crochet pattern - detailed view of completed project

What makes this pattern special is the variety of customization options - choose your hamster's color, pick their favorite snack, and create an entire collection of hungry little friends. The pattern works beautifully with both acrylic yarn and mercerized cotton thread for different size variations.

Why You'll Love This Hungry Hamsters Amigurumi Pattern

I absolutely love this pattern because it combines everything that makes amigurumi so rewarding - adorable results, satisfying construction, and endless creative possibilities. The way these little hamsters come together is pure magic, especially when you add those tiny embroidered details that give each one such personality. I find myself smiling every time I attach those little paws around a miniature cookie or strawberry. The size variations mean you can create a whole family of hamsters, and the different snack options keep the project fresh and exciting. What really makes my heart happy is how gift-worthy these turn out - they're the perfect handmade present that always brings joy to anyone who receives one.

Hungry Hamsters Amigurumi Pattern step 1 - construction progress Hungry Hamsters Amigurumi Pattern step 2 - assembly progress Hungry Hamsters Amigurumi Pattern step 3 - details and accessories Hungry Hamsters Amigurumi Pattern step 4 - final assembly and finishing

Switch Things Up

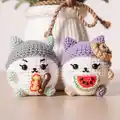
I love experimenting with different color combinations for these hungry hamsters! While the pattern shows beige and white, you could easily create a whole rainbow family using purple, gray, golden brown, or even pastel shades. Each color gives the hamster such a unique personality.

Another fun variation I enjoy is making different sizes by changing your hook and yarn weight. You could go ultra-tiny with embroidery thread for keychain versions, or super chunky with bulky yarn for a huggable plushie. The pattern scales beautifully either way!

I also love mixing and matching the snack options. Why not make a hamster holding a mini cupcake or donut? The basic construction techniques for the included treats can be adapted to create almost any miniature food item you can imagine. Let your creativity run wild with seasonal treats like pumpkins for fall or candy canes for winter!

Common Mistakes & How to Fix Them

βœ— Placing safety eyes too low on the head creating gaps between eyes and colored portion instead of slight touch βœ— Using same size hook for snacks as hamster body resulting in treats that look too large and out of proportion βœ— Forgetting to stuff the body firmly enough before final rounds causing hamster to lose its adorable round shape βœ— Not pinning parts before sewing them permanently which can lead to uneven placement and awkward positioning of limbs

Hungry Hamsters Amigurumi Pattern

Create your own adorable palm-sized hamster friend with this charming crochet pattern! These precious little critters come complete with their favorite snacks - from tiny cookies to pizza slices and strawberries. Perfect for anyone who loves cute amigurumi projects, this pattern includes instructions for both palm-sized and mini versions, plus a variety of sweet treats for your hamster to hold. Watch as these chubby-cheeked cuties come to life, ready to bring smiles and warmth to your crafting collection.

Intermediate 3-4 Hours

Materials Needed for Hungry Hamsters Amigurumi Pattern

β€” Main Fabric

  • 01
    Monaco Mercerized Cotton Thread in beige, white, brown, green, pink, yellow, and dark brown colors
  • 02
    Monaco Acrylic Yarn (3-ply) in beige, white, and various colors for snacks
  • 03
    DMC Embroidery threads in black, brown, white, red, and green for details

β€” Tools Required

  • 01
    Crochet hook size 1.10mm
  • 02
    Crochet hook size 2.25mm
  • 03
    Crochet hook size 0.75mm (optional for micro snacks)
  • 04
    Safety eyes 3mm (for mini hamster)
  • 05
    Safety eyes 6mm (for palm-sized hamster)
  • 06
    Stitch marker
  • 07
    Black embroidery or sewing thread
  • 08
    Tapestry needle
  • 09
    Sewing needle
  • 10
    Toy stuffing
  • 11
    Scissors
  • 12
    Sewing pins

Progress Tracker

0% Complete

β€” Head/Body :

Info :

Use 2.25mm hook and start in beige

Round 1 :

6sc in MR (6)

Round 2 :

inc x6 (12)

Round 3 :

(inc, sc) x6 (18)

Round 4 :

(inc, 2sc) x6 (24)

Round 5 :

(inc, 3sc) x6 (30)

Round 6-7 :

sc around [2 rounds] (30)

Round 8-9 :

s2white sc around [2 rounds] (30)

Info :

Insert eyes between Rounds 8 & 9 (about 6 stitches apart)

Round 10 :

(inc, 4sc) x6 (36)

Round 11-12 :

sc around [2 rounds] (36)

Round 13 :

(inc, 5sc) x6 (42)

Round 14 :

(dec, 5sc) x6 (36)

Round 15 :

(dec, 4sc) x6 (30)

Round 16 :

(dec, 3sc) x6 (24)

Info :

Start filling with polyfill until semi-firm

Round 17 :

(dec, 2sc) x6 (18)

Round 18 :

(dec, sc) x6 (12)

Round 19 :

dec x6 (6)

Info :

Finish off and add more stuffing until body is well-shaped. Sew close

β€” Legs :

Info :

Make 4 in beige. Leave some allowance before you start your chain. Use 2.25mm hook

Instructions :

Ch 2 and hdc in 2nd ch from hook

Info :

Finish off and leave long tail for sewing

β€” Ears :

Info :

Make 2 in beige. Use 2.25mm hook

Round 1 :

Ch2, 4sc in 2nd ch from hook (4)

Round 2 :

(inc, sc) x2 (6)

Info :

Cut thread and leave long tail for sewing

β€” Tail :

Info :

Make in beige. Use 2.25mm hook

Round 1 :

Ch2, 4sc in 2nd ch from hook (4)

Info :

Cut thread and leave long tail for sewing

β€” Cookie A :

Info :

Using 2.25mm hook

Round 1 :

In MR, ch2 then 8 hdc around (8)

Round 2 :

Sl st in each st around (8)

Info :

Leave long yarn tail for sewing. With brown yarn, sew on small chocolate chips

β€” Cookie 2 :

Info :

Using smaller hook and yarn than hamster

Round 1 :

6sc in MR (6)

Round 2 :

inc x6 (12)

Round 3 :

(inc, sc) x6 (18)

Round 4 :

sc around BLO (18)

Round 5 :

(dec, sc) x6 (12)

Round 6 :

dec x6 (6)

Info :

Finish off and leave long tail for sewing. With dark brown thread/yarn, sew small triangles to make choco chips. Sew close

β€” Mini Watermelon/Pizza :

Info :

Using smaller hook and yarn. Color changes indicated for watermelon (W) or pizza (P)

Round 1 :

4sc in MR (4)

Round 2 :

(inc, sc) x2 (6)

Round 3 :

(inc, 2sc) x2 (8)

Round 4 :

(inc, 3sc) x2 (10)

Round 5 :

(inc, 4sc) x2 (12)

Round 6 :

(inc, 5sc) x2 (14)

Infos :

Finish off and leave long tail for sewing. Flatten triangle, making sure that the yarn tail is situated on the side. For watermelon slice, sew on some black thread for watermelon seeds (optional). For pizza slice, embroider 3-4 pepperoni slices with red thread by sewing 4-5 times over the same stitch. Embroider peppers by sewing green thread 2-3 times diagonally randomly on pizza. Sew close by threading yarn tail through back loops of last round

β€” Mini Strawberry :

Info :

Using 1.10mm hook

Round 1 :

6sc in MR (6)

Round 2 :

sc around (6)

Round 3 :

inc x6 (12)

Round 4 :

(inc, 2sc) x4 (16)

Round 5 :

sc around (16)

Round 6 :

(dec, sc) x4 (12)

Round 7 :

dec x6 (6)

Info :

Stuff lightly and finish off with long tail for sewing. Embroider strawberry seeds with white yarn and sew close. Do not cut off yarn tail so you can use it to sew on to the hamster

β€” Strawberry Leaf :

Info :

Make in green

Instructions :

In a magic ring, *ch 2 then sl st in the 2nd ch from hook. Sl st again into the magic ring*. Repeat ** 4 more times

Info :

Leave long tail for sewing and sew on top of strawberry

β€” Mini Acorn :

Info :

Using 1.10mm hook

Round 1 :

6sc in MR (6)

Round 2 :

(inc, sc) x3 (9)

Round 3 :

(inc, 2sc) x3 (12)

Round 4 :

sc around (12)

Round 5 :

(inc, 3sc) x3 (15)

Round 6 :

sc around BLO (15)

Info :

Finish off. Do not sew close

β€” Acorn Cap :

Info :

Make in dark brown

Round 1 :

6sc in MR (6)

Round 2 :

inc x6 (12)

Round 3 :

(inc, sc) x6 (18)

Round 4 :

sl st around (18)

Info :

Finish off with long thread for sewing and sew the front loops of the acorn cap to the edge of the acorn. Embroider a French knot to the top as the nub

Assembly Instructions

  • Pin all individual parts to the body first with sewing pins to ensure you're happy with the placement before permanently sewing
  • Embroider the mouth with black thread: sew a small horizontal dash between the eyes between rounds 7-8, then a vertical line down from center, and two diagonal lines to create a tiny smile
  • Sew two diagonal whisker lines beside the eyes using black thread
  • Attach the ears to the top of the head approximately 6 stitches apart
  • Sew your chosen snack (cookie, strawberry, pizza, watermelon, or acorn) to the center of the white belly portion
  • Position and sew the legs (hands) as if they are holding the snack, using matching sewing thread for invisible stitching
  • Count 2 rounds down from the hands and sew the bottom legs horizontally facing toward the belly, aligning them with the eyes
  • Attach the tail to the back of the hamster around round 15

Important Notes

  • πŸ’‘Use stitch markers to keep track of your rounds especially during color changes from beige to white
  • πŸ’‘The top of the safety eyes should slightly touch the colored portion with no white gaps showing
  • πŸ’‘When crocheting snacks use a hook 3-4 sizes smaller than what you used for the hamster body
  • πŸ’‘Stuff the body firmly but not too tightly to maintain the adorable round hamster shape
  • πŸ’‘For micro crocheting with 0.75mm hook split DMC embroidery thread to use only 3 strands instead of 6
  • πŸ’‘Leave long tails on all small parts for easier sewing and more secure attachment
  • πŸ’‘Pin parts in place before final sewing to ensure proper positioning and balance

This adorable Hungry Hamsters pattern brings the sweetest little companions to life, complete with their favorite miniature treats! Whether you choose to make the palm-sized version or tiny mini hamster, each one is bursting with personality and charm. The variety of snack options means you can create an entire collection of these chubby-cheeked cuties, each clutching their favorite food. Perfect as gifts, desk companions, or additions to your amigurumi collection, these hamsters are sure to bring smiles wherever they go. 🧢 Happy crocheting! 🐹✨

You ask,

we answer.

FAQs

What size will my finished hamster be?

The palm-sized hamster measures approximately 6cm tall when made with 2.25mm hook and Monaco Acrylic Yarn. The mini version measures about 3cm tall when made with 1.10mm hook and Monaco Mercerized Cotton Thread. Your final size may vary slightly depending on tension and yarn choice.

Can I use different yarn than what's recommended?

Absolutely! You can use any yarn weight you prefer, just adjust your hook size accordingly. The key is to use a hook 3-4 sizes smaller than recommended for your yarn when making the snacks so they appear proportionally smaller than the hamster body.

Do I need to make all the snack options?

Not at all! Choose whichever snack appeals to you most. Each hamster only holds one treat, so you can pick your favorite or make multiple hamsters with different foods to create a collection.

What if I can't find 3mm or 6mm safety eyes?

You can substitute with slightly larger or smaller safety eyes (4-5mm for mini, 7-8mm for palm-sized work well). You can also embroider eyes with black thread if you prefer a softer look or if making these for very young children.

Is this pattern suitable for beginners?

Yes! This pattern uses basic amigurumi techniques including magic ring, single crochet, increases, and decreases. If you're comfortable with these stitches and working in continuous rounds, you'll do great. The small size makes it a quick confidence-building project.

How do I prevent gaps around the safety eyes?

Make sure to insert the eyes so the top edge slightly touches the colored portion. If you see white gaps, try using larger eyes or placing them one round higher (between rounds 7-8 instead of 8-9).