๐Ÿงถ Beautiful โœจ Detailed ๐Ÿ’ Adorable

Ice Cream Turtle Amigurumi Pattern

Ice Cream Turtle Amigurumi Pattern
4.8โ˜… Rating
4-5 Hours Time Needed
2.7K Made This
โœ‚๏ธ

Intermediate Level

Ideal for those with basic knitting experience, featuring slightly more advanced stitches and techniques to expand your skills.

โฑ๏ธ

Weekend Treat

Takes 5-7 hours, making it an enjoyable project to finish over a couple of days.

๐Ÿงธ

Cute Companion

An adorable friend to cherish, handcrafted with love to bring comfort and joy for years to come.

About This Ice Cream Turtle Amigurumi Pattern

Ice Cream Turtle Amigurumi Pattern crochet pattern - detailed view of completed project

The pattern includes two color scheme options to suit your style preferences, and the construction technique allows you to attach the legs and tail seamlessly into the body for a polished, professional finish.

Why You'll Love This Ice Cream Turtle Amigurumi Pattern

I absolutely love this pattern because it brings together two of my favorite things: adorable animals and sweet treats! The ruffled ice cream scoops add such a fun texture that makes the turtle look good enough to eat. I appreciate how the pattern walks you through attaching the legs directly into the body rounds, which eliminates bulky seams and creates a much cleaner look. The versatility of choosing between color schemes means you can customize it to match any personality or decor. Plus, working with the soft chenille yarn makes the entire crocheting experience feel luxurious and relaxing.

Ice Cream Turtle Amigurumi Pattern step 1 - construction progress Ice Cream Turtle Amigurumi Pattern step 2 - assembly progress Ice Cream Turtle Amigurumi Pattern step 3 - details and accessories Ice Cream Turtle Amigurumi Pattern step 4 - final assembly and finishing

Switch Things Up

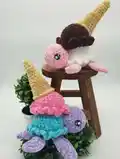
I love experimenting with different color combinations for this ice cream turtle! While the pattern suggests Neapolitan and Cotton Candy schemes, I've had so much fun creating seasonal versions too. Try mint chocolate chip with green and brown, or go wild with rainbow sherbet colors for a vibrant summer vibe.

I also enjoy playing with the cone placement - instead of positioning it slightly off-center, I sometimes place it directly on top for a more symmetrical look, or even tilt it at a dramatic angle for extra personality. You could even make multiple turtles with different ice cream flavors and create an entire dessert-themed collection.

Another variation I adore is adding embroidered details to the ice cream scoops using contrasting yarn colors. Think chocolate chips, sprinkles, or cherry dots worked in with a tapestry needle after assembly. I've also experimented with making the cone striped using alternating tan and light brown rows for that classic waffle cone texture.

For a completely different take, consider making the shell with solid colors instead of the ruffled ice cream design - this creates a more traditional turtle look while keeping the adorable cone hat feature. The possibilities are truly endless with this versatile pattern!

Common Mistakes & How to Fix Them

โœ— Forgetting to work in front loops only for the ruffle rounds can make your ice cream scoops look flat and lifeless instead of dimensional โœ— Not stuffing the ice cream scoops before moving to the next section will leave you with saggy, misshapen layers that lose their appeal โœ— Placing the legs incorrectly during round twenty-two by not paying attention to the curve direction creates awkward positioning and poor balance โœ— Skipping stitch markers when working with fluffy chenille yarn leads to losing your place and creating uneven rounds throughout the project

Ice Cream Turtle Amigurumi Pattern

Create this adorable ice cream turtle that combines the sweetness of a frozen treat with the charm of a friendly reptile. This delightful amigurumi features a colorful ice cream shell with ruffled scoops, cute little legs, and a sugar cone hat that adds the perfect finishing touch. Whether you choose the classic Neapolitan colors or go for a whimsical Cotton Candy palette, this unique turtle will bring smiles to anyone who sees it. Perfect as a gift for ice cream lovers or as a playful addition to your handmade collection.

Intermediate 4-5 Hours

Materials Needed for Ice Cream Turtle Amigurumi Pattern

โ€” Main Fabric

  • 01
    Size 5-6 Bulky Yarn in various colors
  • 02
    Premier Just Chenille - White, Pink, Aqua, Lavender, and Flamingo (Size 6)
  • 03
    Estako Velvet - Brown (similar weight to Premier Just Chenille)
  • 04
    Bernat Velvet - Soft Sunshine in tan color (Size 5)

โ€” Tools Required

  • 01
    Crochet hook size 3.5mm (E)
  • 02
    Safety eyes (12mm)
  • 03
    Tapestry needle
  • 04
    Scissors
  • 05
    Poly-Fil stuffing
  • 06
    Stitch markers (recommended for fluffy yarn)

Progress Tracker

0% Complete

โ€” Front Legs :

Info :

Using Pink (Neapolitan) or Lavender (Cotton Candy) - Make 2

R1 :

8SC in MR (8)

R2 :

Inc (16)

R3 :

SC, Inc (24)

R4 :

3SC, Inc (30)

Info :

SlSt into next St. Fold your circle in half to make a half circle, SC around the half circle through both stitches. BO, there is no need to leave a tail for sewing

โ€” Back Legs :

Info :

Using Pink (Neapolitan) or Lavender (Cotton Candy) - Make 2

R1 :

8SC in MR (8)

R2 :

Inc (16)

R3 :

SC, Inc (24)

Info :

SlSt into next St. Fold your circle in half to make a half circle, SC around the half circle through both stitches. BO, there is no need to leave a tail for sewing

โ€” Tail :

Info :

Using Pink (Neapolitan) or Lavender (Cotton Candy)

R1 :

3SC in MR (3)

R2 :

Inc (6)

R3-5 :

SC (6)

Info :

SlSt, BO, there is no need to leave a tail for sewing

โ€” Head :

Info :

Using Pink (Neapolitan) or Lavender (Cotton Candy)

R1 :

8SC in MR (8)

R2 :

Inc (16)

R3 :

SC, Inc (24)

R4 :

3SC, Inc (30)

R5-8 :

SC (30)

R9 :

SC, Dec (20)

R10 :

2SC, Dec (15)

Info :

SlSt, leave a long tail for sewing (8-9 inches). Add eyes around rows 5-6, about 9-10 stitches apart. Stuff the head

โ€” Shell/Body :

Info :

Begin with the top ice cream scoop color. Brown (Neapolitan) or Flamingo (Cotton Candy)

R1 :

8 SC in MR (8)

R2 :

Inc (16)

R3 :

SC, Inc (24)

R4 :

3SC, Inc (30)

R5-9 :

SC (30)

R10 :

Working in FLO, 3HDC in each stitch, SlSt into the first HDC and BO (90)

R11 :

Attach the same color yarn with a SC into the first stitch of the BLO of R9 and SC around in the rest of the back loops (30)

R12 :

SC, Dec (20)

Info :

Color change to the second ice cream scoop color. White (Neapolitan) or Aqua (Cotton Candy). Add stuffing to the first scoop

R13 :

SC (20)

R14 :

SC, Inc (30)

R15-19 :

SC (30)

R20 :

Working in FLO, 3HDC in each stitch, SlSt into the first HDC and BO (90)

R21 :

Attach the same color yarn with a SC into the first stitch of the BLO of R19 and SC around in the rest of the back loops (30)

R22 :

Grab your legs and tail, this is the row you will SC your pieces into. Place your pieces in front of the stitches of the body, pushing your hook through the leg/tail first then through the body stitch. 3SC, Grab a front leg attach with 3SC, 4SC, Grab a back leg attach with 2SC, 1SC, Grab the tail attach with 4SC, 1SC, Grab the second back leg attach with 2SC, 4SC, Grab the second front leg attach with 3SC, 3SC (30)

R23 :

SC, Dec (20)

Info :

Add stuffing

R24 :

2SC, Dec (15)

R25 :

3SC, Dec (12)

Info :

Add any additional stuffing as desired

R26 :

Dec (6)

Info :

SlSt, cut yarn leaving a short tail to sew the hole closed. Weave the yarn tail back and forth into the stitches around then pull tight to close. Tie to secure and weave the rest into the body

โ€” Cone :

Info :

Using tan color (Bernat - Soft Sunshine)

R1 :

6SC in MR (6)

R2-3 :

SC (6)

R4 :

SC, Inc (9)

Info :

Begin lightly stuffing as you go

R5-7 :

SC (9)

R8 :

2SC, Inc (12)

R9-10 :

SC (12)

R11 :

2SC, Inc (16)

R12-15 :

SC (16)

R16 :

SC, Inc (24)

R17 :

SC in FLO (24)

Info :

SlSt, BO, leave a long tail for sewing (8-9 inches). Add any additional stuffing desired

Assembly Instructions

  • Sew the head onto the bottom ice cream scoop of the body, positioning it underneath the ruffle of the top scoop and evenly centered between the two front legs.
  • Sew the cone onto the top ice cream scoop slightly off to the side or wherever you prefer, stitching into row 16 so that row 17 creates a decorative lip detail.
  • Ensure all legs are securely attached during round 22 with the curves facing the correct direction for proper positioning.
  • When attaching the front legs, make sure the curve is on your right side, and for back legs the curve should be on your left when looking down at your work.
  • Weave in all yarn tails securely to prevent unraveling and maintain the finished appearance of your turtle.

Important Notes

  • ๐Ÿ’กUse stitch markers when working with fluffy chenille yarn to help track your stitches and rounds until you become familiar with the texture
  • ๐Ÿ’กThe Premier Just Chenille yarn is not a super bulky yarn despite being labeled size 6, it's much thinner than Bernat Blanket
  • ๐Ÿ’กWork the ruffle rounds in front loops only to create the dimensional ice cream scoop effect, you will not touch these rows again
  • ๐Ÿ’กWhen attaching legs and tail in round 22, push your hook through the piece first then through the body stitch for secure attachment
  • ๐Ÿ’กStuff each ice cream scoop section before moving to the next color change to maintain proper shape throughout the body
  • ๐Ÿ’กLeave long tails of 8-9 inches when instructed for sewing to ensure you have enough yarn for secure attachment

This whimsical Ice Cream Turtle pattern brings together the best of both worlds - adorable animal charm and delicious dessert aesthetics! The unique shell design with ruffled ice cream scoops and sugar cone topper makes this pattern truly one-of-a-kind. Whether displayed on a shelf or given as a special gift, this turtle is sure to melt hearts everywhere. The soft chenille yarn creates an irresistibly cuddly texture that everyone will want to squeeze. Happy crocheting and enjoy creating your sweet little friend! ๐Ÿฆ๐Ÿขโœจ

You ask,

we answer.

FAQs

Can I use regular worsted weight yarn instead of bulky chenille yarn?

While you can use worsted weight yarn, you'll need to adjust your hook size down to 3.0mm or 2.75mm, and your finished turtle will be significantly smaller than the pattern's 6-7 inch size. The chenille yarn also gives a unique plush texture that's hard to replicate with standard yarn.

How do I create the ruffled ice cream scoop effect?

The ruffle is created by working 3 half double crochets into each stitch while working in the front loops only. This creates the dimensional, rippled edge that looks like melting ice cream. Make sure to only work in the FLO as instructed.

What if I have trouble finding my stitches in the fluffy yarn?

Use stitch markers at the beginning of each round and feel for your stitches with your fingers rather than relying solely on sight. With practice, you'll learn to identify stitches by touch when working with chenille or velvet yarns.

Can I attach the legs by sewing instead of crocheting them into round 22?

While you can sew them on separately, crocheting them directly into the body round creates a much more secure attachment with no visible seams. The pattern is designed for this seamless integration method for the best results.

How should I position the safety eyes on the head?

Place the 12mm safety eyes around rows 5-6 of the head, spacing them about 9-10 stitches apart. Insert them before stuffing the head completely so you can secure the backing washers from the inside.