🧢 Beautiful ✨ Detailed πŸ’ Adorable

Jessy and Woody Toy Story Amigurumi Pattern

Jessy and Woody Toy Story Amigurumi Pattern
4.4β˜… Rating
12-15 Hours Time Needed
2.2K Made This
βœ‚οΈ

Intermediate Level

Ideal for those with basic knitting experience, featuring slightly more advanced stitches and techniques to expand your skills.

⏱️

Slow & Steady

A 10-12 hour projectβ€”great for savoring the process over several sessions.

🧸

Cute Companion

An adorable friend to cherish, handcrafted with love to bring comfort and joy for years to come.

About This Jessy and Woody Toy Story Amigurumi Pattern

This enchanting Jessy and Woody pattern brings two beloved Toy Story characters to your crochet hook! With detailed instructions for creating their distinctive features including terracotta and brown hair, custom hats, and authentic western wear, you'll craft a pair of friends ready for any adventure. The pattern includes both characters with their unique outfits and accessories.

Jessy and Woody Toy Story Amigurumi Pattern crochet pattern - detailed view of completed project

Each doll stands approximately 6-7 inches tall when completed with the recommended yarn and hook sizes. The pattern features detailed color changes and embroidery techniques to bring these Disney characters to life.

Why You'll Love This Jessy and Woody Toy Story Amigurumi Pattern

I absolutely love how this pattern captures the essence of these iconic characters! The attention to detail in their facial features, from the embroidered eyes to the toned cheeks, makes them instantly recognizable. I find the color-changing sections for their outfits particularly satisfying to work on, and watching Jessy's cow-print chaps and Woody's classic cowboy look come together is truly rewarding. The structured approach with clear round-by-round instructions makes even complex sections manageable, and seeing these beloved friends take shape under your hook is pure magic!

Jessy and Woody Toy Story Amigurumi Pattern step 1 - construction progress Jessy and Woody Toy Story Amigurumi Pattern step 2 - assembly progress Jessy and Woody Toy Story Amigurumi Pattern step 3 - details and accessories Jessy and Woody Toy Story Amigurumi Pattern step 4 - final assembly and finishing

Switch Things Up

I love how versatile this Jessy and Woody pattern can be once you master the basic structure! While the classic color scheme is iconic, I have experimented with creating seasonal variationsβ€”imagine a winter Woody in a cozy blue scarf or a spring Jessy with floral accents on her hat. You could also adjust the size by using thicker yarn and a larger hook to create bigger display dolls, or go miniature with thread crochet for adorable keychain versions.

I have found that changing the hair texture by using different stitch techniques in the hair rounds creates wonderfully unique results. For Jessy, try adding some loop stitches to give her hair more volume and texture, or for Woody, create a more structured look with surface crochet lines. The waistcoat design works beautifully as a template for other character variations too.

What I really enjoy is personalizing the facial expressions by adjusting the eye placement and embroidery details. Moving the eyes slightly closer or further apart, or changing the nose shape, can give each doll its own unique personality. The cow-print technique can also be adapted to create other patterns like stars, stripes, or even hearts, making these dolls perfect for themed gifts throughout the year.

Common Mistakes & How to Fix Them

βœ— Not maintaining consistent tension throughout color changes, which can cause gaps or puckering in the fabric between sections βœ— Forgetting to stuff the head and body firmly before closing, resulting in a floppy finished doll that won't stand properly βœ— Misplacing safety eyes or sewing ears at incorrect positions, which drastically affects the character's recognizable appearance and facial expression βœ— Skipping stitch markers when working in continuous rounds, leading to miscounts and misshapen body parts that don't match the pattern specifications

Jessy and Woody Toy Story Amigurumi Pattern

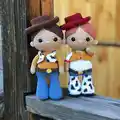
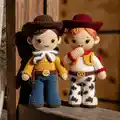
Bring the magic of Toy Story to life with this delightful Jessy and Woody amigurumi pattern! These adorable cowboy and cowgirl characters are crafted with attention to detail, featuring their iconic hats, waistcoats, and signature outfits. Perfect for Disney fans and collectors, this pattern creates charming companions that capture the spirit of friendship and adventure from the beloved movie.

Intermediate 12-15 Hours

Materials Needed for Jessy and Woody Toy Story Amigurumi Pattern

β€” Main Fabric

  • 01
    Drops Safran yarn in bordeaux (20), red clay (59), brown (23), and strong yellow (11)
  • 02
    Drops I Love You 7 yarn in dark grey (04)
  • 03
    Drops I Love You 9 yarn in jeans blue (115)
  • 04
    Alize Cotton Gold yarn in white (55), brown (493), red (56), mustard (02), and beige (152)

β€” Tools Required

  • 01
    Crochet hook size 2mm
  • 02
    Crochet hook size 3mm
  • 03
    Plastic safety eyes 7-8mm diameter
  • 04
    Scissors
  • 05
    Fiber filling (stuffing)
  • 06
    Tapestry needle for sewing
  • 07
    Stitch markers
  • 08
    Indelible marker for adding spots/details (optional)

Progress Tracker

0% Complete

β€” Head :

Info :

Start working with main color

Round 1 :

6 sc in mr

Round 2 :

6 inc (12)

Round 3 :

(1 sc, inc) x 6 (18)

Round 4 :

(2 sc, inc) x 6 (24)

Round 5 :

(3 sc, inc) x 6 (30)

Round 6 :

(4 sc, inc) x 6 (36)

Round 7 :

(5 sc, inc) x 6 (42)

Round 8 :

(6 sc, inc) x 6 (48)

Round 9 :

(7 sc, inc) x 6 (54)

Round 10-19 :

54 sc

Info :

Between the 15-16 rows insert safety eyes, 7-8 mm in diameter

Round 20 :

(7 sc, dec) x 6 (48)

Round 21 :

(6 sc, dec) x 6 (42)

Round 22 :

(5 sc, dec) x 6 (36)

Round 23 :

(4 sc, dec) x 6 (30)

Round 24 :

(3 sc, dec) x 6 (24)

Round 25 :

(2 sc, dec) x 6 (18)

Info :

Stuff. Leave a long tail for sewing

β€” Hair (Jessy) :

Info :

Start working with terracotta color

Round 1 :

6 sc in mr

Round 2 :

6 inc (12)

Round 3 :

(1 sc, inc) x 6 (18)

Round 4 :

(2 sc, inc) x 6 (24)

Round 5 :

(3 sc, inc) x 6 (30)

Info :

Expand crochet and continue work in turning rows

Round 6 :

(4 sc, inc) x 6, ch (36)

Round 7 :

(5 sc, inc) x 6, ch (42)

Round 8 :

(6 sc, inc) x 6, ch (48)

Round 9 :

(7 sc, inc) x 6, ch (54)

Round 10 :

(8 sc, inc) x 6, ch (60)

Round 11 :

Dec, 56 sc, dec, ch (58)

Round 12 :

2 dec, 50 sc, 2 dec, ch (54)

Round 13 :

2 dec, 46 sc, 2 dec, ch (50)

Round 14 :

2 dec, 42 sc, 2 dec, ch (46)

Round 15 :

2 dec, 38 sc, 2 dec, ch (42)

Round 16 :

2 dec, 34 sc, 2 dec, ch (38)

Round 17 :

38 sc

Round 18 :

Continue crochet round bangs hair: 24 sc

Round 19 :

38 sc

Info :

Leave a long tail for sewing

β€” Hair (Woody) :

Info :

Start working with brown color

Round 1 :

6 sc in mr

Round 2 :

6 inc (12)

Round 3 :

(1 sc, inc) x 6 (18)

Round 4 :

(2 sc, inc) x 6 (24)

Round 5 :

(3 sc, inc) x 6 (30)

Info :

Expand crochet and continue work in turning rows

Round 6 :

(4 sc, inc) x 6, ch (36)

Round 7 :

(5 sc, inc) x 6, ch (42)

Round 8 :

(6 sc, inc) x 6, ch (48)

Round 9 :

(7 sc, inc) x 6, ch (54)

Round 10 :

(8 sc, inc) x 6, ch (60)

Round 11 :

Dec, 56 sc, dec, ch (58)

Round 12 :

2 dec, 50 sc, 2 dec, ch (54)

Round 13 :

2 dec, 46 sc, 2 dec, ch (50)

Round 14 :

2 dec, 42 sc, 2 dec, ch (46)

Round 15 :

2 dec, 38 sc, 2 dec, ch (42)

Round 16 :

2 dec, 34 sc, 2 dec, ch (38)

Round 17 :

38 sc

Round 18 :

Continue crochet round bangs hair: 24 sc

Round 19 :

38 sc

Info :

Leave a long tail for sewing

β€” Ears (x2) :

Info :

Start working with main color

Round 1 :

6 sc in mr

Info :

Leave a long tail for sewing

β€” Hat (Jessy) :

Info :

Start working with burgundy color

Round 1 :

6 sc in mr

Round 2 :

6 inc (12)

Round 3 :

(1 sc, inc) x 6 (18)

Round 4 :

(2 sc, inc) x 6 (24)

Round 5 :

(3 sc, inc) x 6 (30)

Round 6 :

(4 sc, inc) x 6 (36)

Round 7 :

BLO 36 sc

Round 8-11 :

36 sc

Round 12 :

BLO (5 sc, inc) x 6 (42)

Round 13 :

3 sc, inc, (6 sc, inc) x 5, 3 sc (48)

Round 14 :

(7 sc, inc) x 6 (54)

Round 15 :

4 sc, inc, (8 sc, inc) x 5, 4 sc (60)

Round 16 :

(9 sc, inc) x 6 (66)

Round 17 :

5 sc, inc, (10 sc, inc) x 5, 5 sc (72)

Round 18 :

(11 sc, inc) x 6 (78)

Round 19 :

78 sc

Info :

Sew the hat on to the head

β€” Hat (Woody) :

Info :

Start working with brown color

Round 1 :

6 sc in mr

Round 2 :

6 inc (12)

Round 3 :

(1 sc, inc) x 6 (18)

Round 4 :

(2 sc, inc) x 6 (24)

Round 5 :

(3 sc, inc) x 6 (30)

Round 6 :

(4 sc, inc) x 6 (36)

Round 7 :

BLO 36 sc

Round 8-11 :

36 sc

Round 12 :

BLO (5 sc, inc) x 6 (42)

Round 13 :

3 sc, inc, (6 sc, inc) x 5, 3 sc (48)

Round 14 :

(7 sc, inc) x 6 (54)

Round 15 :

4 sc, inc, (8 sc, inc) x 5, 4 sc (60)

Round 16 :

(9 sc, inc) x 6 (66)

Round 17 :

5 sc, inc, (10 sc, inc) x 5, 5 sc (72)

Round 18 :

(11 sc, inc) x 6 (78)

Round 19 :

78 sc

Info :

Sew the hat on to the head

Assembly Instructions

  • Sew ears to the head between rounds 16-17, maintaining a distance of 5-6 sc from the safety eyes
  • Attach the hair piece securely to the top of the head, ensuring it covers the crown area evenly
  • Embroider the nose and add white thread details around the eyes, then tone the cheeks
  • Attach the completed head to the body, making sure it is centered and secured firmly
  • Sew the hands to the sides of the body at shoulder height
  • For Jessy, sew the yellow belt detail and mark cow-print spots on legs
  • For Woody, attach the brown belt and add details to the waistcoat, then sew the hat to the head

Important Notes

  • πŸ’‘Use stitch markers consistently to track rounds, especially during color changes between outfit sections
  • πŸ’‘Stuff all body parts firmly but not too tightly to maintain proper shape
  • πŸ’‘When changing colors, carry yarn on the inside to avoid visible lines
  • πŸ’‘Pin all pieces in place before final sewing to ensure proper positioning
  • πŸ’‘Keep consistent tension throughout the project, particularly when working with multiple yarn brands
  • πŸ’‘The waistcoats are worked in turning rows, so remember to chain at the end

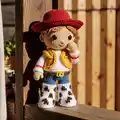
This charming Jessy and Woody pattern captures the heart of Toy Story's most beloved cowboy duo! Designed with meticulous attention to their iconic details, from Jessy's fiery terracotta hair and burgundy hat to Woody's classic brown cowboy hat and cow-print vest, these amigurumi dolls bring Disney magic into your hands. Perfect display pieces or treasured gifts for Toy Story fans of all ages. 🀠🧢✨

You ask,

we answer.

FAQs

What size will the finished dolls be?

When using the recommended yarn weights and hook sizes, both Jessy and Woody will measure approximately 6-7 inches tall, making them perfect display-sized collectibles.

Can I use different yarn brands than specified?

Yes, you can substitute with any sport or DK weight yarn in similar colors. Just ensure you maintain consistent tension and adjust your hook size if needed.

How do I add the cow-print pattern to the clothes?

You can either use an indelible fabric marker to draw the spots directly onto the white fabric, or use a smaller hook with black yarn to crochet small patches and sew them on.

Do I need to make both characters or can I make just one?

The pattern includes instructions for both characters, but you can absolutely choose to make just Jessy or just Woody independently.

Are these dolls suitable for young children?

These dolls use safety eyes and small parts, so they are best suited for older children and adults. If making for young children, consider embroidering the eyes instead.

What is the most challenging part of this pattern?

The color changes in the clothing and the turning rows for the waistcoats require intermediate skills. The hair construction with its turning rows technique is also slightly more advanced.