🧢 Beautiful ✨ Detailed πŸ’ Adorable

Lady Liberty Amigurumi Pattern

Lady Liberty Amigurumi Pattern
4.1β˜… Rating
4-5 Hours Time Needed
3.8K Made This
βœ‚οΈ

Intermediate Level

Ideal for those with basic knitting experience, featuring slightly more advanced stitches and techniques to expand your skills.

⏱️

Weekend Treat

Takes 5-7 hours, making it an enjoyable project to finish over a couple of days.

πŸŽ„

Holiday Cheer

Festive fun for the season, bringing handmade magic to celebrations and creating new family traditions.

About This Lady Liberty Amigurumi Pattern

This Lady Liberty amigurumi pattern captures the essence of America's most iconic symbol in a sweet, crocheted form. Standing proud at 5 inches tall with her crown, she holds her torch high and clutches a book representing freedom and independence. The pattern includes intricate details like a draped dress with shoulder detail, carefully crafted hair with decorative loops, and accessories that bring this patriotic figure to life in miniature form.

Lady Liberty Amigurumi Pattern crochet pattern - detailed view of completed project

Working with pale green yarn and a 2mm hook, you'll create a charming figure perfect for 4th of July celebrations or as a meaningful gift. The pattern uses basic stitches combined with clever construction techniques to achieve impressive results.

Why You'll Love This Lady Liberty Amigurumi Pattern

I absolutely love how this pattern transforms simple stitches into such a recognizable and meaningful figure! The clever construction of the dress with its draped detail adds authenticity, while the crown with its seven points creates that iconic silhouette we all know. What really makes me smile is how the tiny torch and book come together perfectly, and the hair design with its loop details adds such character. It's rewarding to watch each piece come together, and seeing the finished Lady Liberty standing proud makes every stitch worthwhile. Plus, it's the perfect size for display or gifting during patriotic celebrations!

Lady Liberty Amigurumi Pattern step 1 - construction progress Lady Liberty Amigurumi Pattern step 2 - assembly progress Lady Liberty Amigurumi Pattern step 3 - details and accessories Lady Liberty Amigurumi Pattern step 4 - final assembly and finishing

Switch Things Up

I love how versatile this Lady Liberty pattern can be with just a few creative tweaks! While the classic pale green is iconic, you could experiment with bright copper or bronze tones to represent the statue before oxidation, creating a unique historical piece. For a more whimsical approach, try pastel colors for a softer, nursery-friendly version, or go bold with red, white, and blue for an extra patriotic touch.

The dress detail is perfect for customization too. You could add tiny stars embroidered on the dress using white thread, or create stripes using different shades of green. I've thought about adding a small American flag pin or badge to the dress detail for extra flair during July 4th celebrations.

The crown offers wonderful opportunities for embellishment as well. Consider adding tiny beads to the points for a jeweled effect, or use metallic thread to edge the crown for a shimmering, regal appearance. You could even make multiple crowns and swap them out for different occasions!

For the torch, switching up the flame colors can create different effects. Try orange and red gradient flames for a more realistic fire look, or use glitter yarn for a magical, sparkly torch. You could also make the book in different colors and even embroider tiny letters or dates on it for personalization. These small changes can transform your Lady Liberty into a truly one-of-a-kind creation while keeping the beloved silhouette we all recognize!

Common Mistakes & How to Fix Them

βœ— Forgetting to work in the third loop when starting the dress, which creates the proper texture and structure for the garment base βœ— Not stuffing the body firmly enough before attaching the dress, resulting in a floppy figure that won't stand properly with the crown βœ— Skipping the back post stitches on the body and torch, which creates essential definition and prevents the pieces from looking flat βœ— Sewing the crown incorrectly by not aligning it above the double crochet round, causing it to sit crooked or fall forward

Lady Liberty Amigurumi Pattern

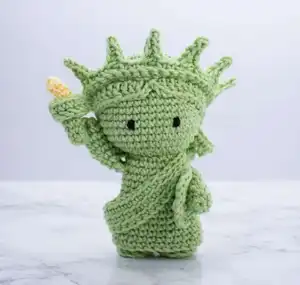
Create your own adorable Lady Liberty amigurumi with this charming 4th of July crochet pattern! Standing at 5 inches tall with her iconic crown, this patriotic design features a detailed dress with decorative elements, a torch with flame, and a book representing freedom. Perfect for celebrating Independence Day or adding a meaningful piece to your handmade collection, this pattern combines simple techniques with delightful details to bring America's beloved symbol to life in soft, huggable form.

Intermediate 4-5 Hours

Materials Needed for Lady Liberty Amigurumi Pattern

β€” Main Fabric

  • 01
    Pale green 3ply 100% cotton yarn (approximately 50g/sports weight)
  • 02
    Small amount of yellow yarn for the flame
  • 03
    Black thread for embroidering the eyes

β€” Tools Required

  • 01
    2mm crochet hook
  • 02
    Sewing needle
  • 03
    Scissors
  • 04
    Pins for assembly
  • 05
    Hypoallergenic polyester stuffing material

Progress Tracker

0% Complete

β€” Dress :

Info :

With pale green chain 26 and start crocheting in the first chain, closing a circle. For the first round, you will crochet in the third loop of the chain

Round 1-6 :

26 sc

Round 7 :

5 sc, 1 dec, 12 sc, 1 dec, 5 sc (24)

Round 8-12 :

24 sts

Round 13 :

(2 sc, 1 dec) repeat 6 times (18)

Info :

Join with a slip stitch. Cut the yarn and fasten it off

β€” Dress Detail :

Info :

With pale green chain 35. Start crocheting in the first chain, closing a circle

Round 1 :

10 sl, 25 sc

Round 2-3 :

10 blsl, 25 blsc

Info :

Join with a sl. Cut the yarn and fasten it off. Leave a small tail for sewing it

β€” Body :

Info :

With pale green yarn start. Make 2 legs following these instructions

Round 1 :

6 sc in a magic ring

Round 2 :

6 inc (12)

Round 3 :

12 bpsc

Round 4-5 :

12 sc

Info :

Cut the yarn and fasten off the first leg. Don't fasten off the second leg and connect the two legs by inserting the loop of the needle inside one stitch of the first leg

Round 6 :

24 sc (12 from each leg)

Round 7-10 :

24 sc

Round 11 :

(6 sc, 1 dec) repeat 3 times (21)

Round 12-14 :

21 sc

Round 15 :

(5 sc, 1 dec) repeat 3 times (18)

Round 16 :

18 sc

Info :

Stop here for adding stuffing material before continuing. For the next round, you will crochet together with the dress

Round 17 :

18 sc

Round 18 :

18 blsl

Info :

For the next round, you will work only in the remaining front loop of the previous round

Round 19 :

FL (1 sc, 1 inc) repeat 9 times (27)

Round 20 :

(2 sc, 1 inc) repeat 9 times (36)

Round 21 :

(5 sc, 1 inc) repeat 6 times (42)

Round 22-29 :

42 sc

Round 30 :

(5 sc, 1 dec) repeat 6 times (36)

Round 31 :

(4 sc, 1 dec) repeat 6 times (30)

Round 32 :

(3 sc, 1 dec) repeat 6 times (24)

Round 33 :

(2 sc, 1 dec) repeat 6 times (18)

Info :

Stop here to finish stuffing the doll

Round 34 :

(1 sc, 1 dec) repeat 6 times (12)

Info :

Cut the yarn, fasten it off and hide the remaining tail inside the toy

β€” Arms :

Info :

Continue working with the green. Make 2 pieces

Round 1 :

6 sc in a magic ring

Round 2 :

(2 sc, 1 inc) repeat 2 times (8)

Round 3-8 :

8 sc

Round 9 :

4 sc (crocheting the sides together, closing the arms)

Info :

Cut the yarn and fasten it off. Leave a small tail for sewing it

β€” Crown :

Info :

With pale green chain 28. Skip the first chain and start

Row 1 :

27 sc, chain 1, turn

Row 2 :

1 blsc, (chain 5, skip the first chain, 1 sl, 1 sc, 1 hdc, 1 dc, skip one st from the foundation, 3 blsc) repeat 7 times, 1 blsc

Info :

Cut the yarn and fasten it off. Leave a tail for sewing it

β€” Hair :

Info :

With pale green yarn start

Round 1 :

6 sc in a magic ring

Round 2 :

6 inc (12)

Round 3 :

(1 sc, 1 inc) repeat 6 times (18)

Round 4 :

(2 sc, 1 inc) repeat 6 times (24)

Round 5 :

(3 sc, 1 inc) repeat 6 times (30)

Round 6 :

(4 sc, 1 inc) repeat 6 times (36)

Round 7 :

(5 sc, 1 inc) repeat 6 times (42)

Round 8-11 :

42 sc

Round 12 :

chain 2, 12 dc, chain 2, 1 sl, chain 2, 12 dc, chain 2, 1 sc, (chain 7, skip the first chain, 6 sc, join with sc) repeat 16 times

Info :

Cut the yarn and fasten it off. Leave a long tail for sewing it

β€” Torch :

Info :

With pale green start

Round 1 :

4 sc in a magic ring

Round 2 :

4 sc

Round 3 :

(1 inc, 1 sc) repeat 2 times (6)

Round 4 :

6 sc

Round 5 :

6 FL inc (12)

Round 6 :

12 bpsc

Round 7 :

12 sc

Info :

Join with a sl. Cut the yarn, fasten it off and leave a small tail for sewing

β€” Flame :

Info :

With yellow start

Round 1 :

6 sc in a magic ring

Round 2-3 :

6 sc

Round 4 :

(2 sc, 1 inc) repeat 2 times (8)

Round 5 :

8 sc

Info :

Cut the yarn and fasten it off. Sew the flame inside the torch

β€” Book :

Info :

Chain 5. Skip the first chain and start

Row 1-4 :

4 sc, chain 1 and turn

Info :

After row 4, crochet the contour around the detail following: 3 sc in the corner, 4 sc going down, 3 sc in the next corner, 3 sc, 3 sc in the next corner, 4 sc. Join with a sl

Assembly Instructions

  • Place the hair on Lady Liberty's head, use pins to fasten the hair to prevent moving while sewing it. Sew all around the hair.
  • Sew the crown above the round with the double crochet on the hair piece.
  • Sew the left arm between rounds 7 and 11 of the body.
  • Dress the dress detail, placing it over the left shoulder. Sew it around the body.
  • Place the book on her left hand and sew it securely in place.
  • Sew the right arm in round 11, taking 4 stitches in length. Add a small stitch to sew the arm on her face so it remains standing upright.
  • Sew the torch in the third round of the right arm.
  • Embroider the eyes in round 24 leaving 5 stitches between them using black thread.

Important Notes

  • πŸ’‘Work in the third loop when starting the dress for proper texture and structure
  • πŸ’‘Use pins to hold all pieces in place before sewing to ensure proper positioning and symmetry
  • πŸ’‘Stuff the body firmly before attaching the dress to maintain shape and allow the figure to stand properly
  • πŸ’‘Pay attention to back post stitches as they create essential definition throughout the pattern
  • πŸ’‘Leave long tails on pieces that need to be sewn for easier assembly and more secure attachment
  • πŸ’‘The crown should be positioned above the double crochet round on the hair for proper placement
  • πŸ’‘Embroider eyes carefully with proper spacing to achieve the correct facial expression

This charming Lady Liberty pattern brings an iconic American symbol to life in adorable amigurumi form! Perfect for Independence Day celebrations or as a meaningful gift, this design combines clever construction techniques with patriotic details. The draped dress, crowned head, and tiny accessories come together to create a figure that's both recognizable and absolutely huggable. Whether you're celebrating freedom or simply love detailed amigurumi projects, this pattern delivers a rewarding crochet experience! πŸ—½πŸ§Άβœ¨

You ask,

we answer.

FAQs

What yarn weight should I use for this pattern?

The pattern calls for 3ply 100% cotton yarn (sports weight, approximately 50g) in pale green. Using the recommended yarn weight with a 2mm hook will give you a finished size of about 5 inches (13 cm) with the crown.

What is the third loop of the chain and why is it important?

The third loop is located on the back/underside of the chain. Working in this loop when starting the dress creates a specific texture and structure that gives the garment its proper appearance. There's a reference video at minute 0:52 in the original pattern notes.

Can I use different colors for this pattern?

While the traditional Lady Liberty uses pale green to represent the oxidized copper, you can certainly experiment with other colors! Just maintain the yellow for the flame to keep the torch recognizable.

How do I make the crown points stand up properly?

The crown is made with chain loops that naturally create pointed peaks. Make sure to follow the stitch pattern carefully in row 2, which includes chain 5 loops worked with decreasing stitch heights (sl, sc, hdc, dc) to form each point.

Do I need to stuff all the pieces?

The main body and head need to be stuffed firmly to maintain shape and allow the figure to stand. The arms can be lightly stuffed or left flat depending on your preference. The torch should have light stuffing, and the flame is sewn inside it.

How do I attach the dress to the body?

You'll crochet the dress separately first, then in round 17 of the body, you'll work through both the body stitches and the dress edge simultaneously to join them together. This creates a seamless attachment.

What size should the finished figure be?

Using the recommended 2mm hook and 3ply cotton yarn, the finished Lady Liberty should measure approximately 5 inches (13 cm) tall including the crown. Size may vary slightly depending on tension and stuffing firmness.