🧢 Beautiful ✨ Detailed πŸ’ Adorable

Lilo and Stitch Purse Crochet Pattern

Lilo and Stitch Purse Crochet Pattern
4.1β˜… Rating
4-5 Hours Time Needed
4.2K Made This
βœ‚οΈ

Intermediate Level

Ideal for those with basic knitting experience, featuring slightly more advanced stitches and techniques to expand your skills.

⏱️

Weekend Treat

Takes 5-7 hours, making it an enjoyable project to finish over a couple of days.

🎁

Tiny Treasure

Small, sweet, and gift-worthy creations that fit perfectly in the palm of your hand with detailed charm.

About This Lilo and Stitch Purse Crochet Pattern

Lilo and Stitch Purse Crochet Pattern crochet pattern - detailed view of completed project

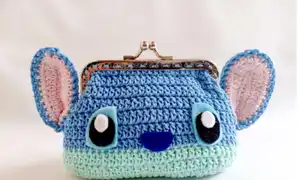
The pattern works up relatively quickly using double crochet stitches for the main body and incorporates color changes to create Stitch's distinctive appearance. The ears are created separately and attached to complete the charming character-inspired design.

Why You'll Love This Lilo and Stitch Purse Crochet Pattern

I absolutely love this pattern because it combines cuteness with functionality in such a clever way. There's something magical about transforming yarn into a beloved Disney character that can actually be used every day. I appreciate how the metal clasp frame elevates this from a simple pouch to a sophisticated little purse that looks store-bought. The color combination of soft pink and cheerful blue creates such a happy, nostalgic feeling that reminds me why I fell in love with Lilo and Stitch in the first place. Plus, watching those iconic ears come together is incredibly satisfying!

Lilo and Stitch Purse Crochet Pattern step 1 - construction progress Lilo and Stitch Purse Crochet Pattern step 2 - assembly progress Lilo and Stitch Purse Crochet Pattern step 3 - details and accessories Lilo and Stitch Purse Crochet Pattern step 4 - final assembly and finishing

Switch Things Up

I absolutely love experimenting with this pattern to make it uniquely mine! Instead of the traditional blue and pink, I've tried making Angel (Stitch's girlfriend) by using purple and lavender yarns with darker purple for the ears. The color swap completely transforms the character while using the exact same pattern structure.

For a more subtle everyday accessory, I've created versions in neutral colors like gray and cream, which gives you the adorable ear shape without the obvious character reference. I've also scaled up the pattern by using bulkier yarn and a larger hook to create a full-sized handbag with a bigger clasp frame, perfect for carrying daily essentials while still showing off that Stitch charm.

I love adding embellishments too! I've sewn tiny flowers near one ear for a Lilo-inspired touch, or attached a small crocheted lei around the purse for extra Hawaiian flair. Sometimes I'll add a small charm or keychain attachment to the clasp for personalization. You could even make matching sets by creating smaller versions as keychains using the same color scheme. The ears are also perfect for experimenting with different textures by using fuzzy or sparkly yarn just for those pieces while keeping the body smooth. Don't be afraid to play with the facial expression eitherβ€”moving the eye placement slightly or changing the mouth shape can give your Stitch purse its own unique personality!

Common Mistakes & How to Fix Them

βœ— Forgetting to count stitches carefully in the foundation chain can throw off the entire purse shape and symmetry throughout the project. βœ— Not maintaining consistent tension when changing colors between blue and pink sections can create visible gaps or puckering in the finished piece. βœ— Rushing the ear assembly without properly aligning the pink and blue pieces together results in ears that look uneven or misshapen. βœ— Skipping the slip stitch connections at the end of rows causes the purse to lose its oval shape and creates an uneven edge for frame attachment.

Lilo and Stitch Purse Crochet Pattern

Create your very own adorable Stitch-inspired coin purse with this charming crochet pattern! This delightful project combines soft pink and vibrant blue yarns to capture Stitch's lovable personality in a functional accessory. Perfect for storing coins, small trinkets, or carrying as a cute statement piece, this purse features Stitch's iconic big ears and sweet facial details. The pattern includes a metal clasp frame for easy opening and closing, making it both practical and decorable for Disney fans of all ages.

Intermediate 4-5 Hours

Materials Needed for Lilo and Stitch Purse Crochet Pattern

β€” Main Fabric

  • 01
    Cotton or acrylic yarn in blue color (for main body)
  • 02
    Cotton or acrylic yarn in soft pink color (for inner ears and details)
  • 03
    Cotton or acrylic yarn in light blue or mint green (optional for belly area)
  • 04
    Medium weight yarn recommended (worsted weight)

β€” Tools Required

  • 01
    Crochet hook size suitable for medium weight yarn (3.5mm-4mm)
  • 02
    Metal clasp purse frame (approximately 8-10cm width)
  • 03
    Yarn needle for sewing
  • 04
    Scissors
  • 05
    Stitch markers
  • 06
    Safety eyes or felt pieces for facial features
  • 07
    Black and white felt for eyes and nose details
  • 08
    Fabric glue or needle and thread for attaching clasp frame

Progress Tracker

0% Complete

β€” Main Purse Body :

Foundation :

Start make ch 17

Row 1 :

ch 3, start dc from the fifth ch from hook, dc in next 15 st, (inc, dc, inc, inc) in last st. Dc in next 16 st (in opposite side), inc 2 times in same st, sl to the first dc we made. (42)

Row 2 :

Ch 3, Start dc in the corner near ch 3, dc in next 15 st, (inc in next st) 7 times, dc in next 15 st, (inc in next st) 7 times, dc in next 15 st (inc in next st) 5 times, sl (55)

Row 3 :

Ch 3, Start dc in the corner near ch 3, dc in next 16 st (inc, dc in next st) 7 times, dc in next 16 st, (inc, dc in next) 4 times, inc in next st, sl (68)

Row 4-5 :

ch 3, dc in each st (68)

Info :

Changing color

Row 6-12 :

ch 3, dc in each st (68)

β€” Ears (Make 4 pieces: 2 soft pink, and 2 blue) :

Foundation :

Ch 12

Row 1 :

Start in the second of st, sc 10 in next st, 3 sc in the last. Sc in next 10 st and inc in the last st, sl (in opposite side) (25)

Row 2 :

ch 3, sc in next 10 sts, 3 sc in next st, start in opposite sc in next 10 sts, inc (25)

Row 3 :

ch 3, dc in next 5 sts, hdc in next 5 sts, sc, inc, sc in next 3 sts, hdc in next 5 sts, dc in next 5 sts, fasten off

Assembly :

Join pink and blue ear with sc in each st

Assembly Instructions

  • Attach the metal clasp frame to the top opening of the purse body by sewing carefully around the frame or using fabric glue for a secure hold.
  • Position the two completed ears (pink and blue joined) on either side of the purse near the top corners and sew them securely in place.
  • Create Stitch's face by attaching safety eyes or cutting and gluing felt eye pieces to the front of the purse between the ears.
  • Cut a small nose shape from black felt and attach it below the eyes using fabric glue or careful stitching.
  • Add any additional facial details such as Stitch's characteristic mouth line or markings using embroidery thread or felt pieces.
  • Weave in all yarn ends securely and trim excess to ensure a neat finish throughout the purse.
  • Give the purse a light blocking or steaming if needed to help it maintain its shape and sit nicely with the frame attached.

Important Notes

  • πŸ’‘Use stitch markers at the beginning of each row to help keep accurate stitch counts throughout the oval-shaped construction
  • πŸ’‘When changing colors between rows, carry the yarn along the inside if continuing with that color to avoid multiple ends to weave in
  • πŸ’‘The metal clasp frame should be measured and selected before starting the project to ensure proper fit with the 68-stitch circumference
  • πŸ’‘Keep tension consistent especially in the foundation rows as this determines the overall shape and symmetry of the finished purse
  • πŸ’‘Test your fabric glue on a yarn scrap first if using it to attach the frame instead of sewing to ensure it doesn't bleed through
  • πŸ’‘Pin the ears in position before permanently attaching to ensure they're symmetrical and positioned at the desired angle

This enchanting Lilo and Stitch purse pattern lets you carry a little piece of ohana wherever you go! Combining practical craftsmanship with beloved character design, this project creates a functional accessory that's sure to bring smiles. The adorable ear details and sweet facial features make this purse perfect for Disney lovers and a wonderful way to showcase your crochet skills. Whether you keep it for yourself or gift it to a fellow Stitch fan, this charming coin purse is destined to become a treasured keepsake. 🧢 Happy crocheting! πŸ’™βœ¨

You ask,

we answer.

FAQs

What size should my metal clasp frame be for this pattern?

The pattern creates an opening of 68 stitches worked in double crochet, which typically fits an 8-10cm (3-4 inch) metal clasp frame. However, it's best to measure your specific frame and adjust the final rows if needed to ensure a perfect fit.

Can I make this purse larger or smaller?

Yes! To adjust the size, simply start with more or fewer chains in the foundation (keeping it an odd number works best), and adjust the increase rows proportionally. Remember to select an appropriately sized clasp frame for your modified dimensions.

How do I attach the metal clasp frame securely?

You can either hand-sew the purse edge to the frame using strong thread and a running stitch around the channel, or use fabric glue specifically designed for textiles. Sewing is more durable for heavy use, while gluing is faster and works well for decorative pieces.

What's the best way to create Stitch's facial features?

You can use safety eyes (10-12mm) and felt cutouts for the most authentic look, or embroider all features with black and white yarn for a completely crocheted finish. Felt pieces with fabric glue offer a nice middle ground between durability and ease.

Do I need to stuff this purse or add any lining?

No stuffing is needed as this is a functional purse meant to hold items. However, adding a fabric lining to the inside is optional and can help protect your belongings and give the purse a more polished, professional appearance.