๐Ÿงถ Beautiful โœจ Detailed ๐Ÿ’ Adorable

Little Kitten Amigurumi Pattern

Little Kitten Amigurumi Pattern
4.0โ˜… Rating
3-4 Hours Time Needed
2.1K Made This
โœ‚๏ธ

Beginner Friendly Level

Perfect for those just starting their sewing journey, with clear instructions and simple techniques

โฑ๏ธ

Bite-Sized Project

Complete in under 2 hoursโ€”quick, fun, and perfect for a little creative escape.

๐Ÿงธ

Cute Companion

An adorable friend to cherish, handcrafted with love to bring comfort and joy for years to come.

About This Little Kitten Amigurumi Pattern

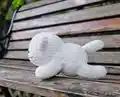
This Little Kitten pattern creates a plump, cuddly feline friend using soft chenille or velvet yarn that feels luxurious to touch. The finished kitten sits at a perfect palm-sized 11 cm tall and stretches 19 cm long, making it ideal for display or cuddles. With simple construction worked in continuous spirals, you'll build each piece from magic rings and basic stitches, creating rounded limbs, perky triangle ears, and a sweet curled tail that captures authentic cat charm.

Little Kitten Amigurumi Pattern crochet pattern - detailed view of completed project

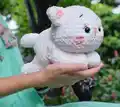
The pattern includes detailed photo tutorials for assembly, showing exactly how to position ears, attach limbs, and create adorable facial features including embroidered whiskers and eyelashes. Working with plush yarn gives your kitten an irresistibly soft texture that makes it perfect for gifting or keeping as your own crafting companion.

Why You'll Love This Little Kitten Amigurumi Pattern

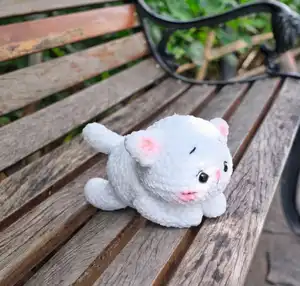
I absolutely love this pattern because it transforms basic crochet techniques into something incredibly precious and huggable. The plush yarn works up so quickly and feels amazing in your hands, making the entire process therapeutic and enjoyable. I'm especially fond of how the facial features come togetherโ€”those safety eyes combined with hand-embroidered whiskers and eyelashes give each kitten so much personality and character. The compact size means you can finish it in an afternoon, yet it looks impressively detailed and professional when complete, making it perfect for last-minute gifts or market items.

Little Kitten Amigurumi Pattern step 1 - construction progress Little Kitten Amigurumi Pattern step 2 - assembly progress Little Kitten Amigurumi Pattern step 3 - details and accessories Little Kitten Amigurumi Pattern step 4 - final assembly and finishing

Switch Things Up

I love experimenting with this pattern because it's so versatile and open to creative variations. Try using variegated yarn to create a unique multicolored kitten, or work with sparkly metallic yarn for a magical celestial cat. I've made versions with embroidered patches or spots using surface crochet for tabby markings that look incredibly realistic.

You could also scale up the pattern with super bulky yarn and a larger hook to create a massive cuddle buddy, or go miniature with thread and tiny hooks for dollhouse-sized kittens. I particularly enjoy adding accessories like tiny crocheted collars with bells, miniature yarn balls for the kitten to hold, or even small bows between the ears for extra sweetness.

Consider making a whole family of kittens in different sizes and colors, or experiment with different eye placements to create various expressionsโ€”closer eyes for a sweet innocent look, or wider spacing for a more alert curious appearance. The basic pattern serves as a perfect foundation for letting your creativity run wild while maintaining that adorable charm.

Common Mistakes & How to Fix Them

โœ— Stuffing too firmly early on can stretch the fabric and show gaps between stitches, so stuff gradually and test firmness โœ— Placing safety eyes too close together creates a cross-eyed look, always count stitches carefully and use pins to test placement first โœ— Forgetting to use stitch markers in continuous spiral rounds leads to misshapen pieces, mark your starting point every single round โœ— Sewing limbs unevenly causes the kitten to tilt or lean awkwardly, always pin all pieces in place before committing to sewing

Little Kitten Amigurumi Pattern

Create your own adorable little kitten with this charming amigurumi pattern! Using soft chenille or velvet yarn, you'll craft a cuddly companion that measures approximately 11 cm tall and 19 cm long. This delightful pattern features a plump body, cute pointy ears, sweet whiskers, and expressive safety eyes that bring personality to life. Perfect for cat lovers and anyone who enjoys making huggable handmade treasures, this little kitten will steal hearts with its irresistible charm and become a cherished keepsake for years to come.

Beginner Friendly 3-4 Hours

Materials Needed for Little Kitten Amigurumi Pattern

โ€” Main Fabric

  • 01
    Plush, velvet, or chenille yarn in white (140m or approximately 1.5 skeins)
  • 02
    Recommended brands: Himalaya Velvet, Himalaya Dolphin Baby, YarnArt Dolce, or Premier Parfait Chunky

โ€” Tools Required

  • 01
    Crochet hook 4mm
  • 02
    Safety eyes 14mm
  • 03
    Safety nose 8mm
  • 04
    Polyester fiberfill stuffing
  • 05
    Tapestry needle with white and black thread
  • 06
    Scissors
  • 07
    Pins
  • 08
    Stitch marker

Progress Tracker

0% Complete

โ€” Head :

Round 1 :

MR 8 sc (8)

Round 2 :

8 inc (16)

Round 3 :

(1 sc, inc) x 8 times (24)

Round 4 :

1 sc, inc, (2 sc, inc) x 7 times, 1 sc (32)

Round 5 :

(3 sc, inc) x 8 times (40)

Round 6-8 :

40 sc (40)

Round 9 :

14 sc, 4 inc, 4 sc, 4 inc, 14 sc (48)

Round 10-12 :

48 sc (48)

Round 13 :

14 sc, 4 dec, 4 sc, 4 dec, 14 sc (40)

Round 14 :

40 sc (40)

Round 15 :

(3 sc, dec) x 8 times (32)

Round 16 :

(2 sc, dec) x 8 times (24)

Round 17 :

12 dec (12)

Round 18 :

6 dec, slst (6)

Infos :

Insert safety eyes between rounds 10 and 11, with 5 sts distance between eyes. Start stuffing the head firmly with fiberfill. Weave yarn tail through front loops of last round and pull tight to close hole, then hide tail inside head.

โ€” Tail :

Round 1 :

MR 6 sc (6)

Round 2 :

(2 sc, inc) x 2 times (8)

Round 3 :

(3 sc, inc) x 2 times (10)

Round 4-10 :

3 sc, inc, 4 sc, dec (10)

Round 11 :

5 sc, slst (5)

Info :

Stuff tail lightly with fiberfill. Flatten opening and single crochet through both layers to close.

โ€” Body :

Round 1 :

MR 8 sc (8)

Round 2 :

8 inc (16)

Round 3 :

(1 sc, inc) x 8 times (24)

Round 4 :

(1 sc, inc, 1 sc) x 8 times (32)

Round 5 :

(3 sc, inc) x 8 times (40)

Round 6-10 :

40 sc (40)

Round 11 :

(3 sc, dec) x 8 times (32)

Round 12-14 :

32 sc (32)

Round 15 :

(14 sc, dec) x 2 times (30)

Round 16 :

30 sc, slst (30)

Info :

Stuff body firmly with fiberfill.

โ€” Ears (Make 2) :

Round 1 :

MR 6 sc (6)

Round 2 :

6 inc (12)

Round 3 :

(5 sc, inc) x 2 times (14)

Round 4-5 :

14 sc (14)

Round 6 :

7 sc, slst (7)

Info :

Do not stuff ears. Flatten opening and single crochet through both layers to close.

โ€” Arms/Legs (Make 4) :

Round 1 :

MR 6 sc (6)

Round 2 :

6 inc (12)

Round 3-12 :

4 sc, inc, 5 sc, dec (12)

Round 13 :

6 sc, slst (6)

Info :

Stuff arms and legs firmly with fiberfill. Flatten opening and single crochet through both layers to close.

Assembly Instructions

  • Create eye sockets by gently pressing around the safety eyes to define the face shape and add dimension
  • Sew ears to head between rounds 4 and 8, positioning them 8 stitches apart for proper spacing
  • Embroider nose, whiskers, and eyelashes using white and black yarn to create sweet facial features
  • Attach body to head by placing both on flat surface, pinning in position, then sewing one stitch on body to one stitch on head
  • Sew legs to round 6 of body with 10 stitches distance between them for balanced stance
  • Attach arms between rounds 12-15 of body, ensuring they're positioned symmetrically on both sides
  • Sew tail to back of body, positioning it at a natural angle for authentic cat appearance

Important Notes

  • ๐Ÿ’กWork in continuous spiral rounds without joining unless pattern specifies otherwise
  • ๐Ÿ’กAlways use stitch marker to mark beginning of each round to maintain accurate shaping
  • ๐Ÿ’กThe finished size varies based on yarn weight and hook size used, adjust accordingly for desired dimensions
  • ๐Ÿ’กRead entire pattern before starting to familiarize yourself with construction sequence and techniques
  • ๐Ÿ’กWeave in all yarn tails securely inside pieces to maintain clean professional appearance
  • ๐Ÿ’กPin all body parts before sewing to ensure proper positioning and balanced proportions

This charming Little Kitten pattern brings together simple amigurumi techniques and luxuriously soft chenille yarn to create an irresistibly cuddly companion. The straightforward construction makes it accessible for beginners, while the attention to detail in facial features and proportions ensures a professional polished result. Whether you're crafting for yourself or creating a heartfelt handmade gift, this sweet kitten will bring smiles and warmth to any space. ๐Ÿฑ๐Ÿงถ Happy crocheting! โœจ

You ask,

we answer.

FAQs

Can I use regular acrylic yarn instead of chenille or velvet yarn?

Yes, you can use any yarn weight, but the texture and final size will differ. Chenille creates a plush soft finish, while regular yarn gives a more traditional amigurumi look. Adjust your hook size accordingly to match your yarn weight.

How do I prevent gaps from showing when using plush yarn?

Work with tension slightly tighter than usual with plush yarn, and ensure your hook size isn't too large for the yarn weight. The fuzzy texture of chenille naturally helps hide small gaps between stitches.

What size will my kitten be if I use different yarn?

The pattern creates an 11 cm tall kitten with the specified chenille yarn and 4mm hook. Using thicker yarn and larger hook will make it bigger, while thinner yarn and smaller hook will create a miniature version.

Can I make this kitten in different colors or patterns?

Absolutely! You can create tabby stripes by alternating colors every few rounds, make a calico with color changes in specific sections, or craft a solid colored kitten in any shade you prefer.

How do I attach the limbs so my kitten can pose?

For poseable limbs, use thread jointing technique with buttons or beads between the body and limbs, allowing them to rotate. Alternatively, add pipe cleaners inside arms and legs before closing for bendable positioning.