🧶 Beautiful ✨ Detailed 💝 Adorable

Little Spark Lightbulb Amigurumi Pattern

Little Spark Lightbulb Amigurumi Pattern
4.1★ Rating
2-3 Hours Time Needed
2.0K Made This
✂️

Beginner Friendly Level

Perfect for those just starting their sewing journey, with clear instructions and simple techniques

⏱️

Bite-Sized Project

Complete in under 2 hours—quick, fun, and perfect for a little creative escape.

🎁

Tiny Treasure

Small, sweet, and gift-worthy creations that fit perfectly in the palm of your hand with detailed charm.

About This Little Spark Lightbulb Amigurumi Pattern

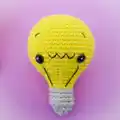
This Little Spark lightbulb amigurumi is the perfect blend of cute and clever! Designed by Alexa Templeton, this pattern transforms simple stitches into an adorable kawaii character that's sure to brighten any space. The cheerful yellow bulb features embroidered facial details and a realistic silver screw base worked in back loops only for authentic texture. Whether you're new to amigurumi or looking for a quick satisfying project, this little companion comes together beautifully with basic increases and decreases.

Little Spark Lightbulb Amigurumi Pattern crochet pattern - detailed view of completed project

Standing at just 8 cm tall, Little Spark makes an ideal gift for students, creatives, or anyone who needs a reminder that great ideas come in small packages. The pattern uses minimal yarn and includes detailed embroidery instructions for creating that perfect expressive face.

Why You'll Love This Little Spark Lightbulb Amigurumi Pattern

I absolutely love how this pattern turns something as ordinary as a lightbulb into an irresistibly cute character! There's something so satisfying about watching the bulb shape emerge as you work through the increases and decreases. I find the color change to the silver screw base particularly rewarding—working in the back loops only creates such a realistic ribbed texture that makes the finished piece feel truly special. The embroidery details are simple but add so much personality, and I love that you can customize the expression to match your mood. This project is quick enough to finish in one sitting but impressive enough that people always ask where you bought it. Plus, it's the perfect stash-buster and makes such a thoughtful handmade gift for teachers, graduates, or anyone celebrating a bright idea!

Little Spark Lightbulb Amigurumi Pattern step 1 - construction progress Little Spark Lightbulb Amigurumi Pattern step 2 - assembly progress Little Spark Lightbulb Amigurumi Pattern step 3 - details and accessories Little Spark Lightbulb Amigurumi Pattern step 4 - final assembly and finishing

Switch Things Up

I love experimenting with this pattern to create different moods and personalities! Try making a whole collection of Little Sparks in rainbow colors—imagine a display of pastel lightbulbs in soft pink, mint green, lavender, and baby blue for a dreamy aesthetic. You could also play with the embroidery to give each one unique expressions: add rosy cheeks with pink thread, create sleepy eyes with curved lines, or make a winking lightbulb for extra charm.

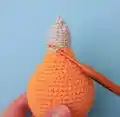
For seasonal variations, I've made Halloween versions in orange with spooky faces, Christmas ones in red and green with festive expressions, and even Valentine's Day bulbs in hot pink with little heart details. The screw base doesn't have to be silver either—try gold metallic yarn for a vintage Edison bulb look, or copper for an industrial vibe.

If you want to make your Little Spark functional, consider adding a small keychain loop at the top to create an adorable bag charm, or attach a safety pin to the back for a unique brooch. I've also made mini versions using thinner yarn and a 1.5mm hook for the tiniest desk buddies that are absolutely precious! Don't be afraid to get creative with the face embroidery too—some makers add glasses, different mouth shapes, or even little freckles to give their lightbulbs distinct personalities that match their own creative spark!

Common Mistakes & How to Fix Them

✗ Not placing safety eyes at the correct position between rounds 16-17 with proper spacing of 10 stitches can make the face look unbalanced ✗ Forgetting to stuff the bulb firmly before closing rounds 20-25 will result in a floppy lightbulb that doesn't hold its characteristic rounded shape ✗ Skipping the back loops only instruction on rounds 26-30 means you'll miss creating the distinctive ribbed screw texture that makes this pattern special ✗ Pulling embroidery thread too tightly when adding facial features can distort the bulb shape and create puckering in the fabric ✗ Not using a stitch marker to track round beginnings can cause the embroidery placement to be off-center and misaligned with the pattern instructions

Little Spark Lightbulb Amigurumi Pattern

Bring brightness to your crochet collection with this adorable Little Spark lightbulb amigurumi! This charming pattern creates a delightful kawaii-style lightbulb character complete with an expressive face and detailed screw base. Perfect for beginners looking to add a whimsical touch to their home décor or create a unique handmade gift that truly lights up someone's day. The finished piece measures approximately 8 cm tall and makes a wonderful desk companion or cute decorative accent.

Beginner Friendly 2-3 Hours

Materials Needed for Little Spark Lightbulb Amigurumi Pattern

— Main Fabric

  • 01
    Cotton yarn 125m/50g in yellow color (approximately 15g needed)
  • 02
    Cotton yarn 125m/50g in silver/grey color (less than 10g needed)
  • 03
    Paintbox Cotton or Yarn & Colors Must Have recommended

— Tools Required

  • 01
    Crochet hook size 2.5mm
  • 02
    Safety eyes 8mm (2 pieces) or black embroidery thread for safety
  • 03
    Black embroidery thread for facial details
  • 04
    Toy stuffing
  • 05
    Tapestry needle
  • 06
    Stitch marker
  • 07
    Scissors

Progress Tracker

0% Complete

— Ready, Steady, Go.... (Main Bulb)

Info:

Start in Yellow. Work in the round.

Round 1:

Sc x 6 in to a MR (6)

Round 2:

Inc x 6 (12)

Round 3:

(Sc, inc) x 6 (18)

Round 4:

(Sc x 2, inc) x 6 (24)

Round 5:

(Sc x 3, inc) x 6 (30)

Round 6:

Sc x 2, inc, (Sc x 4, inc) x 5, Sc x 2 (36)

Round 7:

(Sc x 5, inc) x 6 (42)

Round 8:

Sc x 3, inc, (Sc x 6, inc) x 5, Sc x 3 (48)

Round 9-17:

Sc x 48 (48) - 9 rounds

Round 18:

(Sc x 6, dec) x 6 (42)

Round 19:

(Sc x 5, dec) x 6 (36)

Round 20:

(Sc x 4, dec) x 6 (30)

Info:

Insert the safety eyes between round 16-17 with a space of 10 stitches visible between them. Start to add stuffing and continue to stuff as you go.

Round 21:

(Sc x 4, dec) x 5 (25)

Round 22:

Sc x 25 (25)

Round 23:

(Sc x 3, dec) x 5 (20)

Round 24:

Sc x 20 (20)

Round 25:

(Sc x 2, dec) x 5 (15)

Info:

Change to Silver yarn

Round 26-30:

BLO, Sc x 15 (15) - 5 rounds

Round 31:

(Sc, dec) x 5 (10)

Round 32:

dec x 5 (5)

Info:

Break the yarn and pull through. Weave the yarn tail through the FLO of the final round to close.

— Embroidery Details

Eyebrows:

With black thread embroider small eyebrows above the eyes over r 11

Zig Zag:

Embroider a zig zag between the eyes on r 16

Light Lines:

Embroider a line from the base of each eye down towards to screw base of the lightbulb (over r 19-25)

— The Screw Fitting

Info:

Turn the light bulb upside down, so that the yellow bulb is at the bottom and the grey is at the top. Join Silver yarn to the first grey open front loop of r 26.

Finishing:

Ss in all open front loops of r 26-30

Info:

Cut the yarn and pull through. Weave in the loose end.

Assembly Instructions

  • After completing round 32, weave the yarn tail through the front loops only of the final round and pull tight to close the top of the screw base securely.
  • Turn the completed lightbulb upside down with the yellow bulb at the bottom and silver screw at the top to begin the screw fitting detail.
  • Join silver yarn to the first open front loop of round 26 and slip stitch around all open front loops of rounds 26-30 to create the ribbed screw texture.
  • Use black embroidery thread to add small eyebrows above the eyes over round 11, keeping stitches even and symmetrical.
  • Embroider a small zig-zag line between the eyes on round 16 to create the characteristic lightbulb filament detail.
  • Add two vertical lines from the base of each eye down toward the screw base (covering rounds 19-25) to complete the illuminated look.
  • Weave in all loose ends securely and trim excess yarn for a clean professional finish.

Important Notes

  • 💡Safety eyes should be inserted between rounds 16-17 with exactly 10 stitches visible between them for proper face proportions
  • 💡Use a stitch marker to track your rounds especially during the bulb shaping to ensure accurate stitch counts
  • 💡Work rounds 26-30 in back loops only to create the distinctive ribbed texture of the screw base
  • 💡Begin stuffing at round 20 and continue adding stuffing gradually as you decrease to maintain the classic lightbulb shape
  • 💡If making this for young children, use embroidered eyes instead of safety eyes for added safety
  • 💡The slip stitch finish on the screw fitting should be worked loosely to avoid puckering the ribbed texture

This delightful Little Spark lightbulb pattern by Alexa Templeton is designed to bring a smile and a touch of kawaii charm to any space! The combination of simple shaping techniques with creative embroidery details results in an adorable character that's perfect for beginners yet impressive enough to gift. Whether displayed on a desk, shelf, or given as an inspiring present, this little lightbulb reminds us that creativity and bright ideas come in the cutest packages. Happy crocheting, and may your hooks always find the light! 🧶💡✨

You ask,

we answer.

FAQs

Can I use different yarn weights for this pattern?

Yes, you can use different yarn weights, but the finished size will vary. If using a heavier yarn with a larger hook, your lightbulb will be bigger. If using lighter yarn with a smaller hook, it will be smaller than the 8cm stated in the pattern. Just ensure your stitches are tight enough that stuffing won't show through.

Is it safe to use safety eyes for children's toys?

Safety eyes are not recommended for toys intended for children under 3 years old due to choking hazards. The pattern specifically suggests embroidering eyes with black thread as a safer alternative for young children, which is just as cute and completely secure.

How do I get the screw base to look ribbed and realistic?

The ribbed texture comes from working rounds 26-30 in back loops only (BLO). This creates ridges that look like screw threads. Then, slip stitching through the front loops that were left creates the final realistic screw fitting detail.

What if I don't have silver yarn for the screw base?

You can use grey, light grey, or even white yarn for the screw base. Some crafters also use metallic yarn for extra shine! The key is choosing a color that contrasts with your bulb color to distinguish the two parts clearly.

Can I make the lightbulb in different colors?

Absolutely! While yellow is traditional for lightbulbs, you could create Little Spark in orange, white, or even rainbow colors for a fun twist. Consider seasonal colors like red and green for holidays or pastel shades for spring décor.