🧢 Beautiful ✨ Detailed πŸ’ Adorable

Mini Pumpkin Man Amigurumi Pattern

Mini Pumpkin Man Amigurumi Pattern
4.2β˜… Rating
2-3 Hours Time Needed
3.7K Made This
βœ‚οΈ

Beginner Friendly Level

Perfect for those just starting their sewing journey, with clear instructions and simple techniques

⏱️

Bite-Sized Project

Complete in under 2 hoursβ€”quick, fun, and perfect for a little creative escape.

πŸŽƒ

Sweet Surprise

A delightful, gift-ready creation perfect for birthdays and special occasions that will be treasured for years.

About This Mini Pumpkin Man Amigurumi Pattern

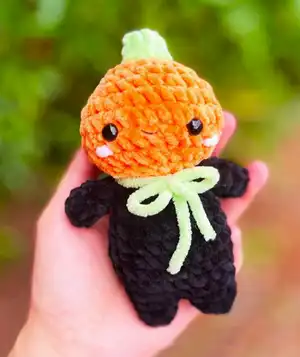
This Mini Pumpkin Man pattern brings festive autumn joy in the most adorable pocket-sized form! Worked in continuous rounds with velvet or chenille yarn, this charming character features a distinctive oval pumpkin head with five realistic dents, sweet safety eyes, and a tiny green stem on top. The black body with attached legs and little arms creates the perfect contrast, while optional details like rosy cheeks and a decorative bow add extra personality to your handmade creation.

Mini Pumpkin Man Amigurumi Pattern crochet pattern - detailed view of completed project

The pattern includes special techniques for creating authentic pumpkin texture with dimensional dents and brown accent lines. Assembly instructions guide you through positioning the face, attaching limbs, and adding those finishing touches that bring your pumpkin man to life.

Why You'll Love This Mini Pumpkin Man Amigurumi Pattern

I absolutely love this pattern because it combines simplicity with impressive results! The unique denting technique transforms a basic oval shape into a realistic pumpkin that looks professionally crafted. I find the color-changing between orange and black creates such a striking visual impact, and the finished size makes it perfect for carrying around or displaying anywhere. The quick working time means you can whip up several in an afternoon for gifts or seasonal decor, and honestly, who can resist that sweet little face with rosy cheeks? It's become one of my favorite quick autumn projects!

Mini Pumpkin Man Amigurumi Pattern step 1 - construction progress Mini Pumpkin Man Amigurumi Pattern step 2 - assembly progress Mini Pumpkin Man Amigurumi Pattern step 3 - details and accessories Mini Pumpkin Man Amigurumi Pattern step 4 - final assembly and finishing

Switch Things Up

I love experimenting with this pattern to create unique variations! One of my favorite tweaks is changing the color scheme entirely - imagine a white ghost pumpkin with pale green stem, or a deep burgundy heirloom variety. I've also played with the facial expressions by repositioning the safety eyes slightly higher or lower to create different moods, from shy to surprised.

For a more whimsical touch, I sometimes add tiny felt leaves around the stem or create a patchwork effect using multiple shades of orange throughout the head. You could even make a whole pumpkin patch family by adjusting hook sizes - use a 3mm hook for tiny baby pumpkins or go up to 6mm for a chunky papa pumpkin.

I've found that replacing the simple V-mouth with an embroidered jack-o'-lantern smile transforms this sweet character into a spooky Halloween decoration. Adding wire inside the arms (carefully!) makes them poseable for different poses. Sometimes I skip the black body entirely and make everything in orange for a pure pumpkin look, or add a crocheted witch hat on top for extra seasonal flair!

Common Mistakes & How to Fix Them

βœ— Not creating proper oval shape in Round 1 - make sure to work into both sides of the foundation chain for the correct head shape βœ— Placing safety eyes incorrectly - they must go between rounds 7-8, exactly 5 stitches apart on the long side of the oval for proper expression βœ— Making dents too loose or too tight - pull yarn firmly but carefully when creating the five pumpkin sections to avoid distorting the head shape βœ— Skipping the stuffing pause during assembly - always stuff the head before creating dents and the body before final decreases for best structure

Mini Pumpkin Man Amigurumi Pattern

Bring autumn charm to life with this adorable Mini Pumpkin Man amigurumi! This delightful pattern guides you through creating a sweet pumpkin character with a cheerful face, little stem, and tiny black body. Perfect for fall decorating, Halloween celebrations, or as a heartwarming handmade gift, this pumpkin friend features charming details like dimensional dents, rosy cheeks, and optional bow accents. Using soft velvet or chenille yarn in vibrant orange, green, and black, you'll craft a cuddly companion that captures the cozy spirit of harvest season.

Beginner Friendly 2-3 Hours

Materials Needed for Mini Pumpkin Man Amigurumi Pattern

β€” Main Fabric

  • 01
    Velvet yarn in orange, black, light green, and light pink colors
  • 02
    Alternative: Chenille yarn in orange, green, and black
  • 03
    Sport weight yarn in black and light brown for detail work

β€” Tools Required

  • 01
    4.5mm crochet hook (or hook matching your yarn weight)
  • 02
    8mm safety eyes
  • 03
    Fiber filling/stuffing
  • 04
    Yarn needle
  • 05
    Scissors
  • 06
    Stitch markers (recommended for tracking rounds)

Progress Tracker

0% Complete

β€” Head (in orange) :

R1 :

6ch, begin in 2nd chain from hook 4sc, inc in last chain, 4sc on the other side of the chain, inc (12)

R2 :

(sc, inc) x6 (18)

R3 :

(sc, inc, sc) x6 (24)

R4 :

sc around (24)

R5 :

(2sc, inc, sc) x6 (30)

R6 :

(2sc, inc, 2sc) x6 (36)

R7 :

sc around (36)

R8 :

(2sc, dec, 2sc) x6 (30)

R9 :

(2sc, dec, sc) x6 (24)

Info :

Insert eyes between R7-R8, 5 stitches apart, while looking from the top, place them on the long side of the R1 oval. Begin stuffing

R10 :

(sc, dec, sc) x6 (18)

R11 :

(sc, dec) x6 (12)

Info :

Finish stuffing the head, sl st and fasten off, leave a long tail for sewing

β€” Legs (in black) - make 2 + Body :

R1 :

6sc in MR (6)

R2 :

sc around (6)

R3 :

(sc, inc) x3 (9)

Info :

After finishing the first leg, cut off the yarn. When making the second leg, do not fasten off and attach it to the first leg by doing 1 sc on any of the stitches of leg 1

R4 :

counting the previous sc, sc around both legs (18)

R5 :

(sc, inc, sc) x6 (24)

R6-R7 :

sc around (24 x2)

R8 :

(4sc, dec) x4 (20)

R9 :

(8sc, dec) x2 (18)

Info :

Stuff the legs and body

R10-R11 :

sc around (18 x2)

R12 :

(sc, dec) x6 (12)

Info :

Finish stuffing, sl st and fasten off

β€” Arms (in black) - make 2 :

R1 :

6sc in MR (6)

R2-R4 :

sc around (6 x3)

Info :

Do not stuff the arms

R5 :

fold the arms in half and 3sc through both sides of the stitches (3)

Info :

Sl st and fasten off. Leave a long tail for sewing

β€” Little stem (in light green) :

R1 :

6sc in MR (6)

R2-R3 :

sc around (6Γ—2)

Info :

Sl st and fasten off. Leave a long tail for sewing

Assembly Instructions

  • Before sewing the head to the body, create 5 pumpkin dents by dragging orange velvet yarn from top to bottom of the head, alternating between sewing under and above rows, pulling firmly to form each dent
  • Start sewing dents from the colored dots shown in the diagram - the front part should be wider than the rest, about 2 stitches from the eyes to each side
  • After finishing head dents, drag brown sport weight yarn through the head and over each dent to create accent lines
  • Position the head onto the body, align the eyes with the legs properly, and sew together using the yarn tail from the head
  • Position the arms right under the head and sew them to the last row of the body on both sides
  • Sew the little green sprout right on top of the head at R1
  • Add a little V-shaped mouth using black sport weight yarn, and add two small lines for blush one row under and one stitch to the side of each eye - optionally add a decorative bow

Important Notes

  • πŸ’‘The pattern is worked in continuous rounds, so use stitch markers to track your progress
  • πŸ’‘Make sure to create a proper oval shape in R1 by working into both sides of the foundation chain
  • πŸ’‘Insert safety eyes between rounds 7-8 exactly 5 stitches apart on the long side for correct facial expression
  • πŸ’‘Pull yarn firmly when creating the 5 pumpkin dents but be careful not to distort the head shape
  • πŸ’‘Do not stuff the arms - they should remain flat when folded and sewn
  • πŸ’‘Pin all parts in place before final sewing to ensure proper positioning and alignment

This charming Mini Pumpkin Man pattern is perfect for celebrating autumn season with handmade warmth! The unique denting technique creates authentic pumpkin texture, while the sweet face and tiny black body give this character irresistible personality. Whether you're decorating for fall, preparing for Halloween, or creating thoughtful handmade gifts, this quick-working pattern delivers impressive results. The combination of velvet yarn and simple stitches makes it enjoyable for beginners while producing a professional-looking amigurumi. πŸŽƒ Happy crocheting! 🧢✨

You ask,

we answer.

FAQs

Can I use regular acrylic yarn instead of velvet or chenille yarn?

Yes, you can use any yarn type you prefer! However, velvet or chenille yarn gives the pumpkin a softer, more plush texture that's perfect for this design. If using acrylic, the finished pumpkin will be slightly smaller and have a different texture.

How do I create the pumpkin dents without distorting the head shape?

The key is to pull the yarn firmly but gradually when creating each dent. Make sure the head is fully stuffed before starting the dents, and work systematically from one colored dot to the next as shown in the diagram. The front section should be wider (about 2 stitches from each eye).

What size will the finished pumpkin man be?

When using 4.5mm hook with velvet or chenille yarn, the finished pumpkin man will be approximately 3-4 inches tall, making it a perfect pocket-sized companion or desk decoration.

Do I need to stuff the arms?

No, the pattern specifically states not to stuff the arms. They should be folded flat and sewn closed with 3 single crochets through both sides, creating thin, unstuffed limbs that contrast nicely with the plump body.

Can I skip the brown accent lines over the dents?

Yes, the brown lines are optional decorative elements. The pumpkin will still look great with just the orange dents, but the brown sport weight yarn lines add extra dimension and a more realistic pumpkin appearance.