🧢 Beautiful ✨ Detailed πŸ’ Adorable

Mini Whale Amigurumi Pattern

Mini Whale Amigurumi Pattern
3.9β˜… Rating
1.5-2 Hours Time Needed
4.0K Made This
βœ‚οΈ

Beginner Friendly Level

Perfect for those just starting their sewing journey, with clear instructions and simple techniques

⏱️

Bite-Sized Project

Complete in under 2 hoursβ€”quick, fun, and perfect for a little creative escape.

🧸

Cute Companion

An adorable friend to cherish, handcrafted with love to bring comfort and joy for years to come.

About This Mini Whale Amigurumi Pattern

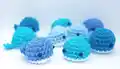
This mini whale pattern is designed to be quick, easy, and absolutely adorable! Using simple rounds of single crochet and basic increases, you'll create a chubby little whale body with a contrasting belly and a sweet forked tail. The pattern works up in just a few rounds, making it perfect for using up yarn scraps or testing out new color combinations. Safety eyes add that extra touch of cuteness, giving your whale its own unique personality.

Mini Whale Amigurumi Pattern crochet pattern - detailed view of completed project

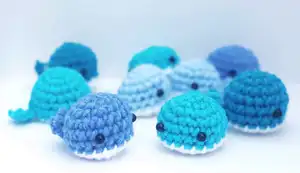
With minimal sewing and straightforward assembly, this pattern is ideal for beginners who want to practice working in the round and creating simple shaped pieces. The finished whale is palm-sized and perfect for little hands or as a desk companion!

Why You'll Love This Mini Whale Amigurumi Pattern

I absolutely love this mini whale pattern because it delivers maximum cuteness with minimum effort! There's something so satisfying about watching this little ocean friend come together in under two hours. I love how the contrast between the body and belly colors creates visual interest, and that adorable forked tail is just the perfect finishing touch. It's one of those patterns I keep coming back to because it's quick enough for last-minute gifts but charming enough that everyone wants one. Plus, experimenting with different color combinations never gets oldβ€”from realistic blues and grays to whimsical pastels and rainbows!

Mini Whale Amigurumi Pattern step 1 - construction progress Mini Whale Amigurumi Pattern step 2 - assembly progress Mini Whale Amigurumi Pattern step 3 - details and accessories Mini Whale Amigurumi Pattern step 4 - final assembly and finishing

Switch Things Up

I love experimenting with color combinations on this mini whale pattern! Try making a classic ocean-blue body with a white or cream belly for that traditional whale look, or go bold with bright rainbow colors for a whimsical twist. You could even create a whole family of whales in graduating sizes by adjusting your yarn weightβ€”use fingering weight for tiny babies and bulky yarn for mama and papa whales.

I've also found that adding small details can really personalize each whale. Consider embroidering a little smile with black yarn, or add blush to the cheeks with pink thread or makeup for an extra sweet touch. Some crafters like to add a small water spout on top using white or light blue yarn worked in a few chain stitches. You could even make the tail in a contrasting color from the body for added visual interest.

For a gift set, I love pairing the whale with other small ocean creatures like starfish, octopi, or fishβ€”all made from simple variations of basic amigurumi shapes. Package them together in a little mesh bag as an ocean-themed gift set that's perfect for baby showers or kids' birthdays!

Common Mistakes & How to Fix Them

βœ— Not stuffing firmly enough before closing the belly, which can result in a floppy whale that doesn't hold its rounded shape properly βœ— Placing safety eyes too close together or unevenly, which affects the whale's facial expression and overall cuteness factor significantly βœ— Forgetting to leave a long tail when fastening off the belly piece, making it difficult to sew securely to the body βœ— Sewing the tail too high or too low on the body instead of at the 6th row directly opposite the eyes

Mini Whale Amigurumi Pattern

Create your own adorable mini whale with this beginner-friendly crochet pattern! This charming ocean companion features a sweet rounded body, cute belly detail, and a distinctive whale tail that brings personality to this tiny treasure. Perfect for quick gifting or building your amigurumi collection, this mini whale works up fast and uses basic stitches that any crocheter can master. With simple shaping and minimal assembly, you'll have your own handmade whale ready to make a splash in no time!

Beginner Friendly 1.5-2 Hours

Materials Needed for Mini Whale Amigurumi Pattern

β€” Main Fabric

  • 01
    Worsted weight yarn in your choice of colors for body and belly
  • 02
    Red Heart Soft Yarn recommended or similar worsted weight yarn

β€” Tools Required

  • 01
    Crochet hook appropriate for worsted weight yarn
  • 02
    One pair of 6mm safety eyes
  • 03
    Polyfil stuffing
  • 04
    Yarn needle for sewing
  • 05
    Scissors

Progress Tracker

0% Complete

β€” Body :

Round 1 :

Using the color for the body, ch 2. Sc 6 into 2nd ch from hook. (6)

Round 2 :

Inc in each st around. (12)

Round 3 :

*Sc in next st, inc. Repeat from * around. (18)

Round 4 :

Sc in each st around. (18)

Rounds 5-6 :

Repeat Round 4. (18)

Info :

F/o, weave in ends. Attach safety eyes in between the 5th and 6th rows, 4 st apart.

β€” Belly :

Round 1 :

Using the color for the belly, ch 2. Sc 6 into 2nd ch from hook. (6)

Round 2 :

Inc in each st around. (12)

Round 3 :

*Sc in next st, inc. Repeat from * around. (18)

Info :

F/o and leave long tail for sewing.

β€” Tail :

Instructions :

Ch 3. Turn, sc into 2nd ch from hook. Sc in next st. Ch 3, sc in 3rd st from hook, sl st into the side of the next st. Ch 3, sc in 3rd st from hook, and sl st into the next st. Continue making sl st until you reach the bottom of your very first st. F/o and leave tail for sewing.

Assembly Instructions

  • Attach safety eyes between the 5th and 6th rows of the body, spacing them 4 stitches apart.
  • Position the belly piece on the front of the body and begin sewing around the edges.
  • When about halfway through sewing the belly, begin stuffing the whale firmly but not too tightly.
  • Continue sewing the belly to the body until completely closed, then weave in ends securely.
  • Sew the tail to the 6th row of the body, positioning it directly behind the eyes on the opposite side of the whale.
  • Weave in all remaining ends and trim excess yarn.

Important Notes

  • πŸ’‘Make sure to insert safety eyes before sewing the belly closed, as they cannot be added later
  • πŸ’‘Leave long tails when fastening off pieces that need to be sewn to make assembly easier
  • πŸ’‘Stuff the whale firmly enough to maintain its round shape but not so tightly that stitches stretch
  • πŸ’‘The tail can be tricky for beginners, so practice the chain and slip stitch sequence on scrap yarn first
  • πŸ’‘Use stitch markers to keep track of your rounds and ensure even shaping throughout the body

This sweet mini whale pattern is perfect for anyone looking to create a quick and adorable ocean friend! The simple construction and minimal assembly make it ideal for beginners, while the charming results make it a favorite for experienced crocheters too. Whether you're making a single whale or creating an entire pod in different colors, this pattern delivers big smiles in a tiny package. Dive into your yarn stash and bring this little whale to life! πŸ‹πŸ’™

You ask,

we answer.

FAQs

What size will the finished whale be?

The mini whale measures approximately 3-4 inches long when made with worsted weight yarn and a standard crochet hook, making it the perfect palm-sized companion!

Can I use different yarn weights for this pattern?

Yes! You can use any yarn weight, but remember to adjust your hook size accordingly. Lighter weight yarns will create a smaller whale, while bulky yarns will make a larger one.

Do I need to know how to crochet in the round?

Yes, this pattern is worked entirely in the round using a continuous spiral technique. If you're new to this method, there are many helpful tutorials online to get you started!

Can I make this whale without safety eyes?

Absolutely! You can embroider eyes using black yarn or felt instead, which is especially recommended if the whale will be given to young children.

How do I keep track of my rounds?

Use a stitch marker at the beginning of each round to help you keep count. You can use a commercial stitch marker or simply a piece of contrasting yarn.