About This Nutcracker Amigurumi Pattern
Perfect for displaying throughout the holiday season, this Nutcracker makes a wonderful handmade gift or a cherished addition to your own festive collection.
Ideal for those with basic knitting experience, featuring slightly more advanced stitches and techniques to expand your skills.
A 10-12 hour project—great for savoring the process over several sessions.
Festive fun for the season, bringing handmade magic to celebrations and creating new family traditions.
Perfect for displaying throughout the holiday season, this Nutcracker makes a wonderful handmade gift or a cherished addition to your own festive collection.
I absolutely adore this pattern because it combines so many fun techniques in one project. The color changes keep things interesting, and watching the Nutcracker come together piece by piece feels like unwrapping a gift. I love how the finished piece captures that classic holiday magic while being completely unique and handmade. There's something really special about creating your own Christmas decorations, and this Nutcracker has become one of my favorites to make and share.
I fell in love with this Nutcracker pattern the moment I saw all the intricate details come together. There's something incredibly satisfying about watching each piece take shape, from the striped hat to the swirling candy base beneath his feet. The color work keeps you engaged throughout the entire project, and I find myself looking forward to each new section.
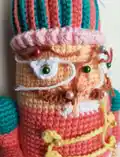
What really drew me in was how this pattern captures the classic Nutcracker charm while adding those whimsical touches like the snowman topper and the Christmas tree accessory. I appreciate that the designer included so many thoughtful details like the embroidered teeth and felt eyelids that really bring the face to life.
Every time I work on this project, I'm reminded why I love amigurumi so much. It's not just about following instructions but about creating something with personality and soul. The finished Nutcracker has become one of my favorite holiday decorations, and I know anyone who makes one will feel the same pride and joy when they display it in their home.
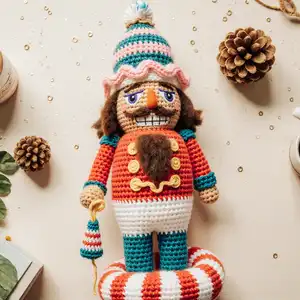
Bring the magic of the holidays into your home with this enchanting Nutcracker amigurumi! This delightful pattern guides you through creating a stunning festive soldier complete with his signature hat, curly brown wig, and charming facial details. You'll also craft an adorable snowman to sit atop his head and a whimsical peppermint candy base. Whether you're decorating your mantle or gifting to someone special, this Nutcracker will become a treasured part of your Christmas traditions for years to come.
6sc into magic ring (6)
2 sc in each stitch (12)
1 sc, 2 sc in next st (18)
2 sc, 2 sc in next st (24)
3 sc, 2 sc in next st (30)
4 sc, 2 sc in next st (36)
5 sc, 2 sc in next st (42)
6 sc, 2 sc in next st (48)
7 sc, 2 sc in next st (54)
8 sc, 2 sc in next st (60)
on back loops: 60 sc (60)
60 sc (60)
26 sc, change to white and 8 sc, change to nude and finish (60) change to red
26 sc, change to white and 8 sc, change again to red and finish (60)
60 sc in red (60) change to pink
60 sc in pink (60) change to red
60 sc in red (60) change to white
60 sc in white (60)
on back loops 8 sc, 1 dec (54)
7 sc, 1 dec (48)
6 sc, 1 dec (42)
5 sc, 1 dec (36) stuff
4 sc, 1 dec (30)
3 sc, 1 dec (24)
2 sc, 1 dec (18)
1 sc, 1 dec (12) leave a long piece of yarn and close
6sc into magic ring (6)
2sc in each stitch around (12)
1 sc, 2 sc in next st (18)
18 sc on back loops (18)
18 sc (18) change to white
18 slip stitch (18)
obl 18 sc (18) change to khaki
18 slip stitch (18)
obl 18 sc (18)
18 sc (18) leave a long piece of yarn to sew, do not forget stuffing
6sc into magic ring (6)
Instead of continuing the round, go up with one chain and 2sc in each stitch (12)
Chain 1 to go up and 12 sc (12) Stuff a little and sew the pieces to the legs to create boots
6sc into magic ring (6)
2 sc in each stitch (12)
1 sc, 2 sc in next st (18)
2 sc, 2 sc in next st (24)
24 sc (24)
2 sc, 1 dec (18)
1 sc, 1 dec (12) change to red
12 sc (12) change to pink
12 sc (12) change to nude
12 sc (12) stuff
dec all row (6) hide the yarn with needle and cut it
6sc into magic ring (6)
2 sc in each stitch (12)
1 sc, 2 sc in next st (18)
2 sc, 2 sc in next st (24)
24 sc (24)
2 sc, 1 dec (18)
1 sc, 1 dec (12) change to red
12 sc (12) stuff now
obl decrease x6, with a needle hide the yarn
6sc into magic ring (6)
2 sc in each stitch (12)
12 sc (12) change to pink
12 sc (12) change to red
12 sc (12) stuff leave a long piece of yarn to sew with part 1
6 sc on magic ring, slip stitch, chain 13, go up with 1 chain and 6sc on chain 13. Finish with slip stitch and attach to body with glue. Use pins to help.
On back loops from top of the head, work 1 popcorn stitch (hdc), 1 hdc. See video.
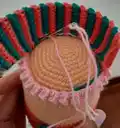
Chain 10, chain 1 more to go up and sc in all stitches
Chain 1, obl sc in all stitches. Change to green
Chain 1, obl sc in all stitches
Chain 1, obl sc in all stitches. Change to red
Repeat this until you have 14 red rows and 13 green rows. Once finished, sew the sides to create the hat. Sew this piece with the pink base using pink thread so the stitches are not visible.
6sc into magic ring (6)
2 sc in each stitch (12)
1 sc, 2 sc in next st (18)
2 sc, 2 sc in next st (24)
3 sc, 2 sc in next st (30)
4 sc, 2 sc in next st (36)
5 sc, 2 sc in next st (42)
6 sc, 2 sc in next st (48)
7 sc, 2 sc in next st (54)
54 sc (54) Once finished, sew this piece to the hat base, do not forget stuffing
6sc into magic ring (6)
2 sc in each stitch (12)
1 sc, 2 sc in next st (18)
2 sc, 2 sc in next st (24)
3 sc, 2 sc in next st (30)
4 sc, 2 sc in next st (36)
36 sc (36)
4 sc, 1 dec all row (30)
3 sc, 1 dec all row (24)
2 sc, 1 dec all row (18)
1 sc, 1 dec all row (12) stuff
1dec all row (6) close
6sc into magic ring (6)
2 sc in each stitch (12)
1 sc, 2 sc in next st (18)
2 sc, 2 sc in next st (24)
3 sc, 2 sc in next st (30)
6sc into magic ring (6)
2 sc in each stitch (12)
1 sc, 2 sc in next st (18)
obl, 18 sc (18) change to yellow
18 sc (18) sew to base, do not stuff
6sc into magic ring
Chain 50 and work 1hdc red, 1 hdc white in all stitches
Round 1: 4sc into magic ring (4). Round 2: 1sc, 2 sc in next stitch (6) sew to face, do not stuff
Chain 7 and sc in every stitch, make 2 pieces
Chain 15 and hdc in each stitch, DO NOT CUT THE YARN
Now chain 20 and hdc in each stitch repeat this 19 times
For last hair, chain 15 and hdc in each stitch. Attach the wig with glue
Try the wig, depending on your yarn it might need more or less than 19 hairs
6sc into magic ring (6)
6 sc (6)
1 sc, 2 sc in next stitch (9)
9 sc (9)
2 sc, 2 sc in next stitch (12)
12 sc (12)
1 sc, 2 sc in next st (18)
18 sc (18)
2 sc, 2 sc in next st (24)
24 sc (24)
obl, decrease (using 3 stitches instead of 2) all row and stuff. Change to brown
obl, sc all row
sc all row, cut the yarn and hide
To create the white details, insert your hook between rows 10 and 11 and slip stitch all row. Repeat this procedure in the other rows
On magic ring, work sc, dc (5 times) and finish with sc. Attach the star with glue to the hand and tree. Embroider red stitches in the tree to create the look
Chain 5. On chain nr. 5, 2 chains and hdc on chains 4,3,2,1. Cut the thread and hide
White part: Chain 3. On chain nr. 3, 4 chains and trc on chains 2 and 1. Cut the thread and hide, attach to the face with glue
Now cut two circles of felt fabric (as the pupils) and attach them too. Use two mini white beads and attach them to the blue piece
Finally cut two more pieces of gray felt fabric to be the eyelids
Chain 4 and cut the yarn, attach them with glue
Chain 8
Sc in the first 3 stitches and slip stitch on the rest. Attach with glue, use pins to help
Embroider the teeth with black thread so they look better
Chain 7 and dc on each chain (7)
7 dc (7)
In chain nr.4, 7 dc and slip stitch in chain nr. 7. Attach with glue, use pins to help
6 sc into magic ring
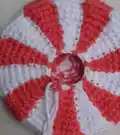
7sc into magic ring (7)
1 sc red and 1sc white in same st, repeat all round (14)
2 red sc in red st, 1 white sc in white st (21) Use white in white stitches, red in red st
1 sc red, 1 sc red, 2 sc in white st (28)
1 increase red, 1 sc red, 1 sc White, 1 sc White
1 Sc red, 1 sc red, 1 sc red, increase white, 1 sc White
Increase red, 1 Sc red, 1 sc red, increase White, 1 sc White, 1 sc White
Increase red, 1 Sc red, 1 sc red, 1 sc red, 1 sc White in next 4 stitches
1 Sc red in next 5 st, inc white, 1 sc White, 1 sc White, 1 sc White
Increase red, 1 Sc red in next 4 st, increase white, 1 sc White in next 4 st
Increase red, 1 Sc red in next 5 st, 1 sc White in next 6 st
On back loops: 1 sc red in next 7 st, 1 sc White in next 6 st
1 sc red in next 7 st, 1 sc White in next 6 st
On back loops: dec red, 1 Sc red in next 5 st, 1 sc White in next 6 st
Dec red, 1 Sc red in next 4 st, dec white, 1 sc White in next 4 st
1sc red in next 5 st, dec white, 1 sc White in next 3 st
Dec red, 1sc red in next 3 st, 1 sc White in next 4 st
Dec red, 1sc red in next 2 st, dec white, 1 sc White in next 2 st
1 sc red in next 3 st, dec white, 1 sc White
Dec red, 1 sc red, sc white in next two stitches
1 sc red in next 2 st, dec White
dec red, 1 sc White and close
This charming Nutcracker amigurumi brings together so many wonderful holiday elements in one magical project! From the classic soldier uniform to the adorable snowman topper and swirling peppermint base, every detail has been designed to capture the spirit of Christmas. Whether displayed on your mantle or given as a heartfelt gift, this handmade treasure will bring joy season after season. 🎄 Happy crocheting and happy holidays! 🧶✨
Using the recommended 2mm hook and cotton yarn, your Nutcracker will be approximately 20-25cm tall including the hat and candy base. The exact size may vary slightly depending on your tension and yarn weight.
Yes, but keep in mind that changing hook size will affect your final dimensions. A larger hook will create a bigger Nutcracker while a smaller hook will make it more compact. Adjust your stuffing accordingly.
Fabric glue or craft glue works wonderfully for this project. Hot glue can also be used but work quickly as it sets fast. For the wig especially, a strong craft glue ensures the curls stay in place.
The candy base requires careful attention to which color goes in which stitch. Use different colored stitch markers to indicate where red and white sections begin, and always work red stitches in red and white stitches in white.
Absolutely! You can simplify the design by just creating the hat without the snowman. Simply close off the hat top and add a pompom or leave it as a classic military-style cap.
