🧢 Beautiful ✨ Detailed πŸ’ Adorable

Oak Grove Earflap Hat Pattern

Oak Grove Earflap Hat Pattern
4.1β˜… Rating
4-6 Hours Time Needed
3.8K Made This
βœ‚οΈ

Intermediate Level

Ideal for those with basic knitting experience, featuring slightly more advanced stitches and techniques to expand your skills.

⏱️

Weekend Treat

Takes 5-7 hours, making it an enjoyable project to finish over a couple of days.

🧣

Snug Essential

Everyday comfort with practical charm, designed for both functionality and style through changing seasons.

About This Oak Grove Earflap Hat Pattern

This Oak Grove Earflap Hat pattern offers a unique sideways construction method that creates seamless earflaps without additional sewing. The special yarn-over slip stitch technique provides excellent texture and warmth while maintaining elasticity for a comfortable fit. With five comprehensive size options ranging from baby to adult large, you can create matching hats for the entire family. The pattern includes detailed instructions for adding contrast edging, braided ties, and a fluffy pompom to personalize each creation.

Oak Grove Earflap Hat Pattern crochet pattern - detailed view of completed project

Perfect for winter wear, this hat features practical earflaps with braided ties to keep it securely in place during outdoor activities. The worsted weight yarn and special stitch pattern create a dense, warm fabric ideal for cold weather protection.

Why You'll Love This Oak Grove Earflap Hat Pattern

I absolutely love how this pattern uses a sideways construction technique that makes creating the earflaps so much easier than traditional methods! The yarn-over slip stitch creates beautiful texture while working up relatively quickly. I appreciate that it includes five different sizes with precise measurements, so you can ensure a perfect fit for anyone. The customization options with contrast colors let you get creative with team colors or personal preferences. Plus, the detailed pompom and tie instructions mean you get a completely finished, professional-looking accessory.

Oak Grove Earflap Hat Pattern step 1 - construction progress Oak Grove Earflap Hat Pattern step 2 - assembly progress Oak Grove Earflap Hat Pattern step 3 - details and accessories Oak Grove Earflap Hat Pattern step 4 - final assembly and finishing

Switch Things Up

I love experimenting with this versatile earflap hat pattern to create unique variations for different occasions and preferences! One of my favorite modifications is playing with color combinations - instead of using just two colors, I sometimes work with three or four contrast colors in the edging for a vibrant striped effect that really makes the hat pop.

For a more textured look, I've tried working the main body in different stitch patterns while keeping the earflap shaping the same. A simple half double crochet or even a shell stitch can create completely different aesthetics while maintaining the practical warmth.

I also enjoy adjusting the pompom size and style - sometimes I make smaller, tighter pompoms for a more subtle look, or even replace them with tassels or fur pompoms for a trendy modern twist. You could also skip the pompom entirely and add a fun appliquΓ© or crocheted flower instead.

The braided ties are another area where I get creative. Instead of the standard three-strand braid, I sometimes do a four-strand or fishtail braid for added interest. You could even add beads to the ends of the ties or finish them with small crocheted balls instead of simple knots.

For kids' versions, I love adding fun embellishments like crocheted animal ears on top, embroidered faces on the front, or colorful buttons along the band. These personalized touches make each hat truly one-of-a-kind and special for the recipient!

Common Mistakes & How to Fix Them

βœ— Not maintaining consistent stitch count during increases and decreases can cause uneven earflaps - use stitch markers to track your counts carefully βœ— Working the yarn-over slip stitch too tightly creates a stiff fabric that lacks stretch - keep your tension relaxed for proper drape βœ— Skipping the blocking step results in uneven shaping and the hat won't sit properly on the head for best fit βœ— Closing the top of the hat too loosely leaves gaps and cold air can enter - weave the yarn tightly through ridges before securing

Oak Grove Earflap Hat Pattern

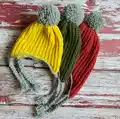
Create a cozy and practical earflap hat that the whole family will love! This versatile pattern works sideways using increases and decreases to form seamless earflaps, keeping ears warm through cold seasons. Customize with contrast edging and pompoms in your favorite team colors or school spirit shades. Available in five sizes from baby to adult large, this utilitarian design combines functionality with style for years of comfortable wear.

Intermediate 4-6 Hours

Materials Needed for Oak Grove Earflap Hat Pattern

β€” Main Fabric

  • 01
    Worsted weight yarn (CYCA#4) for main color: 165-265 yards depending on size, preferably wool, alpaca, acrylic or blend
  • 02
    Worsted weight yarn (CYCA#4) for contrast color: approximately 70 yards for any size, preferably wool, alpaca, acrylic or blend
  • 03
    Kelbourne Woolens Germantown recommended (100% North American Wool, 220 yards per 3.5 oz skein)

β€” Tools Required

  • 01
    US H/8 (5.0 mm) crochet hook for hat body or size needed to obtain gauge
  • 02
    US F/5 (3.75 mm) crochet hook for edging only
  • 03
    Yarn needle for seaming and weaving in ends
  • 04
    Removable stitch markers (optional but helpful for tracking stitches)
  • 05
    3.5 inch (9 cm) piece of cardboard for making pompom
  • 06
    Scissors for cutting yarn and trimming pompom

Progress Tracker

0% Complete

β€” Hat :

Starting Chain :

With larger hook, ch 27 (30, 33, 37, 41)

Row 1 :

Beginning with the second ch from hook and working into the bottom of the chain, 1 YOslst into each st. 26 (29, 32, 36, 40) YOslst

Rows 2-5 (2-7, 2-7, 2-9, 2-9) :

Ch 1, turn, 1 YOslst Blp into each of the next 26 (29, 32, 36, 40) sts

Row 6 (8, 8, 10, 10) - begins increase section :

Ch 3, turn, beginning with the second ch from hook YOslst Blp in each of the next 2 chs, YOslst Blp in each of the next 26 (29, 32, 36, 40) sts. 28 (31, 34, 38, 42) YOslst

Row 7 (9, 9, 11, 11) :

Ch 1, turn, 1 YOslst Blp into each st across until one st remains, YOslst in next st

Row 8 (10, 10, 12, 12) - increase row :

Ch 4, turn, beginning with the second ch from hook YOslst Blp in each of the next 3 chs, YOslst Blp in each of the next 28 (31, 34, 38, 42) sts. 31 (34, 37, 41, 45) YOslst

Row 9 (11, 11, 13, 13) :

Ch 1, turn, 1 YOslst Blp into each st across until one st remains, YOslst in next st

Info :

For sizes toddler (child/adult small, adult medium, adult large) only continue with next rows

Row 12 (12, 14, 14) - increase row :

Ch 4, turn, beginning with the second ch from hook YOslst Blp in each of the next 3 chs, YOslst Blp in each of the next 34 (37, 41, 45) sts. 37 (40, 44, 48) YOslst

Row 13 (13, 15, 15) :

Ch 1, turn, 1 YOslst Blp into each st across until one st remains, YOslst in next st

Info :

For sizes adult medium (adult large) only continue with next rows

Row 16 (16) - increase row :

Ch 4, turn, beginning with the second ch from hook YOslst Blp in each of the next 3 chs, YOslst Blp in each of the next 44 (48) sts. 47 (51) YOslst

Row 17 (17) :

Ch 1, turn, 1 YOslst Blp into each st across

Info :

For all sizes continue here

Row 10 (14, 14, 18, 18) - increase row :

Ch 2, turn, beginning with the second ch from hook YOslst Blp in the next ch, YOslst Blp in each of the next 31 (37, 40, 47, 51) sts. 32 (38, 41, 48, 52) YOslst

Rows 11-16 (15-18, 15-20, 19-22, 19-24) :

Ch 1, turn, 1 YOslst Blp into each st across

Row 17 (19, 21, 23, 25) - begins decrease section :

Ch 1, turn, YOslst Blp in each of the next 30 (36, 39, 46, 50) sts, YOslst2tog Blp. 31 (37, 40, 47, 51) YOslst

Row 18 (20, 22, 24, 26) :

Ch 1, turn, 1 YOslst Blp into each st across

Row 19 (21, 23, 25, 27) - decrease row :

Ch 1, turn, YOslst Blp in each of the next 27 (33, 36, 43, 47) sts, YOslst2tog Blp twice. 29 (35, 38, 45, 49) YOslst

Row 20 (22, 24, 26, 28) - decrease row :

Ch 1, turn, YOslst2tog Blp, YOslst Blp in each of the next 27 (33, 36, 43, 47) sts. 28 (34, 37, 44, 48) YOslst

Row 21 (23, 25, 27, 29) - decrease row :

Ch 1, turn, YOslst Blp in each of the next 24 (30, 33, 40, 44) sts, YOslst2tog Blp twice. 26 (32, 35, 42, 46) YOslst

Row 22 (24, 26, 28, 30) - decrease row :

Ch 1, turn, YOslst2tog Blp, YOslst Blp in each of the next 24 (30, 33, 40, 44) sts. 25 (31, 34, 41, 45) YOslst

Info :

For sizes toddler (child/adult small, adult medium, adult large) only continue with next rows

Row 25 (27, 29, 31) - decrease row :

Ch 1, turn, YOslst Blp in each of the next 27 (30, 37, 41) sts, YOslst2tog Blp twice. 29 (32, 39, 43) YOslst

Row 26 (28, 30, 32) - decrease row :

Ch 1, turn, YOslst2tog Blp, YOslst Blp in each of the next 27 (30, 37, 41) sts. 28 (31, 38, 42) YOslst

Info :

For sizes adult medium (adult large) only continue with next rows

Row 31 (33) - decrease row :

Ch 1, turn, YOslst Blp in each of the next 34 (38) sts, YOslst2tog Blp twice. 36 (40) YOslst

Row 32 (34) - decrease row :

Ch 1, turn, YOslst2tog Blp, YOslst Blp in each of the next 34 (38) sts. 35 (39) YOslst

Info :

For all sizes continue here

Row 23 (27, 29, 33, 35) - decrease row :

Ch 1, turn, YOslst Blp in each of the next 23 (26, 29, 33, 37) sts, YOslst2tog Blp. 24 (27, 30, 34, 38) YOslst

Row 24 (28, 30, 34, 36) - decrease row :

Ch 1, turn, YOslst2tog Blp, YOslst Blp in each of the next 22 (25, 28, 32, 36) sts. 23 (26, 29, 33, 37) YOslst

Rows 25-35 (29-41, 31-45, 35-51, 37-55) - section across forehead :

Ch 1, turn, 1 YOslst Blp into each st across

Row 36 (42, 46, 52, 56) - begins increase section :

Ch 3, turn, beginning with the second ch from hook YOslst Blp in each of the next 2 chs, YOslst Blp in each of the next 23 (26, 29, 33, 37) sts. 25 (28, 31, 35, 39) YOslst

Row 37 (43, 47, 53, 57) :

Ch 1, turn, 1 YOslst Blp into each st across until 1 st remains, YOslst in last st

Row 38 (44, 48, 54, 58) - increase row :

Ch 4, turn, beginning with the second ch from hook YOslst Blp in each of the next 3 chs, YOslst Blp in each of the next 25 (28, 31, 35, 39) sts. 28 (31, 34, 38, 42) YOslst

Rows 39-52 (45-60, 49-66, 55-74, 59-80) :

Repeat Rows 7-20 (9-24, 9-26, 11-30, 11-32)

Row 53 (61, 67, 75, 81) - decrease row :

Ch 1, turn, YOslst Blp in each of the next 26 (29, 32, 36, 40) sts, YOslst2tog Blp. 27 (30, 33, 37, 41) YOslst

Row 54 (62, 68, 76, 82) - decrease row :

Ch 1, turn, YOslst2tog Blp, YOslst Blp in each of the next 25 (28, 31, 35, 39) sts. 26 (29, 32, 36, 40) YOslst

Rows 55-60 (63-68, 69-76, 77-84, 83-92) :

Ch 1, turn, 1 YOslst Blp into each st across

β€” Seaming :

Seaming Row :

Turn as if to work another row, fold hat matching ends with foundation row directly behind last row worked. Working through both loops of row in front and front loops of row in back, sl st across. Do not fasten off. Turn so seam is on inside of hat

β€” Edging :

Edging Round :

Change to smaller hook (two sizes smaller than hook used for hat). With CC, ch 1 (does not count as a stitch), SC around edge of hat making one SC into each ridge and either 1, 2, OR 3 SC between ridges along earflaps. Place 1 SC in each row-end across straight edges. Slst into first SC of edging round and fasten off

Final Edging :

Continuing with smaller hook and CC, pull up loop in same st as join, YOslst in each st around, sl st to fasten off

β€” Finishing :

Top Closure :

Use a double-stranded length of MC to weave through each ridge along top edge of hat, and pull tight to close top of hat as much as possible. Turn hat inside out and use yarn tails to sew remaining hole at top of hat closed. Weave in ends, turn RS out and block

β€” Pompom :

Pompom Instructions :

Cut 1 piece of CC yarn to 16 inches and set aside. Cut 1 piece of CC yarn to 32 inches and set aside. Wrap CC yarn loosely around 3.5 inch cardboard about 140-160 times. Before removing loops from cardboard, tie the 16 inch piece tightly around loops near center. Fold the 32 inch piece in half, then holding doubled, tie center of opposite side in tight knot. Carefully slide loops off cardboard and tie doubled piece around center of loops on both sides with very tight knot. Use scissors to cut all loops, being careful not to cut the two longer strands. Fluff pompom and trim ends into a 3.5 inch ball. Using yarn needle and long strands, attach pompom to top of hat. Weave in ends

β€” Tie Ends :

Tie Instructions :

Cut 24 pieces of CC at 32 inches. Set 12 pieces aside for second tie. Insert hook from WS to RS through earflap near tip, lay center of 12 strands of cut yarn over hook, and pull through earflap until large enough loop forms to pull all 24 ends through. Divide strands into 3 equal sections (8 ends each) and braid until desired length. Tie in overhand knot and trim ends. Repeat for opposite tie end with remaining 12 strands

Assembly Instructions

  • After completing all rows, fold the hat with foundation row behind last row worked and seam together using slip stitch method
  • Add contrast color edging around entire hat opening, adjusting stitch count to prevent puckering or stretching along earflaps
  • Complete a final round of yarn-over slip stitches in contrast color around the entire edge for polished finish
  • Weave double-stranded main color yarn through ridges at top of hat and pull tightly to gather and close opening
  • Turn hat inside out to sew remaining hole closed at top, then turn right side out and block for best shape
  • Create pompom using cardboard template and attach securely to top of hat using long yarn tails
  • Add braided ties to each earflap tip by pulling yarn strands through and braiding into three sections

Important Notes

  • πŸ’‘Turning chains do not count as stitches throughout this pattern - do not work into them on following rows
  • πŸ’‘Use removable stitch markers to track first and last stitch of each row for accurate stitch counts, especially helpful for beginners
  • πŸ’‘Child/small adult size uses nearly all of one skein of main color yarn - consider purchasing extra skein to avoid running out
  • πŸ’‘Gauge is crucial for proper fit - take time to check that 16 stitches and 15 rows equal 4 inches in the yarn-over slip stitch pattern
  • πŸ’‘Hat has considerable stretch and fits best when measuring 0-2 inches smaller than actual head circumference for snug comfortable fit
  • πŸ’‘Adjust edging stitch count along earflaps based on your tension - use fewer stitches if edge puckers, more if it stretches

This Oak Grove Earflap Hat pattern brings together practical cold-weather functionality with customizable style options that make it perfect for the whole family. The unique sideways construction creates seamless earflaps that are both comfortable and effective at keeping ears warm during winter activities. With five size options and endless color combinations for the contrast edging and pompom, you can create matching sets or personalized pieces in favorite team colors. The special yarn-over slip stitch technique creates beautiful texture while working up relatively quickly for an enjoyable weekend project. 🧢 Happy crocheting! 🧡✨

You ask,

we answer.

FAQs

What does it mean that this hat is worked sideways?

Instead of working in rounds from bottom to top, this hat is constructed in turned rows from one side to the other. This unique method allows the earflaps to be shaped naturally through increases and decreases along one edge, eliminating the need for separate pieces or additional seaming.

Can I substitute a different yarn weight for this pattern?

While it's possible to use a different yarn weight, you'll need to adjust your hook size and carefully check gauge. Using lighter or heavier yarn will significantly change the finished measurements, so you may need to recalculate stitch counts for proper fit.

How do I know which size to make?

Measure the head circumference of the intended wearer and choose a size that is 0-2 inches smaller than that measurement. The hat has considerable stretch and fits best when slightly smaller than the actual head size for a snug, comfortable fit.

What is a yarn-over slip stitch and how is it different from regular slip stitch?

A yarn-over slip stitch involves wrapping yarn over the hook before inserting it into the stitch, then pulling through both loops at once. This creates more height and texture than a regular slip stitch, giving the hat its distinctive look and warm, dense fabric.

Do I need to block this hat after finishing?

Yes, blocking is highly recommended for this pattern. It helps even out the stitches, sets the shape properly, and ensures the hat sits correctly on the head. Simply wet or steam block according to your yarn's care instructions.

Can I make this hat without the pompom and ties?

Absolutely! The pompom and braided ties are decorative elements that can be omitted if you prefer a simpler look. The hat is fully functional without them, though the ties do help keep the earflaps secure in windy conditions.