🧢 Beautiful ✨ Detailed πŸ’ Adorable

Pocket Wall Hanging Pattern

Pocket Wall Hanging Pattern
4.2β˜… Rating
6-8 Hours Time Needed
2.0K Made This
βœ‚οΈ

Intermediate Level

Ideal for those with basic knitting experience, featuring slightly more advanced stitches and techniques to expand your skills.

⏱️

Weekend Treat

Takes 5-7 hours, making it an enjoyable project to finish over a couple of days.

🏑

Cozy Accent

A warm touch for your space that transforms ordinary corners into inviting nooks filled with handmade charm.

About This Pocket Wall Hanging Pattern

Pocket Wall Hanging Pattern crochet pattern - detailed view of completed project

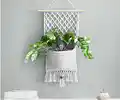
Perfect for organizing small treasures like keys, mail, or craft supplies, this wall hanging adds both style and functionality to your home. The neutral grey color works beautifully in any decor style, from modern minimalist to cozy farmhouse.

Why You'll Love This Pocket Wall Hanging Pattern

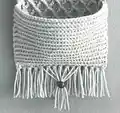
I absolutely love this pattern because it teaches you the beautiful diamond stitch technique while creating something genuinely useful for your home. The combination of decorative texture and practical storage makes this project so rewarding to complete. I find the rhythm of the front post treble stitches meditative once you get the hang of them, and watching those diamond shapes emerge row by row is incredibly satisfying. The finishing touches with the tassels and bead give it such a professional, boutique look that you'll be proud to display or gift. Plus, having a stylish spot to stash your essentials near the door or by your workspace just makes daily life a little easier and prettier.

Pocket Wall Hanging Pattern step 1 - construction progress Pocket Wall Hanging Pattern step 2 - assembly progress Pocket Wall Hanging Pattern step 3 - details and accessories Pocket Wall Hanging Pattern step 4 - final assembly and finishing

Switch Things Up

I love experimenting with color in this pattern to completely transform its look and feel! Try using a variegated or self-striping yarn to watch the diamond pattern come alive with color transitions, or work in bold jewel tones like deep teal or burgundy for a more dramatic statement piece. You could also create an ombre effect by gradually changing yarn shades every few rows throughout the diamond section.

For a more personalized touch, I sometimes add embroidery details to the front of the pocket using contrasting colors - simple flowers, initials, or geometric shapes work beautifully. The back loop only rows create perfect little valleys that make surface stitching incredibly easy and neat.

Another fun variation I enjoy is making the pocket section in a contrasting color or pattern. You could work it in stripes, add a simple border in a accent color, or even work a different texture stitch while maintaining the same stitch count. The diamond section and pocket don't have to match perfectly to look cohesive and intentional.

Common Mistakes & How to Fix Them

βœ— Forgetting to skip stitches after working FPtr or FPtr2tog before the next set of single crochets, which throws off the diamond pattern alignment βœ— Not working into the correct rows when creating front post stitches, causing the diamonds to appear uneven or misshapen throughout the design βœ— Pulling front post treble stitches too tight or leaving them too loose, resulting in diamonds that don't have uniform shape and texture βœ— Missing the transition to back loop only stitches when starting the pocket section, which affects the folding line and pocket structure βœ— Incorrectly counting stitches during increase rounds in the pocket, leading to a pocket that doesn't lay flat or align properly with edges

Pocket Wall Hanging Pattern

Create a stunning decorative wall hanging featuring an elegant diamond stitch pattern with a functional pocket at the bottom. This beautiful piece measures 8 inches by 17 inches and combines textured stitchwork with practical storage, making it perfect for organizing small items while adding handmade charm to any room. The design includes detailed tassels with a bead accent and hangs gracefully from a wooden dowel, creating a bohemian-inspired accent piece that's both stylish and useful for your home decor.

Intermediate 6-8 Hours

Materials Needed for Pocket Wall Hanging Pattern

β€” Main Fabric

  • 01
    225 yards of light grey yarn size 4 weight (Craftsmart Value in Mushroom or similar)
  • 02
    Light grey worsted weight yarn approximately 225 yards total for complete project

β€” Tools Required

  • 01
    5mm crochet hook
  • 02
    Yarn needle
  • 03
    Scissors
  • 04
    Wooden dowel for hanging
  • 05
    Small brass or wooden bead for tassel decoration
  • 06
    Stitch markers (recommended)

Progress Tracker

0% Complete

β€” Diamond Stitch Section :

Row 1 :

ch 30. Starting in the 2nd ch from the hook, sc into the back bump of each ch (29)

Row 2 :

dc into each st (29)

Row 3 :

Work a FPtr into the 2nd st from the right of row 1. [Skip a st and then sc into the next 3 sts of row 2. FPtr2tog by working into the same st as the last FPtr st worked, skip the next 3 sts of row 1, and then work into the 4th st] 6 times. When you have 5 sts left in the row, skip a st and then sc into the next 3 sts of row 2. FPtr into the same st as the last FPtr worked from row 1, but stop before completing the stitch (with 2 loops left on the hook). Work a sl st by inserting your hook into the last stitch of the row, pulling up a loop and then pulling that loop through both loops on the hook (29)

Row 4 :

dc into each st (29)

Row 5 :

sc 2. FPtr2tog by working around the first FPtr from row 3 and then around the following FPtr2tog (around the entire upside down V). [Skip a st and then sc into the next 3 sts of row 4. FPtr2tog by working around the last FPtr2tog from row 3 that you just worked around and then around the following FPtr2tog from row 3] 5 times. When there are 7 stitches left in the row, skip a st and then sc into the next 3 sts of row 4. FPtr2tog by working around the last FPtr2tog from row 3 that you just worked around and then around the final FPtr from row 3. Skip a st and then sc into the last 2 sts (29)

Row 6 :

dc into each st (29)

Row 7 :

FPtr around the first FPtr2tog from row 5. [Skip a st and then sc into the next 3 sts of row 6. FPtr2tog by working around the last FPtr2tog you just worked around and then around the following FPtr2tog from row 5] 6 times. When you have 5 sts left in the row, skip a st and then sc into the next 3 sts of row 6. FPtr around the last FPtr2tog that you just worked around from row 5, but stop before completing the stitch (with 2 loops left on the hook). Work a sl st by inserting your hook into the last stitch, pulling up a loop and then pulling that loop through both loops on the hook (29)

Rows 8-39 :

Repeat the same sequence [rows 4-7] 8 times (29)

β€” Pocket Section :

Row 40-42 :

sc into the BLO of each st (29)

Row 43 :

[sc 9, inc, sc 9, inc, sc 9] into the BLO of each st (31)

Row 44 :

sc into the BLO of each st (31)

Row 45 :

[sc 10, inc, sc 9, inc, sc 10] into the BLO of each st (33)

Row 46 :

sc into the BLO of each st (33)

Row 47 :

[sc 10, inc, sc 11, inc, sc 10] into the BLO of each st (35)

Row 48 :

sc into the BLO of each st (35)

Row 49 :

[sc 17, inc, sc 17] into the BLO of each st (36)

Row 50 :

sc into the BLO of each st (36)

Row 51 :

[sc 17, inc, sc 18] into the BLO of each st (37)

Row 52-67 :

sc into the BLO of each st (37)

β€” Tassels :

Step 1 :

Cut 30 strands of 5.5 inch yarn, and 7 strands of 8.5 inch yarn

Step 2 :

Use 2 strands of the 5.5 inch yarn for each tassel. There will be 15 tassels placed on every other stitch, starting in one corner

Step 3 :

To make a tassel, fold the 2 strands in half. Insert your hook up through the back of the stitch and pull up a loop of the strands. Pull the ends through the loop and tighten

Step 4 :

Make a tassel using one strand of the 8.5 inch yarn on top of each of the 7 center tassels you already created

Step 5 :

Take one strand from each long tassel (or both if your bead is larger), and thread through the bead. Make a knot underneath the bead if you need to

Step 6 :

Trim the remaining long strands not used in the bead to make them level with the shorter strands

Assembly Instructions

  • Fasten off the pocket section after completing row 67 and weave in all loose ends with your yarn needle
  • Fold the pocket section upward to overlap with the diamond stitch pattern section, aligning the edges carefully
  • Using your yarn needle and matching yarn, sew the two layers together along both side edges to create the pocket opening
  • Fasten off and weave in all remaining ends securely on the wrong side of the work
  • Attach the wooden dowel to the top edge by threading yarn around the dowel and through each stitch across the top row
  • To prevent corners from pinching, secure the hanging yarn to each end of the wooden dowel before hanging on wall
  • If needed for heavier items, use small tacks below the pocket edge to pin the wall hanging flush against the wall for added stability

Important Notes

  • πŸ’‘Maintain consistent tension throughout the project, especially during front post stitches to ensure even diamond shapes
  • πŸ’‘Use stitch markers to track your position in pattern repeats and to mark the beginning of each row
  • πŸ’‘Practice the FPtr and FPtr2tog techniques on a swatch before starting the main project if you're new to these stitches
  • πŸ’‘Always skip a stitch after completing front post stitches before working the next set of single crochets
  • πŸ’‘The back loop only technique in rows 40-42 creates a natural fold line for the pocket section
  • πŸ’‘This wall hanging is designed for lightweight items only, such as mail, keys, or small craft supplies
  • πŸ’‘Take care when working row 3 to establish the diamond pattern correctly as all subsequent rows build on this foundation

This elegant Pocket Wall Hanging pattern brings together beautiful texture and everyday function in one stunning piece. The diamond stitch creates visual interest while the practical pocket keeps your essentials organized and within reach. Whether you're looking to add handmade charm to your entryway, organize your craft supplies, or create a thoughtful housewarming gift, this pattern delivers style and substance. The finished piece showcases your crochet skills while serving as a daily reminder of the beauty in handmade items. Happy crocheting! 🧢✨

You ask,

we answer.

FAQs

What is the diamond stitch and is it difficult to learn?

The diamond stitch uses front post treble crochet techniques to create raised diamond shapes on the fabric surface. While it looks complex, it becomes intuitive once you understand the pattern of working around posts from previous rows. Practice the FPtr technique on a small swatch first and follow the pattern carefully for best results.

Can I use a different yarn weight for this pattern?

Yes, but your finished dimensions will change accordingly. If using a different weight, adjust your hook size to match the yarn weight and work a gauge swatch first. Lighter weight yarns will create a smaller, more delicate piece while heavier yarns will make it larger and sturdier.

How do I know where to work the front post stitches?

The pattern specifies which row to work into for each front post stitch. Always work around the post of stitches from two rows below your current row. The key is following the established diamond pattern and remembering to skip a stitch after each front post stitch before working your single crochets.

What size items can the pocket hold?

The pocket is designed for lightweight, small items like keys, mail, pens, small craft supplies, or remotes. It measures approximately 8 inches wide and can accommodate items that weigh up to a few ounces. For heavier items, use the optional tacking method mentioned in the notes.

Can I make the wall hanging without the tassels?

Absolutely! The tassels are a decorative element and can be omitted if you prefer a cleaner, more minimalist look. You could also substitute different finishing options like fringe, pom poms, or leave the bottom edge plain.