🧢 Beautiful ✨ Detailed πŸ’ Adorable

Rac the Raccoon Amigurumi Pattern

Rac the Raccoon Amigurumi Pattern
4.2β˜… Rating
6-8 Hours Time Needed
3.2K Made This
βœ‚οΈ

Intermediate Level

Ideal for those with basic knitting experience, featuring slightly more advanced stitches and techniques to expand your skills.

⏱️

All-Day Adventure

Requires 8-10 hours, ideal for a full day of immersive knitting.

🐾

Pocket Pal

A mini friend to carry anywhere, providing comfort and companionship in a perfectly portable size.

About This Rac the Raccoon Amigurumi Pattern

Rac the Raccoon Amigurumi Pattern crochet pattern - detailed view of completed project

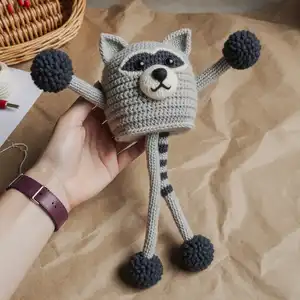
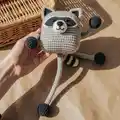
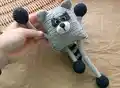
Standing at 27 cm from ears to feet, Rac is the perfect size for little hands to grasp and cuddle. The combination of grey, black, and white yarns creates authentic raccoon coloring that brings this woodland creature to life.

Why You'll Love This Rac the Raccoon Amigurumi Pattern

I absolutely love this pattern because it brings together functionality and cuteness in one incredible project. The stretchy limbs aren't just adorable – they actually help children develop hand-eye coordination and motor skills through play. I find the color-changing technique for the striped tail both challenging and rewarding, and the final result always brings smiles. There's something special about creating a toy that's both educational and entertaining, and Rac delivers on both fronts beautifully.

Rac the Raccoon Amigurumi Pattern step 1 - construction progress Rac the Raccoon Amigurumi Pattern step 2 - assembly progress Rac the Raccoon Amigurumi Pattern step 3 - details and accessories Rac the Raccoon Amigurumi Pattern step 4 - final assembly and finishing

Switch Things Up

I love experimenting with different color combinations for Rac the Raccoon – while the traditional grey and black creates an authentic woodland look, you could try brown and cream tones for a softer aesthetic, or even get creative with bright colors for a more whimsical version. The beauty of this pattern lies in its versatility.

If you want to make Rac even more special, consider adding a small fabric bow around the neck or creating tiny accessories like a miniature scarf. Some makers have embroidered little details on the paws or added felt patches to personalize their raccoon.

For those looking to adjust the size, using thicker yarn with a larger hook will create a bigger buddy, while thinner thread with smaller hooks produces an adorable miniature version. Just remember that changing the size will affect how the stretchy limbs function.

You could also experiment with the limb length – adding or subtracting rounds in the grey section changes how much the limbs can stretch. I've seen beautiful variations where crafters made the legs slightly longer than the arms for a different proportional look.

Another fun modification is creating different facial expressions by adjusting eye placement or embroidering different mouth shapes. A slightly upturned mouth makes Rac look cheerful, while a straight line creates a more serious woodland guardian vibe.

Common Mistakes & How to Fix Them

βœ— Not stuffing the black paw sections tightly enough before transitioning to grey yarn, which can cause the limbs to become floppy and lose their stretchy quality. βœ— Forgetting to leave the grey middle section of the limbs unstuffed, which is essential for achieving the proper stretchy effect that makes this toy unique. βœ— Placing the safety eyes too close together or at the wrong angle, which can affect the raccoon's characteristic facial expression and overall appearance. βœ— Over-stuffing the body during assembly, making it difficult to properly insert and secure the stretchy arm-leg pieces between the designated rows. βœ— Sewing the tail too low on the back instead of centering it properly, which throws off the balanced proportions of the finished raccoon.

Rac the Raccoon Amigurumi Pattern

Meet Rac the Raccoon, an adorable stretchy companion designed to spark imagination and develop fine motor skills in children aged 2 to 120. This unique amigurumi features extendable limbs that can stretch up and down, creating endless play possibilities. With its charming raccoon mask, striped tail, and huggable body, Rac becomes an instant favorite for both kids and adults who love creative, interactive toys.

Intermediate 6-8 Hours

Materials Needed for Rac the Raccoon Amigurumi Pattern

β€” Main Fabric

  • 01
    YarnArt Jeans 50gr/160m (55% cotton, 45% acrylic) in grey shade 80
  • 02
    YarnArt Jeans in black shade 28
  • 03
    YarnArt Jeans in white shade 62
  • 04
    Alize Cotton Gold 100gr/330m (55% cotton, 45% acrylic) in dark grey shade 87

β€” Tools Required

  • 01
    2mm crochet hook
  • 02
    3mm crochet hook
  • 03
    8mm safety eyes
  • 04
    Fiber filler/stuffing
  • 05
    Scissors
  • 06
    Large eye needle for sewing
  • 07
    Stitch markers (if necessary)

Progress Tracker

0% Complete

β€” Arms and Legs (make 2) :

Info :

Arms and legs are crocheted in one piece. Begin crocheting in black with 2 mm hook.

Round 1 :

6 MR (6)

Round 2 :

INC *6 (12)

Round 3 :

(1 SC, INC)*6 (18)

Round 4 :

(2 SC, INC)*6 (24)

Round 5 :

(3 SC, INC)*6 (30)

Round 6-9 :

4 rnds straight: 30 SC

Round 10 :

(DEC, 3 SC)*6 (24)

Round 11 :

(DEC, 2 SC)*6 (18)

Round 12 :

(DEC, 1 SC)*6 (12)

Info :

Stuff tightly.

Round 13 :

(DEC, 4 SC)*2 (10)

Info :

Switch to grey yarn. Go on crocheting. Don't stuff the grey piece.

Round 14-65 :

52 rnds straight: 10 SC

Info :

Switch to black yarn.

Round 66 :

(INC, 4 SC)*2 (12)

Round 67 :

(1 SC, INC)*6 (18)

Round 68 :

(2 SC, INC)*6 (24)

Round 69 :

(3 SC, INC)*6 (30)

Round 70-73 :

4 rnds straight: 30 SC

Round 74 :

(DEC, 3 SC)*6 (24)

Round 75 :

(DEC, 2 SC)*6 (18)

Round 76 :

(DEC, 1 SC)*6 (12)

Info :

Stuff the piece.

Round 77 :

DEC*6 fasten off.

β€” Ears (make 2) :

Info :

Work in grey with 2 mm hook.

Round 1 :

6 MR (6)

Round 2 :

(1 SC, INC)*3 (9)

Round 3 :

1 rnd straight: 9 SC (9)

Round 4 :

(2 SC, INC)*3 (12)

Round 5 :

(3 SC, INC)*3 (15)

Round 6 :

1 rnd straight: 15 SC

Round 7 :

(4 SC, INC)*3 (18)

Round 8 :

1 rnd straight: 18 SC

Info :

Fold in half and single crochet 9 through both edges. Leave a long yarn tail for sewing.

β€” Snout (nose) :

Info :

Work in white with 2 mm hook.

Round 1 :

6 MR (6)

Round 2 :

INC*6 (12)

Round 3 :

INC*12 (24)

Round 4-6 :

3 rnds straight: 24 SC

Info :

Leave a long yarn tail for sewing. Stuff the piece.

β€” Eyes (make 2) :

Info :

Work in dark grey with 2 mm hook. Chain 4 as if into MR, but do not join in the round, work in turning rows. Make 1 turning CH at the end of each row.

Row 1-2 :

2 rows straight: 4 SC

Row 3 :

INC, 2 SC, INC (6)

Row 4-5 :

2 rows straight: 6 SC

Info :

Leave a long yarn tail for sewing.

β€” Tail :

Info :

Then alternate grey and black yarn every 3 rounds. Use 2 mm hook. Stuff the tail gradually. In black:

Round 1 :

6 MR (6)

Round 2 :

(1 SC, INC)*3 (9)

Round 3 :

1 rnd straight: 9 SC (9)

Round 4 :

INC*9 (18)

Round 5 :

1 rnd straight: 18 SC (18). Switch to grey.

Round 6 :

(1 SC, INC)*9 (27)

Round 7-8 :

2 rnds straight: 27 SC. Switch to black.

Round 9-11 :

3 rnds straight: 27 SC. Switch to grey.

Round 12-14 :

3 rnds straight: 27 SC. Switch to black.

Round 15 :

(1 SC, DEC)*9 (18)

Round 16-17 :

2 rnds straight: 18 SC. Switch to grey.

Round 18-20 :

3 rnds straight: 18 SC. Switch to black.

Round 21-23 :

3 rnds straight: 18 SC. Switch to grey.

Round 24-25 :

2 rnds straight: 18 SC

Round 26 :

(1 SC, DEC)*6 (12). Switch to black.

Round 27-29 :

3 rnds straight: 12 SC in black.

Info :

Fold in half and single crochet 6 through both edges. Leave a long yarn tail for sewing.

β€” Body (make 2) :

Info :

Work in grey with 3 mm hook. Chain 25, and starting into the 2nd stitch from hook work 24 SC.

Row 1-19 :

19 rows straight: 24 SC, make 1 turning CH at the end of each row.

Row 20 :

1 SC, DEC, 18 SC, DEC, 1 SC (22)

Round 21 :

1 rnd straight: 22 SC

Round 22 :

1 SC, DEC, 16 SC, DEC, 1 SC (20)

Round 23-25 :

3 rnds straight: 20 SC.

Info :

Fasten off and cut yarn.

Assembly Instructions

  • Begin joining the two body parts together from the right upper corner using 2mm hook, working 19 SC through both parts' stitches, then 2 SC to the corner stitch.
  • At the side edge, insert the first arm-leg piece between rows 11 and 15 by working 10 SC through both parts, then 3 SC across front part only, position the limb, and continue with 11 SC through both parts and 2 SC to corner.
  • Along the bottom edge, work 5 SC through both parts, 3 SC across front only, insert arm-leg piece, work 6 SC through both parts, 3 SC across front only, insert second arm-leg piece, then 5 SC and 2 SC to corner.
  • Stuff the body firmly before continuing with the remaining side, working 11 SC through both parts, 3 SC across front only, adding more stuffing, then finishing with 10 SC through both parts.
  • Sew the ears onto the outer corners of the body at the top.
  • Install 8mm safety eyes in the second row of the eye pieces, then sew these eye pieces between rows 16-22 in the middle of the face, adding white yarn details for eye whites.
  • Sew the white snout in the middle below the eyes at the level of rows 12-13, then embroider a black nose on the snout, and attach the striped tail centered on the back.

Important Notes

  • πŸ’‘Use stitch markers to keep track of rounds, especially during the long stretchy limb sections and color changes in the tail
  • πŸ’‘Remember not to stuff the grey middle section of the limbs - this is crucial for achieving the stretchy effect
  • πŸ’‘Stuff the black paw sections of the limbs very tightly to create proper contrast with the unstuffed stretchy parts
  • πŸ’‘Pin all facial features in place before sewing to ensure the raccoon has the correct expression and proportions
  • πŸ’‘When assembling the body with limbs, work carefully and check positioning frequently to ensure limbs are placed symmetrically
  • πŸ’‘The finished toy should measure approximately 27 cm from ears to feet when using the recommended yarn and hook sizes

This delightful Rac the Raccoon pattern combines the cuteness of a woodland creature with innovative stretchy limbs that make playtime extra special. Perfect for developing fine motor skills in children while providing endless entertainment, this amigurumi stands out with its authentic raccoon markings and interactive design. The detailed instructions guide you through creating those unique extendable limbs and the beautifully striped tail that makes Rac truly one-of-a-kind. 🦝 Happy crocheting! 🧢✨

You ask,

we answer.

FAQs

Why shouldn't I stuff the grey middle section of the limbs?

The grey sections are intentionally left unstuffed to create the stretchy, extendable effect that makes this toy unique. Stuffing these sections would make the limbs rigid and defeat the purpose of the interactive stretchy feature that helps develop children's motor skills.

Can I use different yarn brands for this pattern?

Yes, you can substitute other DK weight yarns with similar fiber content (cotton/acrylic blends work best), but keep in mind your finished toy size may vary slightly. The key is maintaining consistent tension and using the recommended hook sizes to achieve the proper fabric density for the stretchy limbs.

How do I ensure the limbs are properly positioned during assembly?

The pattern specifies that arm-leg pieces should be inserted between rows 11 and 15 on the sides. Pin everything in place before sewing, and work the assembly slowly, checking that both limbs on each side are symmetrical and at the same height for a balanced appearance.

Is this toy safe for very young children?

While the pattern specifies age 2-120, always supervise young children with handmade toys. The safety eyes should be secured very tightly, or you can embroider eyes instead for children under 3. Make sure all yarn ends are woven in securely and test the stretchy limbs to ensure they're well-constructed.

How can I make the striped tail look neater when changing colors?

To achieve clean color transitions in the tail, complete the last stitch of each color section by pulling through with the new color. Carry the unused yarn inside the work and weave in ends carefully as you go. The pattern's structured color changes every 2-3 rounds create the authentic raccoon stripe pattern.