About This Ragdoll Pocket Whale Amigurumi Pattern
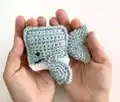
This Ragdoll Pocket Whale pattern is designed with simplicity in mind, using basic single crochet stitches worked in rows to create a flat, huggable body. The pattern features two body panels that are crocheted separately and then joined together, with adorable circular flippers and a distinctive tail. The color-blocking technique with a white belly adds visual interest while keeping the construction straightforward and beginner-friendly.

What makes this whale special is its ragdoll construction method, which creates a softer, more flexible finish than traditional amigurumi. The flat body style makes it perfect for attaching to keyrings or backpacks.
Why You'll Love This Ragdoll Pocket Whale Amigurumi Pattern
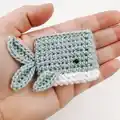
I absolutely love this pattern because it's one of those instant-gratification projects that you can complete in an afternoon while still ending up with something truly special. The ragdoll construction method is so forgiving for beginners, and I find it incredibly satisfying to watch the two flat pieces transform into an adorable three-dimensional whale when you join them together. The color change from blue to white creates such a sweet contrast that captures the essence of a real whale's coloring. Plus, there's something so charming about the pocket-sized scale—it's small enough to take anywhere but detailed enough to showcase your crochet skills. I love making these as quick gifts because they work up so fast, and everyone seems to fall in love with their squishy, huggable texture.
Switch Things Up
I love experimenting with color combinations for this adorable pocket whale to create different ocean-inspired looks. Instead of the classic blue and white, try using pastel pink and cream for a magical baby whale, or go bold with teal and coral for a tropical vibe. You could even create an orca-inspired version using black and white yarn for a dramatic contrast.
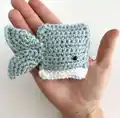
For added personality, I sometimes embroider little details like eyelashes using the same black embroidery thread, or add tiny French knot bubbles around the whale using white or light blue thread. Another fun variation is making the tail slightly larger by working an additional round before folding and attaching it, which gives the whale a more dramatic presence.
If you want to turn this into a holiday ornament instead of a keychain, simply attach a ribbon loop at the top before closing the body. I've also experimented with adding a small bow tie or flower embellishment near the head area using contrasting yarn colors, which gives each whale its own unique character. The ragdoll construction method is so forgiving that you can really play around with embellishments without worrying about ruining the structure.
Common Mistakes & How to Fix Them
✗ Not working in the second chain from the hook for Row 1, which can throw off your stitch count and make the body panel too long or uneven.
✗ Forgetting to chain one and turn at the end of each row, resulting in working in the wrong direction and creating twisted or misshapen body panels.
✗ Overstuffing the body, which can distort the ragdoll shape and make it difficult to close the opening neatly—use minimal stuffing for the best flat appearance.
✗ Sewing the flippers and tail in the wrong positions or at different angles on each side, creating an asymmetrical whale that doesn't hang or display properly.