🧢 Beautiful ✨ Detailed πŸ’ Adorable

Simple Playdays Cardigan Pattern

Simple Playdays Cardigan Pattern
3.9β˜… Rating
8-12 Hours Time Needed
3.3K Made This
βœ‚οΈ

Intermediate Level

Ideal for those with basic knitting experience, featuring slightly more advanced stitches and techniques to expand your skills.

⏱️

All-Day Adventure

Requires 8-10 hours, ideal for a full day of immersive knitting.

πŸ‘•

Casual Chic

Relaxed style with a modern twist, perfect for everyday wear while maintaining that handcrafted uniqueness.

About This Simple Playdays Cardigan Pattern

The Simple Playdays Cardigan is a delightful top-down construction that grows with your crochet hook, starting from the shoulders and working seamlessly to the hem. This pattern features raglan-style increases that create a comfortable fit for babies and toddlers. The versatility shines through with options for simple button bands or decorative shell and ruffle edging, plus adorable rainbow and bunny appliques to add personality. With seven different sizes ranging from preemie to 4 years, this cardigan pattern offers endless opportunities for customization and creative expression.

Simple Playdays Cardigan Pattern crochet pattern - detailed view of completed project

This pattern uses straightforward single crochet stitches with strategic increases to create the classic cardigan shape. The construction method eliminates difficult seaming, making it perfect for those looking to advance their skills while creating a practical, wearable garment for little ones.

Why You'll Love This Simple Playdays Cardigan Pattern

I absolutely love this pattern because it strikes the perfect balance between simplicity and versatility. The top-down construction means I can try it on as I go, ensuring a perfect fit every time. I'm drawn to how customizable it isβ€”whether I want a simple, classic cardigan or something playful with rainbow or bunny appliques, this pattern adapts to my creative mood. The fact that it works up in one piece means less weaving in ends and no complicated seaming. I also appreciate how the pattern includes multiple sizes, making it perfect for gift-giving or creating matching pieces for siblings. The optional edging treatments let me match different styles and preferences, making each cardigan truly unique.

Simple Playdays Cardigan Pattern step 1 - construction progress Simple Playdays Cardigan Pattern step 2 - assembly progress Simple Playdays Cardigan Pattern step 3 - details and accessories Simple Playdays Cardigan Pattern step 4 - final assembly and finishing

Switch Things Up

I love experimenting with this versatile cardigan pattern to create unique pieces every time. Sometimes I work it in a single solid color for a classic, timeless look that pairs with everything. Other times, I use variegated yarn that creates its own beautiful color patterns as I crochet.

For a modern twist, I've tried working the body in one color and the sleeves in a contrasting shade, or even doing color-block sections throughout. The appliques offer another opportunity for creativityβ€”I've made multiple rainbow appliques in different sizes scattered across the front, or created my own simple flower or heart appliques using the same technique as the bunny.

I also enjoy playing with the edging options. The shell edging gives such an elegant, vintage-inspired finish, while the ruffle adds playful movement. Sometimes I skip the edging entirely and add a simple picot border instead. For special occasions, I've sewn tiny ribbon bows at the neckline or added decorative buttons that don't need to be functional.

The beauty of this pattern is how adaptable it is to different yarn weights too. While it's written for DK weight, I've successfully worked it in sport weight for a lighter spring cardigan, adjusting my hook size and checking gauge carefully. Each variation creates a completely different look while using the same basic construction method.

Common Mistakes & How to Fix Them

βœ— Forgetting to work the ch1 at the beginning of rows which doesn't count as a stitch, leading to incorrect stitch counts throughout the pattern. βœ— Not maintaining consistent tension during raglan increases, which can create uneven shoulders and an ill-fitting cardigan with puckered seams. βœ— Skipping the gauge swatch and ending up with a cardigan that's too large or too small for the intended recipient. βœ— Miscounting stitches when dividing for armholes, resulting in uneven front panels or a back that doesn't align properly with button bands.

Simple Playdays Cardigan Pattern

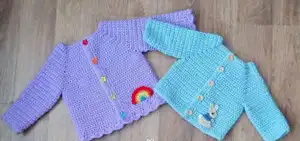
Create a charming handmade cardigan for little ones with this versatile top-down pattern. This one-piece construction cardigan works seamlessly from shoulder to hem, featuring customizable button bands and optional decorative appliques. Available in seven sizes from preemie to 4 years, this pattern offers endless possibilities for personalization with rainbow or bunny appliques, plus shell or ruffle edging options.

Intermediate 8-12 Hours

Materials Needed for Simple Playdays Cardigan Pattern

β€” Main Fabric

  • 01
    DK weight yarn (weight 3) in your choice of colors
  • 02
    Approximately 220-550 metres depending on size (preemie to 4 years)

β€” Tools Required

  • 01
    4mm crochet hook (main cardigan)
  • 02
    3mm crochet hook (button bands)
  • 03
    2mm-4mm crochet hooks for appliques (size-dependent)
  • 04
    4-6 buttons (15mm)
  • 05
    Yarn needle for weaving in ends
  • 06
    Stitch markers
  • 07
    Scissors
  • 08
    Measuring tape

Progress Tracker

0% Complete

β€” Preemie 4-6lb :

Starting Chain :

With a 4mm hook Ch39

Row 1 :

sc in 2nd ch from hook, sc 4, [3 sc] in the next, sc 6, [3 sc] in the next, sc 12, [3 sc] in the next, sc 6, [3 sc] in the next, sc 5. (46) Turn

Row 2 :

ch1, sc in the same, sc to end. (46) Turn

Row 3 :

ch1, sc in the same, sc 5, [3 sc] in the next, sc 8, [3 sc] in the next, sc 14, [3 sc] in the next, sc 8, [3 sc] in the next, sc 6. (54) Turn

Row 4 :

ch1, sc in the same, sc to end. (54) Turn

Row 5 :

ch1, sc in the same, sc 6, [3 sc] in the next, sc 10, [3 sc] in the next, sc 16, [3 sc] in the next, sc 10, [3 sc] in the next, sc 7. (62) Turn

Row 6 :

ch1, sc in the same, sc to end. (62) Turn

Row 7 :

ch1, sc in the same, sc 7, [3 sc] in the next, sc 12, [3 sc] in the next, sc 18, [3 sc] in the next, sc 12, [3 sc] in the next, sc 8. (70) Turn

Row 8 :

ch1, sc in the same, sc to end. (70) Turn

Row 9 :

ch1, sc in the same, sc 8, [3 sc] in the next, sc 14, [3 sc] in the next, sc 20, [3 sc] in the next, sc 14, [3 sc] in next, sc 9. (78) Turn

Row 10 :

ch1, sc in the same, sc to end. (78) Turn

Row 11 :

ch1, sc in the same, sc 9, [3 sc] in the next, sc 16, [3 sc] in the next, sc 22, [3 sc] in the next, sc 16, [3 sc] in the next, sc 10. (86) Turn

Row 12 :

ch1, sc in the same, sc to end. (86) Turn

Row 13 (Divide for armholes) :

ch1, sc in the same, sc 10, [3 sc] in the next, skip 18, [3 sc] in the next, sc 24, [3 sc] in the next, skip 18, [3 sc] in the next, sc 11. (58) Turn

Row 14 :

ch1, sc in the same, sc to end. (58) Turn

Info :

Repeat Row 14 until work measures approx 7 inches from the shoulder, ending with an even row

β€” Sleeves (Preemie) :

Row 1 :

With the wrong side facing join yarn to the first un-worked sc under the arm, ch1, sc in the same, sc 21, slst to first. (22) Turn

Rows 2-9 :

ch1, sc all, slst to first. (22) Turn

Row 10 :

ch1, dec, sc to end, slst to first. (21) Turn

Row 11 :

ch1, sc all, slst to first. (21) Turn

Row 12 :

ch1, dec, sc to end, slst to first. (20) Turn

Row 13 :

ch1, sc all, slst to first. (20) Turn

Row 14 :

ch1, dec, sc to end, slst to first. (19) Turn

Row 15 :

ch1, sc all, slst to first. (19) Turn

Info :

Repeat row 15 until the sleeve measures 7 inches from the shoulder. Fasten off and repeat for the other sleeve

β€” Button/Buttonhole Bands :

Info :

Change to 3mm hook, continuing from body

Button Band Row 1 :

ch1, 1 sc in the same, sc 1 in each row up to the top. Turn

Button Band Row 2 :

Ch1, sc in the same, sc in each stitch back to bottom. Turn

Button Band Row 3 :

Ch1, sc in the same, sc in each stitch back to top. Fasten off

Buttonhole Band Row 1 :

With the right side facing, join yarn to the top of the left hand side of the front edge, ch1, 1 sc in the same, 1 sc in each row. Turn

Info :

Mark out where you want the button holes, on the next row ch1 and skip the one where the markers are

Buttonhole Band Row 2 :

Ch1, sc in the same, sc all but ch1 and skip where the markers are to create the buttonholes. Turn

Buttonhole Band Row 3 :

Ch1, sc in the same and sc in all, including the chains. Fasten off and sew your buttons on to match the button holes and weave in all ends

β€” Rainbow Applique (Optional) :

Row 1 :

with purple, ch 2, 4 sc in second ch from hook. (4) Fasten off

Row 2 :

join blue where fastened off, ch1, 2 sc in each. (8) Fasten off

Row 3 :

join green where fastened off, ch1, sc in same, inc, *sc 1, [2 sc] in the next* repeat to end. (12) Fasten off

Row 4 :

join yellow were fastened off, ch1, sc in same, sc in next, inc, *sc 2, [2 sc] in the next* repeat to end. (16) Fasten off

Row 5 :

join orange where fastened off, ch1, sc in same and next two, inc, *sc 3, [2 sc] in the next* repeat to end. (20) Fasten off

Row 6 :

join red where fastened off, ch1, sc in same, sc to end. (20) Fasten off. Sew in all the ends and sew the rainbow on the cardigan

β€” Bunny Applique (Optional) :

Head :

With beige, Ch4, slst to first to form a ring, ch3, 11 dc in centre of ring, slst to top of ch3. (12)

Ears :

Ch6, sc in the second ch from the hook, sc 4, slst to the base of the ear. Slst into the next stitch, ch6, sc in the second ch from the hook, sc 4, slst to the base of the ear. Fasten off

Body Row 1 :

Skip one stitch from where fastened off. Join in the sweater coloured yarn. ch1, [2 hdc] in the same, hdc 3. (5) Turn

Body Row 2 :

ch1, hdc in the same, hdc 1, [2 hdc] in the next, hdc 2. (6) Turn. Fasten off. Join beige where fastened off

Body Row 3 :

ch1, [2 hdc] in the same, hdc 4, [2 hdc] in the last. (8) Turn

Body Row 4 :

ch1, dec, hdc 4, dec. (6) Fasten off

Finishing :

Add foot, arm, and tail details following pattern instructions. Sew face details with pink nose and black/white eyes. Sew in all ends

Assembly Instructions

  • Complete the cardigan body by working from the starting chain through all raglan increases and dividing for armholes.
  • Work sleeves separately by joining yarn to unworked stitches under each arm and working in the round with decreases.
  • Add button band to the right front edge by working three rows of single crochet with a 3mm hook.
  • Create buttonhole band on left front edge, marking buttonhole placements and working chain spaces on row 2.
  • Sew buttons to button band to align with buttonholes, ensuring secure attachment for functional wear.
  • Optional: Attach rainbow or bunny appliques to front of cardigan using whipstitch or invisible seaming method.
  • Optional: Add shell or ruffle edging around bottom hem for decorative finish, following pattern instructions for stitch multiples.

Important Notes

  • πŸ’‘The ch1 at the beginning of rows does not count as a stitch - always work into the first stitch.
  • πŸ’‘Check gauge carefully before starting: 9 sc x 9 rows should equal 2 inches x 2 inches with 4mm hook.
  • πŸ’‘When dividing for armholes, use stitch markers to ensure you skip the correct number of stitches for each size.
  • πŸ’‘Try the cardigan on the recipient as you work to ensure proper fit, adjusting length as needed before button bands.
  • πŸ’‘Choose applique hook size based on cardigan size: 2mm for preemie/newborn up to 4mm for 3-4 years.
  • πŸ’‘Shell edging requires multiples of 6 stitches plus 1 - add a row of single crochet if needed to achieve correct count.

This adorable Simple Playdays Cardigan pattern combines practical top-down construction with endless creative possibilities. Whether you keep it simple and classic or add playful rainbow and bunny appliques, each cardigan becomes a treasured handmade piece. The seamless raglan design ensures comfort for little ones while the variety of sizes makes it perfect for creating coordinating pieces or gifts that grow with your loved ones. With optional decorative edging and customizable details, this pattern truly makes every cardigan unique. 🧢 Happy crocheting! 🧡✨

You ask,

we answer.

FAQs

What does 'top-down construction' mean?

Top-down construction means you start crocheting at the shoulders and work your way down to the hem. This method allows you to try on the cardigan as you go and easily adjust the length without complicated calculations or seaming.

Can I adjust the length of the cardigan or sleeves?

Absolutely! After dividing for armholes, simply continue working even rows until the body reaches your desired length. For sleeves, repeat the final round until you achieve the sleeve length you want.

Do I need to make the appliques?

No, the appliques are completely optional! The cardigan looks beautiful plain, with simple button bands, or dressed up with the rainbow or bunny decorations. You can also create your own applique designs.

How do I choose which edging option to use?

The plain button band creates a classic, timeless look. The shell edging adds elegant texture, while the ruffle edging creates a fun, playful finish. Choose based on your personal style preference and the recipient's taste.

What if my gauge doesn't match?

If your gauge is off, try adjusting your hook size. Use a larger hook if your stitches are too tight, or a smaller hook if they're too loose. Getting the correct gauge ensures your cardigan will be the right size.