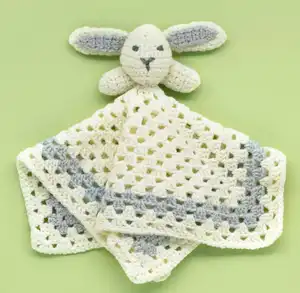
Create an adorable keepsake with this charming Snuggle Bunny blanket pattern! This delightful project combines a cozy granny square blanket with an endearing amigurumi bunny complete with floppy ears, sweet embroidered features, and tiny huggable arms. Perfect for baby gifts or nursery décor, this pattern uses soft baby yarn in gentle colors that create a treasured companion for little ones. The blanket measures 30cm square, making it an ideal lovey or comfort blanket that's just the right size for tiny hands to hold and cuddle.
Progress Tracker
0% Complete
— MAIN SECTION :
Setup :
Make 4 ch using 4mm hook and A, join with ss to form a ring
Round 1 (RS) :
3 ch (counts as first st), 2 tr (dc) into ring, (2 ch, 3 tr (dc) into ring) 3 times, 1 ch, 1 dc (sc) into top of 3 ch at beg of round
Round 2 :
3 ch (counts as first st), 2 tr (dc) into ch sp partly formed by dc (sc) at end of previous round, *1 ch, miss 3 tr (dc), (3 tr (dc), 2 ch and 3 tr (dc)) into next ch sp, rep from * twice more, 1 ch, 3 tr (dc) into same ch sp as used at beg of round, 1 ch, 1 dc (sc) into top of 3 ch at beg of round
Round 3 :
3 ch (counts as first st), 2 tr (dc) into ch sp partly formed by dc (sc) at end of previous round, *1 ch, miss 3 tr (dc), 3 tr (dc) into next ch sp, 1 ch, miss 3 tr (dc)**, (3 tr (dc), 2 ch and 3 tr (dc)) into next ch sp, rep from * to end, ending last rep at **, 3 tr (dc) into same ch sp as used at beg of round, 1 ch, 1 dc (sc) into top of 3 ch at beg of round
Round 4 :
3 ch (counts as first st), 2 tr (dc) into ch sp partly formed by dc (sc) at end of previous round, *(1 ch, miss 3 tr (dc), 3 tr (dc) into next ch sp) twice, 1 ch, miss 3 tr (dc)**, (3 tr (dc), 2 ch and 3 tr (dc)) into next ch sp, rep from * to end, ending last rep at **, 3 tr (dc) into same ch sp as used at beg of round, 1 ch, 1 dc (sc) into top of 3 ch at beg of round
Round 5 :
3 ch (counts as first st), 2 tr (dc) into ch sp partly formed by dc (sc) at end of previous round, *(1 ch, miss 3 tr (dc), 3 tr (dc) into next ch sp) 3 times, 1 ch, miss 3 tr (dc)**, (3 tr (dc), 2 ch and 3 tr (dc)) into next ch sp, rep from * to end, ending last rep at **, 3 tr (dc) into same ch sp as used at beg of round, 1 ch, 1 dc (sc) into top of 3 ch at beg of round
Round 6 :
3 ch (counts as first st), 2 tr (dc) into ch sp partly formed by dc (sc) at end of previous round, *(1 ch, miss 3 tr (dc), 3 tr (dc) into next ch sp) 4 times, 1 ch, miss 3 tr (dc)**, (3 tr (dc), 2 ch and 3 tr (dc)) into next ch sp, rep from * to end, ending last rep at **, 3 tr (dc) into same ch sp as used at beg of round, 1 ch, 1 dc (sc) into top of 3 ch at beg of round
Round 7 :
3 ch (counts as first st), 2 tr (dc) into ch sp partly formed by dc (sc) at end of previous round, *(1 ch, miss 3 tr (dc), 3 tr (dc) into next ch sp) 5 times, 1 ch, miss 3 tr (dc)**, (3 tr (dc), 2 ch and 3 tr (dc)) into next ch sp, rep from * to end, ending last rep at **, 3 tr (dc) into same ch sp as used at beg of round, 1 ch, 1 dc (sc) into top of 3 ch at beg of round
Round 8 :
3 ch (counts as first st), 2 tr (dc) into ch sp partly formed by dc (sc) at end of previous round, *(1 ch, miss 3 tr (dc), 3 tr (dc) into next ch sp) 6 times, 1 ch, miss 3 tr (dc)**, (3 tr (dc), 2 ch and 3 tr (dc)) into next ch sp, rep from * to end, ending last rep at **, 3 tr (dc) into same ch sp as used at beg of round, 1 ch, 1 dc (sc) into top of 3 ch at beg of round
Round 9 :
3 ch (counts as first st), 2 tr (dc) into ch sp partly formed by dc (sc) at end of previous round, *(1 ch, miss 3 tr (dc), 3 tr (dc) into next ch sp) 7 times, 1 ch, miss 3 tr (dc)**, (3 tr (dc), 2 ch and 3 tr (dc)) into next ch sp, rep from * to end, ending last rep at **, 3 tr (dc) into same ch sp as used at beg of round, 1 ch, 1 dc (sc) into top of 3 ch at beg of round
Round 10 :
3 ch (counts as first st), 2 tr (dc) into ch sp partly formed by dc (sc) at end of previous round, *(1 ch, miss 3 tr (dc), 3 tr (dc) into next ch sp) 8 times, 1 ch, miss 3 tr (dc)**, (3 tr (dc), 2 ch and 3 tr (dc)) into next ch sp, rep from * to end, ending last rep at **, 3 tr (dc) into same ch sp as used at beg of round, 1 ch, 1 dc (sc) into top of 3 ch at beg of round
Round 11 :
3 ch (counts as first st), 2 tr (dc) into ch sp partly formed by dc (sc) at end of previous round, *(1 ch, miss 3 tr (dc), 3 tr (dc) into next ch sp) 9 times, 1 ch, miss 3 tr (dc)**, (3 tr (dc), 2 ch and 3 tr (dc)) into next ch sp, rep from * to end, ending last rep at **, 3 tr (dc) into same ch sp as used at beg of round, 1 ch, 1 dc (sc) into top of 3 ch at beg of round
Info :
Break off A and join in B
Round 12 :
3 ch (counts as first st), 2 tr (dc) into ch sp partly formed by dc (sc) at end of previous round, *(1 ch, miss 3 tr (dc), 3 tr (dc) into next ch sp) 10 times, 1 ch, miss 3 tr (dc)**, (3 tr (dc), 2 ch and 3 tr (dc)) into next ch sp, rep from * to end, ending last rep at **, 3 tr (dc) into same ch sp as used at beg of round, 1 ch, 1 dc (sc) into top of 3 ch at beg of round
Round 13 :
3 ch (counts as first st), 2 tr (dc) into ch sp partly formed by dc (sc) at end of previous round, *(1 ch, miss 3 tr (dc), 3 tr (dc) into next ch sp) 11 times, 1 ch, miss 3 tr (dc)**, (3 tr (dc), 2 ch and 3 tr (dc)) into next ch sp, rep from * to end, ending last rep at **, 3 tr (dc) into same ch sp as used at beg of round, 1 ch, 1 dc (sc) into top of 3 ch at beg of round
Info :
Break off B and join in A
Round 14 :
3 ch (counts as first st), 2 tr (dc) into ch sp partly formed by dc (sc) at end of previous round, *(1 ch, miss 3 tr (dc), 3 tr (dc) into next ch sp) 12 times, 1 ch, miss 3 tr (dc)**, (3 tr (dc), 2 ch and 3 tr (dc)) into next ch sp, rep from * to end, ending last rep at **, 3 tr (dc) into same ch sp as used at beg of round, 1 ch, 1 dc (sc) into top of 3 ch at beg of round
Round 15 :
3 ch (counts as first st), 2 tr (dc) into ch sp partly formed by dc (sc) at end of previous round, *(1 ch, miss 3 tr (dc), 3 tr (dc) into next ch sp) 13 times, 1 ch, miss 3 tr (dc)**, (3 tr (dc), 2 ch and 3 tr (dc)) into next ch sp, rep from * to end, ending last rep at **, 3 tr (dc) into same ch sp as used at beg of round, 2 ch, ss to top of 3 ch at beg of round
Round 16 :
1 ch (does NOT count as st), 1 dc (sc) into st at base of 1 ch, 1 dc (sc) into each of next 2 tr, *(1 dc (sc) into next ch sp, 1 dc (sc) into each of next 3 tr) 14 times, 3 dc (sc) into next ch sp**, 1 dc (sc) into each of next 3 tr, rep from * to end, ending last rep at **, ss to first dc (sc)
— HEAD :
Setup :
Make 2 ch using 3mm hook and A
Round 1 (RS) :
6 dc (sc) into 2nd ch from hook, ss to first dc (sc), turn. 6 sts
Round 2 :
1 ch (does NOT count as st), 2 dc (sc) into st at base of 1 ch, 2 dc (sc) into each of next 5 dc (sc), ss to first dc (sc), turn. 12 sts
Round 3 :
1 ch (does NOT count as st), (1 dc (sc) into next dc (sc), 2 dc (sc) into next dc (sc)) 3 times, (2 dc (sc) into next dc (sc), 1 dc (sc) into next dc (sc)) 3 times, ss to first dc (sc), turn. 18 sts
Round 4 :
1 ch (does NOT count as st), 1 dc (sc) into each of first 8 sts, 2 dc (sc) into each of next 2 sts, 1 dc (sc) into each of last 8 sts, ss to first dc (sc), turn. 20 sts
Round 5 :
1 ch (does NOT count as st), (1 dc (sc) into each of next 2 dc (sc), 2 dc (sc) into next dc (sc)) twice, 1 dc (sc) into each of next 3 dc (sc), 2 dc (sc) into each of next 2 dc (sc), 1 dc (sc) into each of next 3 dc (sc), (2 dc (sc) into next dc (sc), 1 dc (sc) into each of next 2 dc (sc)) twice, ss to first dc (sc), turn. 26 sts
Round 6 :
1 ch (does NOT count as st), 1 dc (sc) into each st to end, ss to first dc (sc), turn
Round 7 :
1 ch (does NOT count as st), (1 dc (sc) into each of next 3 dc (sc), 2 dc (sc) into next dc (sc)) twice, 1 dc (sc) into each of next 4 dc (sc), 2 dc (sc) into each of next 2 dc (sc), 1 dc (sc) into each of next 4 dc (sc), (2 dc (sc) into next dc (sc), 1 dc (sc) into each of next 3 dc (sc)) twice, ss to first dc (sc), turn. 32 sts
Round 9 :
1 ch (does NOT count as st), 1 dc (sc) into each of first 15 dc (sc), 2 dc (sc) into each of next 2 dc (sc), 1 dc (sc) into each of last 15 dc (sc), ss to first dc (sc), turn. 34 sts
Round 11 :
1 ch (does NOT count as st), (1 dc (sc) into each of next 3 dc (sc), dc2tog (sc2tog) over next 2 dc (sc)) twice, 1 dc (sc) into each of next 14 dc (sc), (dc2tog (sc2tog) over next 2 dc (sc), 1 dc (sc) into each of next 3 dc (sc)) twice, ss to first dc (sc), turn. 30 sts
Round 13 :
1 ch (does NOT count as st), (1 dc (sc) into each of next 2 dc (sc), dc2tog (sc2tog) over next 2 dc (sc)) twice, 1 dc (sc) into each of next 5 dc (sc), (dc2tog (sc2tog) over next 2 dc (sc)) twice, 1 dc (sc) into each of next 5 dc (sc), (dc2tog (sc2tog) over next 2 dc (sc), 1 dc (sc) into each of next 2 dc (sc)) twice, ss to first dc (sc), turn. 24 sts
Round 14 :
1 ch (does NOT count as st), 1 dc (sc) into each of first 10 sts, (dc2tog (sc2tog) over next 2 sts) twice, 1 dc (sc) into each of last 10 sts, ss to first dc (sc), turn. 22 sts
Round 15 :
1 ch (does NOT count as st), (1 dc (sc) into next st, dc2tog (sc2tog) over next 2 sts) 3 times, (dc2tog (sc2tog) over next 2 sts) twice, (dc2tog (sc2tog) over next 2 sts, 1 dc (sc) into next st) 3 times, ss to first dc (sc), turn. 14 sts
Round 16 :
1 ch (does NOT count as st), (dc2tog (sc2tog) over next 2 sts) 7 times, ss to first st. 7 sts
Info :
Fasten off, leaving a fairly long end
— EARS (MAKE 2) :
Setup :
Make 2 ch using 3mm hook and A
Round 1 (RS) :
4 dc (sc) into 2nd ch from hook, ss to first dc (sc), turn. 4 sts
Round 2 :
1 ch (does NOT count as st), 2 dc (sc) into st at base of 1 ch, 2 dc (sc) into each of next 3 dc (sc), ss to first dc (sc), turn. 8 sts
Round 3 :
1 ch (does NOT count as st), 1 dc (sc) into st at base of 1 ch, 1 dc (sc) into each dc (sc) to end, ss to first dc (sc), turn
Round 4 :
1 ch (does NOT count as st), 2 dc (sc) into st at base of 1 ch, 1 dc (sc) into each of next 2 dc, 2 dc (sc) into each of next 2 dc (sc), 1 dc (sc) into each of next 2 dc (sc), 2 dc (sc) into last dc (sc), ss to first dc (sc), turn. 12 sts
Round 15 :
1 ch (does NOT count as st), dc2tog (sc2tog) over first 2 sts, 1 dc (sc) into each of next 2 dc (sc), (dc2tog (sc2tog) over next 2 dc (sc)) twice, 1 dc (sc) into each of next 2 dc (sc), dc2tog (sc2tog) over last 2 dc (sc), ss to first st, turn. 8 sts
Info :
Fasten off, leaving a fairly long end
— EAR PATCHES (MAKE 2) :
Setup :
Make 2 ch using 3mm hook and B
Row 1 (RS) :
3 dc (sc) into 2nd ch from hook, turn. 3 sts
Row 2 :
1 ch (does NOT count as st), 1 dc (sc) into each dc (sc) to end, turn
Row 10 :
1 ch (does NOT count as st), dc3tog (sc3tog) over all 3 sts, turn. 1 st
Row 11 :
1 ch (does NOT count as st), 1 dc (sc) into top of dc3tog (sc3tog)
Info :
Fasten off, leaving a fairly long end
— ARMS (MAKE 2) :
Setup :
Make 2 ch using 3mm hook and A
Round 1 (RS) :
6 dc (sc) into 2nd ch from hook, ss to first dc (sc), turn. 6 sts
Round 2 :
1 ch (does NOT count as st), 2 dc (sc) into st at base of 1 ch, 2 dc (sc) into each of next 5 dc (sc), ss to first dc (sc), turn. 12 sts
Round 3 :
1 ch (does NOT count as st), 1 dc (sc) into st at base of 1 ch, 1 dc (sc) into each of next 11 sts, ss to first dc (sc), turn
Rounds 4-9 :
Rep last round 6 times more
Info :
Fasten off, leaving a fairly long end
This precious Snuggle Bunny blanket pattern beautifully combines the timeless appeal of granny squares with the adorable charm of amigurumi. Whether you're creating a treasured baby gift or a nursery keepsake, this pattern offers a rewarding project that results in a lovey that will be cherished for years. The sweet bunny with its floppy ears and tiny hugging arms brings personality and warmth to a practical comfort blanket. With clear instructions and baby-safe design considerations, you'll create something truly special. Happy crocheting and enjoy watching this precious companion come to life! 🐰💕