🧶 Beautiful ✨ Detailed 💝 Adorable

Stanley the Strawberry Amigurumi Pattern

Stanley the Strawberry Amigurumi Pattern
3.9★ Rating
1-1.5 Hours Time Needed
4.1K Made This
✂️

Beginner Friendly Level

Perfect for those just starting their sewing journey, with clear instructions and simple techniques

⏱️

Bite-Sized Project

Complete in under 2 hours—quick, fun, and perfect for a little creative escape.

🧸

Tiny Treasure

Small, sweet, and gift-worthy creations that fit perfectly in the palm of your hand with detailed charm.

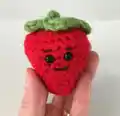
About This Stanley the Strawberry Amigurumi Pattern

Stanley the Strawberry Amigurumi Pattern crochet pattern - detailed view of completed project

This pattern is ideal for using up yarn scraps and practicing your amigurumi basics. The straightforward construction and small size make it a satisfying quick project that you can complete in one sitting, perfect for gift-giving or building your collection of cute crochet friends.

Why You'll Love This Stanley the Strawberry Amigurumi Pattern

I absolutely adore this pattern because Stanley is just ridiculously cute and so rewarding to make! There's something magical about watching a simple red sphere transform into this cheerful little strawberry character with just a few stitches and some embroidery. I love that it works up so quickly—you can make an entire basket of strawberry friends in an afternoon, which is perfect for last-minute gifts or craft fair stock. The small size means it's incredibly portable to work on, and it's so satisfying to see it come together round by round. Plus, the embroidered face gives you creative freedom to give each Stanley their own unique personality and expression. It's the perfect stress-relief project that always brings a smile!

Stanley the Strawberry Amigurumi Pattern step 1 - construction progress Stanley the Strawberry Amigurumi Pattern step 2 - assembly progress Stanley the Strawberry Amigurumi Pattern step 3 - details and accessories Stanley the Strawberry Amigurumi Pattern step 4 - final assembly and finishing

Switch Things Up

Stanley the Strawberry is wonderfully versatile, and I love experimenting with different variations to create a whole collection! Try using different shades of red—from bright cherry red to deep burgundy—to give each strawberry its own unique personality. You could even use pink yarn to create adorable unripe or sweeter-looking berries that are equally charming.

For extra texture and realism, I sometimes embroider tiny yellow French knots or seed stitches all over the red body to represent strawberry seeds. This adds such a delightful detail that really makes Stanley look like the real thing! You can also experiment with the leaf count—instead of 5 leaves, try making 3 larger leaves or 7 smaller ones for variety.

I absolutely love turning Stanley into other fruits by simply changing colors! Use orange with green leaves for a tiny orange, yellow for a lemon (add some white highlights for extra pop), or purple for a sweet plum. Each one works up just as quickly and creates an adorable fruit family. Consider making the stem longer and adding a small loop to transform Stanley into a keychain or bag charm—they make perfect gifts for friends, teachers, or anyone who appreciates handmade cuteness. You could even create a rainbow of fruit friends and display them in a little basket for the most Instagram-worthy craft project ever!

Common Mistakes & How to Fix Them

✗ Forgetting to insert safety eyes between rounds 8-9 before closing the body makes it nearly impossible to add them later ✗ Not stuffing firmly enough creates a floppy strawberry that won't hold its adorable rounded shape and loses its appeal ✗ Skipping the invisible decrease technique results in visible gaps and holes that make the finished piece look less polished ✗ Pulling the yarn tail too loosely when closing the magic ring leaves an obvious hole at the bottom of the strawberry

Stanley the Strawberry Amigurumi Pattern

Meet Stanley the Strawberry, an absolutely adorable mini fruit friend that's perfect for beginners! This charming amigurumi strawberry measures approximately 2.5 inches tall and features the sweetest embroidered face with safety eyes and a cheerful smile. Complete with a leafy green stem on top, Stanley works up quickly using worsted weight yarn and makes a delightful gift, keychain charm, or decorative piece. The pattern includes clear step-by-step instructions for creating this kawaii-style fruit character that's bursting with personality and cuteness.

Beginner Friendly 1-1.5 Hours

Materials Needed for Stanley the Strawberry Amigurumi Pattern

— Main Fabric

  • 01
    Yarn #4 Worsted Weight in Red for the body
  • 02
    Small amount of Green yarn for the stem and leaves
  • 03
    Black embroidery thread or yarn for facial details

— Tools Required

  • 01
    Crochet hook size G (4.0mm or 4.25mm)
  • 02
    Two 6mm safety eyes (optional)
  • 03
    Tapestry needle for weaving and embroidery
  • 04
    Stitch marker
  • 05
    Measuring tape
  • 06
    Fibre fill or stuffing
  • 07
    Scissors
  • 08
    Pins for assembly

Progress Tracker

0% Complete

— Body :

Round 1 :

Using red create a magic ring, sc 6 (6)

Round 2 :

*sc 2, scinc in next* repeat around (8)

Round 3 :

*sc 3, scinc in next* repeat around (10)

Round 4 :

*sc 4, scinc in next* repeat around (12)

Round 5 :

*sc 3, scinc in next* repeat around (15)

Round 6 :

*sc 4, scinc in next* repeat around (18)

Round 7 :

*sc 5, scinc in next* repeat around (21)

Round 8 :

*sc 6, scinc in next* repeat around (24)

Info :

Insert the safety eyes between rnds 8 & 9 (OR embroider eye so they are 1st apart.)

Round 9 :

*sc 7, scinc in next* repeat around (27)

Round 10 :

*sc 8, scinc in next* repeat around (30)

Round 11 :

sc in each st around (30)

Round 12 :

invdec 15 times (15), leaving a long tail, change to green

Round 13 :

*sc, invdec* repeat around (10), join to first with slst

Round 14 :

ch 1, turn, working in front loops *sc, [2dc, ch 2, 2dc] in next* repeat around (5 sc, 5 leaves)

Info :

Fasten off and weave in ends. Using a tapestry needle, weave the yarn tail from the join in and out of the back loops of rnd 14, pull tight to close the hole. Continue to weave the yarn tail in and out of the top until the opening is fully closed.

— Mouth :

Info :

Using a small length of black embroidery thread or yarn, embroider a mouth just below the eyes (See photo on page 1)

— Stem :

Info :

Using green, ch 7 (or until desired length). Fasten off and attach as loop on top of the strawberry (See photo on page 1)

Assembly Instructions

  • After completing round 11, stuff the strawberry body firmly with fiberfill before beginning the decreases to ensure a nice rounded shape.
  • Insert safety eyes between rounds 8 and 9, spacing them approximately 1 stitch apart for the perfect kawaii expression.
  • When working round 14 for the leaves, make sure to work in the front loops only to create the dimensional leafy effect.
  • Weave the long tail from round 12 through the back loops of round 14, pulling tight to close the top opening completely.
  • Embroider a small curved smile below the eyes using black embroidery thread, referring to the photo for placement guidance.
  • Create the stem by chaining 7 stitches in green yarn, then attach it as a loop to the top center of the strawberry.
  • Weave in all remaining ends securely and trim excess yarn for a clean, professional finish.

Important Notes

  • 💡This design is worked in continuous rounds - mark the beginning of each round with a stitch marker to avoid confusion
  • 💡Stuff each piece as you work rather than waiting, as it becomes difficult to stuff properly once the opening is too small
  • 💡Using 6mm safety eyes as suggested creates the perfect proportions for this 2.5-inch design
  • 💡Insert safety eyes according to manufacturer's directions between rnds 8 & 9, approximately 1st apart for best results
  • 💡The invisible decrease technique is essential for creating a smooth, professional finish without visible gaps
  • 💡With G hook, gauge is approximately 5 sc & 5 rows equals 1 inch in single crochet

Stanley the Strawberry is an irresistibly cute amigurumi pattern from SnuggleMe Stitches that's perfect for crocheters of all skill levels! This tiny treasure works up quickly in continuous rounds and features an adorable kawaii-style face with sweet embroidered details. At just 2.5 inches tall, Stanley makes the perfect keychain, gift, or collectible piece that's sure to bring smiles wherever he goes. The pattern includes clear instructions and helpful tips to ensure your strawberry friend turns out absolutely perfect! 🍓🧶✨

You ask,

we answer.

FAQs

What size will my finished Stanley the Strawberry be?

When using #4 worsted weight yarn and a size G (4.0mm or 4.25mm) hook, your finished Stanley will measure approximately 2.5 inches (about 6.4 cm) tall. The size may vary slightly depending on your tension and the specific yarn brand you use.

Can I use embroidered eyes instead of safety eyes?

Absolutely! The pattern notes that you can either use 6mm safety eyes OR embroider the eyes. Embroidered eyes are a great choice if you're making Stanley for young children or if you prefer a softer, more handmade look. Simply use black yarn or embroidery thread to create small circles or French knots between rounds 8 and 9.

What is an invisible decrease and why is it important for this pattern?

An invisible decrease (invdec) is a technique that creates a smoother, more professional-looking decrease without visible gaps or holes. It's especially important for amigurumi like Stanley because it keeps the surface smooth and polished. The pattern uses this technique in rounds 12-13 to shape the top of the strawberry beautifully.

How do I work the leaves in round 14?

Round 14 creates the leafy top by working in the front loops only of round 13. You'll alternate between single crochets and leaf petals made with [2dc, ch 2, 2dc] in the same stitch. This creates 5 dimensional leaves that sit on top of the strawberry. The pattern includes a turn and works in rows rather than continuous rounds for this special decorative finish.

Can I make Stanley in different colors to create other fruits?

Yes! This versatile pattern is perfect for creating a whole fruit basket! Try orange yarn with green leaves for a cute clementine, yellow for a lemon, pink for a peach, or purple for a plum. You can also adjust the stem and leaf details to match different fruit styles. Get creative and make an entire collection!

How do I close the top of the strawberry after adding the leaves?

After completing round 14, you'll use the long tail left from the color change in round 12. Thread it through a tapestry needle and weave it in and out of the back loops of round 14, then pull tight to gather and close the hole. Continue weaving through the top until the opening is completely closed, creating a neat finish hidden under the leaves.