🧢 Beautiful ✨ Detailed πŸ’ Adorable

Summertime Cuties Bucket Hat Pattern

Summertime Cuties Bucket Hat Pattern
4.0β˜… Rating
4-6 Hours Time Needed
4.0K Made This
βœ‚οΈ

Intermediate Level

Ideal for those with basic knitting experience, featuring slightly more advanced stitches and techniques to expand your skills.

⏱️

Weekend Treat

Takes 5-7 hours, making it an enjoyable project to finish over a couple of days.

🧸

Cute Companion

An adorable friend to cherish, handcrafted with love to bring comfort and joy for years to come.

About This Summertime Cuties Bucket Hat Pattern

This bucket hat pattern brings summertime magic to life with adorable animal and nature-inspired designs. The pattern includes complete instructions for creating hats in three different sizes, from newborn to adult, ensuring everyone can enjoy these charming accessories. Each design features detailed decorative elements like chick beaks and cheeks, frog details, bee stripes, and strawberry embellishments that make these hats truly special and memorable.

Summertime Cuties Bucket Hat Pattern crochet pattern - detailed view of completed project

The versatile sizing options make this pattern perfect for family matching sets or thoughtful handmade gifts. With clear gauge instructions and helpful tips throughout, you'll create professional-looking results that bring smiles wherever they go.

Why You'll Love This Summertime Cuties Bucket Hat Pattern

I absolutely love this pattern because it combines practical wearability with pure cuteness in the most delightful way! The ability to create matching hats for the whole family means you can coordinate adorable summer outfits for everyone. I appreciate how the pattern takes a simple bucket hat base and transforms it into personality-filled accessories through creative decorative elements. The polymer clay ring inspiration gives these hats a trendy, modern aesthetic that stands out from typical crochet hat designs. What really makes this special is how customizable it is - you can adjust stripe patterns, choose your favorite theme, or even create your own unique design variations once you master the base techniques.

Summertime Cuties Bucket Hat Pattern step 1 - construction progress Summertime Cuties Bucket Hat Pattern step 2 - assembly progress Summertime Cuties Bucket Hat Pattern step 3 - details and accessories Summertime Cuties Bucket Hat Pattern step 4 - final assembly and finishing

Switch Things Up

I absolutely love experimenting with color combinations on these bucket hats! While the pattern provides beautiful suggested colors, I've found that switching to pastels creates an entirely different soft aesthetic perfect for spring. Try making the chick in lavender and cream, or the strawberry in peachy pink tones for a subtle twist.

Another fun variation I enjoy is adding embroidered details instead of crocheted ones. For the bee design, I sometimes embroider tiny wings with white thread to give extra dimension without bulk. You could also add French knot flowers around the frog's hat brim or create a leafy border on the strawberry version.

Size customization is easier than you might think! If you need something between sizes, simply adjust the number of crown rows. I've made teen versions by working the large size with fewer edging rounds, creating a shallower fit that's trendy and comfortable.

Don't limit yourself to the four designs provided - use the base pattern as your canvas! I've created watermelon versions, ladybug designs, and even sunflower hats using the same construction method. The possibilities are endless once you understand the basic structure.

Common Mistakes & How to Fix Them

βœ— Not checking gauge before starting can result in hats that are too tight or too loose for the intended head size βœ— Forgetting to use stitch markers during increase rounds makes it difficult to track where each round begins and ends βœ— Pulling magic ring tail too tight before completing the first row can cause the center to pucker and distort the hat shape βœ— Overstuffing decorative elements like cheeks makes them look bulky instead of soft and properly proportioned for the hat design

Summertime Cuties Bucket Hat Pattern

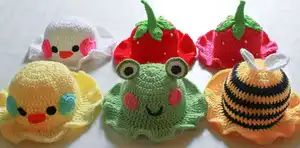
Create adorable bucket hats in three sizes featuring charming designs like strawberries, frogs, chicks, and bees! This delightful pattern guides you through crafting functional and fun hats perfect for newborns, toddlers, and adults. Each design includes step-by-step instructions for decorative elements that transform a simple hat into a whimsical wearable accessory. Whether you're making gifts or building your handmade wardrobe, these summertime cuties bring personality and charm to any sunny day adventure.

Intermediate 4-6 Hours

Materials Needed for Summertime Cuties Bucket Hat Pattern

β€” Main Fabric

  • 01
    Worsted weight yarn in desired colors (Big Twist or Mainstays brands recommended)
  • 02
    Strawberry hat: Bubblegum or hot pink, Varsity Red for body, Spring Green for stem
  • 03
    Frog hat: Light Green, Medium Rose or Pink, Black, White
  • 04
    Chick hat: White, Pale Yellow, Varsity Orange, Aqua, Black, Pretty N' Pink
  • 05
    Bee hat: Yellow, White, Black

β€” Tools Required

  • 01
    Size G 4.0mm crochet hook
  • 02
    Tapestry needle for sewing in ends
  • 03
    Scissors
  • 04
    Polyfill or stuffing (scrap yarn works great)
  • 05
    Stitch markers
  • 06
    Pearl beads for strawberry seeds
  • 07
    Sewing needle
  • 08
    Pink and red thread for attaching seeds

Progress Tracker

0% Complete

β€” Hat Base (All Sizes) :

Info :

ch2 does not count as a stitch at any point. Use magic ring OR ch 3 and slst into first ch made

Row 1 :

ch 2, 13dc into the ring (Pull yarn tail tight if magic ring was used). slst into the first dc made (13dc Total)

Row 2 :

ch2, dc inc into each stitch around and join (26dc Total)

Row 3 :

ch2, [*dc inc, dc*] 13x, join (39dc Total)

Row 4 :

ch2, dc1, [*dc inc, dc 2*] 12x. dc inc, dc in last stitch and join (52dc Total)

Info :

Increase rows end here for small/newborn size

Row 5 :

ch2, [*dc inc, dc 3*] 13x, join (65dc Total)

Info :

Increase rows end here for medium size

Row 6 :

ch2, dc 2, [*dc inc, dc 4*] 12x. dc inc, dc 2 and join (78dc Total)

Info :

This is the end of increase rows for adult/large size

β€” Crown Rows :

Info :

This row will be worked a different amount of times for each hat size

Row 1 :

ch2, dc 1 in each stitch around, join

Info :

Small: Repeat 6 times (52dc Total), Medium: Repeat 7 times (65dc Total), Large: Repeat 7 times (78dc Total)

β€” Edging :

Row 1 :

ch2, [*In flo, dc inc, dc 2*]

Row 2 :

ch2, [*dc inc, dc 2*] until all stitches are filled. Join

Row 3 :

ch2, [*dc, dc inc*] until all stitches are filled. Join and tie off

β€” Bee Color Changes :

Small Hat :

Row 1-3 Yellow, Row 4 Black, Row 5 Yellow, Row 6 Black, Row 7 Yellow, Row 8 Black, Row 9 Yellow, Row 10 Black, Edging rows in yellow

Medium Hat :

Row 1-4 Yellow, Row 5 Black, Row 6 Yellow, Row 7 Black, Row 8 Yellow, Row 9 Black, Row 10 Yellow, Row 11 Black, Row 12 Yellow, Edging rows in yellow

Large Hat :

Row 1-3 Yellow, Row 4-5 Black, Row 6-7 Yellow, Row 8-9 Black, Row 10-11 Yellow, Row 12-13 Black, Edging rows in yellow

β€” Chick Beak (Medium Size) :

Info :

With orange make a slip knot and chain 6. Work in the round, do not join rows

Row 1 :

sc inc into second chain from the hook, sc 3, sc 3 into the last chain. Continuing down the other side of the chain: sc 3, sc into the same space as the first sc inc, pm (12sc Total)

Row 2 :

sc inc, sc 5, sc inc, sc 5, pm (14sc Total)

Row 3 :

sc inc, sc 7, sc inc, sc 5, pm (16sc Total)

Row 4 :

sc inc, sc 8, sc inc, sc 6, pm (18sc Total)

Row 5 :

sc, slst and tie off leaving a long end to sew. Squish it in half as this is how it will be sewn on

β€” Chick Eyes (Medium Size - Make 2) :

Row 1 :

Make a magic ring, ch 1, sc 8 into the ring and pm (8sc Total)

Row 2 :

[sc inc] 8x (16sc Total)

Info :

Join and leave a long end for sewing. Tighten the tail and weave it in

β€” Chick Cheeks (Medium Size - Make 2) :

Row 1 :

Make a magic ring, ch1, sc 8 into the ring and pm (8sc Total)

Row 2 :

Working in the round now! [*sc inc, sc*] 4x, pm (12sc Total)

Row 3 :

[*sc inc, sc*] 6x, pm (18sc Total)

Row 4 :

[*sc 2, sc inc*] 6x, pm (24sc Total)

Row 5 :

sc 24 (24sc Total)

Info :

Tie off leaving a long end to sew. Tighten the tail and weave it in

β€” Chick Beak (Large Size) :

Info :

With orange make a slip knot and chain 8. Work in the round, do not join rows

Row 1 :

sc inc into second chain from hook, sc 5, sc 3 into last chain. Continuing down the other side of the chain: sc 5, sc into the same space as the first sc inc, pm (16sc Total)

Row 2 :

sc inc, sc 7, sc inc, sc 7, pm (18sc Total)

Row 3 :

sc inc, sc 9, sc inc, sc7, pm (20sc Total)

Row 4 :

sc 2, sc inc, sc 9, sc inc, sc7, pm (22sc Total)

Row 5 :

sc 2, slst and tie off leaving a long end to sew. Squish it in half as this is how it will be sewn on

β€” Chick Eyes (Large Size - Make 2) :

Row 1 :

Make a magic ring, ch 1, sc 8 into the ring and pm (8sc Total)

Row 2 :

[sc inc] 8x, pm (16sc Total)

Row 3 :

[*sc inc, sc*] 8x (24sc Total)

Info :

Join and leave a long end for sewing. Tighten the tail and weave it in

β€” Chick Cheeks (Large Size - Make 2) :

Row 1 :

Make a magic ring, ch1, sc 8 into the ring and pm (8sc Total)

Row 2 :

Working in the round now! [*sc inc, sc*] 4x, pm (12sc Total)

Row 3 :

[*sc inc, sc*] 6x, pm (18sc Total)

Row 4 :

[*sc 2, sc inc*] 6x, pm (24sc Total)

Row 5 :

sc 24 (24sc Total)

Row 6 :

[*sc inc, sc*] 12x (38sc Total)

Info :

Tie off leaving a long end to sew. Tighten the tail and weave it in. Stretch the large cheeks out a bit to flatten them

Assembly Instructions

  • Weave in all loose ends from the hat base before attaching decorative elements
  • For chick design: Position and pin the beak in the center of the hat front, then sew securely without stuffing
  • Attach stuffed cheeks on either side of the beak, stuffing them lightly to create gentle dimension
  • Sew eyes above the beak using the long tails, spacing them appropriately for the hat size
  • For strawberry design: Stuff the stem with leftover yarn or fiberfill before sewing it to the top center of the hat
  • Attach pearl beads as strawberry seeds using doubled matching thread, tying each one individually for security
  • For frog design: Slip stitch or sew the mouth detail through the hat, adjusting position until it sits correctly

Important Notes

  • πŸ’‘Gauge is crucial: 4 dc and 2 rows per inch. Check your gauge with a swatch and adjust hook size if needed
  • πŸ’‘The pattern designer notes tighter personal tension, so adjust accordingly based on your own crocheting style
  • πŸ’‘For large size hats with smaller heads, use only 12 dc in the starting ring and remove 1 repeat from each increase row
  • πŸ’‘Feel free to use felt pieces instead of crocheted elements if you prefer not to make small decorative pieces
  • πŸ’‘Pin all decorative elements in place before sewing to ensure proper positioning and spacing
  • πŸ’‘Use the provided photos as reference when assembling your hat for best results
  • πŸ’‘Crochet fabric naturally stretches and has give, so circumference measurements are approximate guides

These Summertime Cuties bucket hats are inspired by adorable polymer clay ring trends and beloved plushie designs! The pattern offers incredible versatility with three size options and multiple theme choices, making it perfect for creating matching family sets or personalized gifts. From cheerful chicks to buzzing bees, playful frogs to sweet strawberries, each design adds personality and whimsy to a practical accessory. The clear instructions and helpful tips ensure your hats turn out beautifully every time. Happy crocheting and enjoy your summertime cuties! 🌞🧢✨

You ask,

we answer.

FAQs

Can I substitute different yarn weights for this pattern?

While the pattern is designed for worsted weight yarn, you can substitute with different weights by adjusting your hook size and checking your gauge. Remember that changing yarn weight will affect the final hat size, so make a test swatch first to ensure proper fit.

What if my gauge doesn't match the pattern specifications?

If your gauge doesn't match 4 dc and 2 rows per inch, adjust your hook size. Use a larger hook if your stitches are too tight, or a smaller hook if they're too loose. Always make a gauge swatch before starting the full hat to ensure proper sizing.

Can I make the decorative elements from felt instead of crocheting them?

Absolutely! The pattern specifically mentions that felt pieces work great if you prefer not to crochet small decorative elements. This can save time and simplify the finishing process while still creating adorable designs.

How do I customize the bee stripe pattern?

The pattern provides stripe variations for each size but encourages customization. You can make stripes thicker by working more rows in each color, or adjust the spacing to your preference. Just maintain the overall row count for your chosen hat size.

What's the best way to attach strawberry seeds without them falling off?

Use doubled matching thread and tie each pearl bead individually rather than weaving through multiple beads. This method ensures each seed is securely attached independently, so if one comes loose, the others remain in place.