🧢 Beautiful ✨ Detailed πŸ’ Adorable

Sweet Arrival Heart Baby Blanket Pattern

Sweet Arrival Heart Baby Blanket Pattern
4.6β˜… Rating
12-15 Hours Time Needed
2.3K Made This
βœ‚οΈ

Intermediate Level

Ideal for those with basic knitting experience, featuring slightly more advanced stitches and techniques to expand your skills.

⏱️

Slow & Steady

A 10-12 hour projectβ€”great for savoring the process over several sessions.

🎁

Tiny Treasure

Small, sweet, and gift-worthy creations that fit perfectly in the palm of your hand with detailed charm.

About This Sweet Arrival Heart Baby Blanket Pattern

This Sweet Arrival heart blanket pattern showcases an adorable heart design created entirely with puff stitches that create beautiful dimension and texture. The pattern uses light worsted yarn in soft pastels, perfect for creating a gentle and cozy blanket for baby. Working row by row, you'll build up the charming heart motif while mastering the technique of creating perfectly popped puff stitches that add wonderful tactile appeal to this precious handmade gift.

Sweet Arrival Heart Baby Blanket Pattern crochet pattern - detailed view of completed project

The finished blanket measures approximately 21x20 inches, making it the ideal size for a baby's first blanket, stroller cover, or nursery decoration. With clear row-by-row instructions and a helpful chart option, this pattern guides you through creating each textured heart detail.

Why You'll Love This Sweet Arrival Heart Baby Blanket Pattern

I absolutely love this pattern because it transforms simple stitches into something truly special and meaningful for welcoming a new baby. The puff stitch technique creates such beautiful texture and dimension that makes the hearts really stand out, and watching the design emerge row by row is incredibly satisfying. I also appreciate how the pattern is versatile enough to work with different yarn weights and hook sizes, so you can customize it to your preferred tension and style. The repetitive nature of the rows makes it a relaxing project to work on while still creating an impressive finished piece that looks intricate and thoughtfully crafted. Plus, knowing you're creating something that will be cherished by a family for years to come makes every stitch feel special and worthwhile.

Sweet Arrival Heart Baby Blanket Pattern step 1 - construction progress Sweet Arrival Heart Baby Blanket Pattern step 2 - assembly progress Sweet Arrival Heart Baby Blanket Pattern step 3 - details and accessories Sweet Arrival Heart Baby Blanket Pattern step 4 - final assembly and finishing

Switch Things Up

I love how versatile this heart blanket pattern is for customization and making it uniquely yours. You can easily switch up the color palette to match any nursery themeβ€”think soft blues and grays for a modern look, pastels for traditional sweetness, or even bold rainbow colors for a playful vibe.

I've experimented with adding multiple hearts by repeating the heart section, or creating a larger blanket by adding plain rows between design elements. You could also work the pattern in stripes by changing colors every few rows while keeping the puff stitches in a contrasting shade for extra dimension.

The border is another perfect opportunity for creativityβ€”I've tried everything from simple scalloped edges to elaborate shell patterns, and each gives the blanket a completely different finished look. You can even personalize it by adding the baby's name or initials using surface crochet or embroidery after completing the main blanket.

For a more textured version, I sometimes work the entire background in a different stitch pattern like half double crochet or even a subtle shell stitch, which makes the puff stitch hearts stand out even more dramatically. Don't be afraid to make this pattern your own and create something truly special!

Common Mistakes & How to Fix Them

βœ— Puff stitches not popping to the front: Make sure you're working them on the wrong side and pull loops up loosely enough before completing the stitch βœ— Losing stitch count throughout rows: Always count to ensure you end with 75 stitches per row and use stitch markers to track your progress regularly βœ— Puff stitches appearing too tight or flat: Try pulling up higher loops when creating the 6 yarn overs to make them looser before pulling through βœ— Border edges looking messy or uneven: Work a row of single crochet along the side edges in the main color before adding your decorative border

Sweet Arrival Heart Baby Blanket Pattern

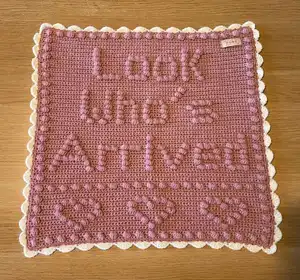
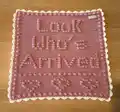
Create a precious keepsake with this charming heart-themed baby blanket pattern that combines delicate puff stitches with a sweet design perfect for welcoming a new little one. This beautiful blanket features an eye-catching heart motif created through textured puff stitches that pop beautifully against the soft background, making it ideal for baby showers, nursery decor, or as a treasured gift for new parents. The pattern works up at approximately 21x20 inches, creating the perfect size for swaddling, tummy time, or displaying in a cozy nursery corner.

Intermediate 12-15 Hours

Materials Needed for Sweet Arrival Heart Baby Blanket Pattern

β€” Main Fabric

  • 01
    Light worsted yarn (DK weight) in main color, approximately 150g
  • 02
    Stylecraft 100% Premium Acrylic DK in Pale Rose (1080) for main color
  • 03
    Stylecraft 100% Premium Acrylic DK in Cream (1005) for border
  • 04
    Approximately 1.5 balls of 100g for main color

β€” Tools Required

  • 01
    Crochet hook 4mm to 5mm (for light worsted/DK yarn)
  • 02
    Crochet hook 5mm to 5.5mm (for worsted/aran yarn)
  • 03
    Scissors
  • 04
    Yarn needle for weaving in ends
  • 05
    Stitch markers (optional but helpful)
  • 06
    Measuring tape

Progress Tracker

0% Complete

β€” Foundation :

Chain :

76 sts

β€” Main Blanket :

Row 1 :

Sc into 2nd loop from the hook (the back bump of the Ch to create a nice edge to add your border to). Ch1 and turn.

Info :

All even rows throughout this pattern are Sc into all sts

Row 3 :

Sc 1 st, (ps, sc 3 sts) x 18 times, ps, sc 1 st, ch 1, turn

Row 5 :

Sc all sts, ch1, turn

Row 7 :

Sc 1 st, ps, sc 12 sts, (ps, sc 22 sts) repeat once more, ps, sc 12 sts, ps, sc 1 st, ch1, turn

Row 9 :

Sc 12 sts, ps, sc 3 sts, ps, sc 18 sts, ps, sc 3 sts, ps, sc 18 sts, ps, sc 3 sts, ps, sc 12 sts, ch1, turn

Row 11 :

Sc 1 st, ps, sc 8 sts, (ps, sc 7 sts, ps, sc 14 sts) repeat once more, ps, sc 7 sts, ps, sc 8 sts, ps, sc 1 st, ch1, turn

Row 13 :

Sc 8 sts, ps, sc 11 sts, (ps, sc 10 sts, ps, sc 11 sts) repeat once more, ps, sc 8 sts, ch1, turn

Row 15 :

Sc 1 st, ps, sc 6 sts, ((ps, sc 5 sts) x 2, ps, sc 10 sts) repeat once more, (ps, sc 5 sts) x 2, ps, sc 6 sts, ps, sc1 st, ch1, turn

Row 17 :

Sc 10 sts, (ps, sc 1 st, ps, sc 3 sts, ps, sc 1 st, ps, sc 14 sts) repeat once more, ps, sc 1 st, ps, sc 3 sts, ps, sc 1 st, ps, sc 10 sts, ch1, turn

Row 19 :

Sc 1 st, ps, sc 71 sts, ps, sc 1 st, ch1, turn

Row 21 :

Sc into all sts, ch1, turn

Row 23 :

Sc 1 st, (ps, sc 3 sts) x 18 times, ps, sc 1 st, ch 1, turn

Row 25 :

Sc into all sts, ch1, turn

Row 27 :

Sc 1 st, ps, sc 71 sts, ps, sc 1 st, ch1, turn

Row 29 :

Sc into all sts, ch1, turn

Row 31 :

Sc 1 st, ps, sc 3 sts, ps, sc 11 sts, ps, sc 3 sts, (ps, sc 7 sts) x 3, ps, sc 8 sts, (ps, sc 1st) x 2, ps, sc 5 sts, (ps, sc 1st) x 2, ps, sc 4 sts, ps, sc 1, ch1, turn

Row 33 :

Sc 6 sts, ps, sc 9 sts, ps, sc 4 sts, (ps, sc 7 sts) x 2, ps, sc 6 sts, ps, sc 1 st, ps, sc 6 sts, ps, sc 9 sts, ps, sc 4 sts, ps, sc 6 sts, ch1, turn

Row 35 :

Sc 1 st, ps, sc 5 sts, (ps, sc 1 st) x 4, ps, sc 5 sts, (ps, sc 7 sts) x 2, ps, sc 5 sts, ps, sc 3 sts, ps, sc 5 sts, (ps, sc 1 st) x 3, ps, sc 3 sts, (ps, sc 4 sts) x 2, ps, sc 1 st, ch1, turn

Row 37 :

Sc 8 sts, ps, sc 5 sts, ps, sc 6 sts, (ps, sc 7 sts) x 2, ps, sc 4 sts, ps, sc 5 sts, ps, sc 4 sts, ps, sc 5 sts, ps, sc 3 sts, ps, sc 4 sts, ps, sc 6 sts, ch1, turn

Row 39 :

Sc 1 st, ps, sc 7 sts, ps, sc 3 sts, ps, sc 7 sts, (ps, sc 1 st) x 2, ps, sc 3 sts, (ps, sc 1 st) x 2, ps, sc 3 sts, ps, sc 3 sts, ps, sc 7 sts, ps, sc 4 sts, (ps, sc 1 st) x 2, ps, sc 5 sts, (ps, sc 1 st) x 2, ps, sc 4 sts, ps, sc 1, ch1, turn

Row 41 :

Sc 10 sts, ps, sc 1 st, ps, sc 55 sts, ps, sc 6 sts, ch1, turn

Row 43 :

Sc 1 st, ps, sc 9 sts, ps, sc 25 sts, ps, sc 30 sts, ps, sc 4 sts, ps, sc 1 st, ch1, turn

Row 45 :

Sc into all sts, ch1, turn

Row 47 :

Sc 1 st, ps, sc 71 sts, ps, sc 1 st, ch1, turn

Row 49 :

Sc into all sts, ch1, turn

Row 51 :

Sc 1 st, ps, sc 15 sts, ps, sc 3 sts, ps, sc 5 sts, (ps, sc 4 sts) x 2, (ps, sc 1 st) x 2, ps, sc 11 sts, (ps, sc 1 st) x 2, ps, sc 15 sts, ps, sc 1 st, ch1, turn

Row 53 :

Sc 15 sts, (ps, sc 3 sts) x 3, ps, sc 4 sts, ps, sc 3 sts, ps, sc 5 sts, ps, sc 16 sts, ps, sc 15 sts, ch1, turn

Row 55 :

Sc 1 st, ps, sc 13 sts, (ps, sc 3 sts) x 3, ps, sc 4 sts, ps, sc 3 sts, ps, sc 5 sts, ps, sc 10 sts, (ps, sc 1 st) x 2, ps, sc 15 sts, ps, sc 1 st, ch1, turn

Row 57 :

Sc 15 sts, ps, sc 7 sts, ps, sc 3 sts, ps, sc 4 sts, ps, sc 3 sts, ps, sc 5 sts, ps, sc 8 sts, ps, sc 23 sts, ch1, turn

Row 59 :

Sc 1 st, ps, sc 13 sts, ps, sc 7 sts, ps, sc 3 sts, (ps, sc 1 st) x 2, ps, sc 5 sts, (ps, sc 1 st) x 2, ps, sc 11 sts, (ps, sc 1 st) x 2, ps, sc 15 sts, ps, sc 1 st, ch1, turn

Row 61 :

Sc 15 sts, ps, sc 7 sts, ps, sc 3 sts, ps, sc 18 sts, ps, sc 28 sts, ch1, turn

Row 63 :

Sc 1 st, ps, sc 13 sts, ps, sc 7 sts, ps, sc 3 sts, ps, sc 19 sts, ps, sc 25 sts, ps, sc 1 st, ch1, turn

Row 65 :

Sc 48 sts, ps, sc 26 sts, ch1, turn

Row 67 :

Sc 1 st, ps, sc 71 sts, ps, sc 1 st, ch1, turn

Row 69 :

Sc into all sts, ch1, turn

Row 71 :

Sc 1 st, ps, sc 18 sts, (ps, sc 1 st) x 3, ps, sc 4 sts, (ps, sc 1 st) x 2, ps, sc 5 sts, (ps, sc 1 st) x 2, (ps, sc 4 sts) x 2, ps, sc 17 sts, ps, sc 1 st, ch1, turn

Row 73 :

Sc 19 sts, ps, sc 10 sts, ps, sc 5 sts, ps, sc 3 sts, ps, sc 5 sts, (ps, sc 3 sts) x 2, ps, sc 20 sts, ch1, turn

Row 75 :

Sc 1 st, ps, sc 17 sts, ps, sc 10 sts, ps, sc 5 sts, ps, sc 3 sts, ps, sc 5 sts, ps, sc 3 sts, ps, sc 2 sts, ps, sc 19 sts, ps, sc 1 st, ch1, turn

Row 77 :

Sc 19 sts, ps, sc 10 sts, ps, sc 5 sts, ps, sc 3 sts, ps, sc 5 sts, ps, sc 3 sts, ps, sc 1 st, ps, sc 22 sts, ch1, turn

Row 79 :

Sc 1 st, ps, sc 17 sts, ps, sc 11 sts, (ps, sc 1 st) x 2, ps, sc 5 sts, (ps, sc 1 st) x 2, ps, sc 4 sts, ps, sc 2 sts, ps, sc 19 sts, ps, sc 1 st, ch1, turn

Row 81 :

Sc 19 sts, ps, sc 30 sts, ps, sc 3 sts, ps, sc 20 sts, ch1, turn

Row 83 :

Sc 1 st, ps, sc 17 sts, ps, sc 30 sts, ps, sc 4 sts, ps, sc 17 sts, ps, sc 1 st, ch1, turn

Row 85 :

Sc into all sts, ch1, turn

Row 87 :

Sc 1 st, ps, sc 71 sts, ps, sc 1 st, ch1, turn

Row 89 :

Sc into all sts, ch1, turn

Row 91 :

Sc 1 st, (ps, sc 3 sts) x 18 times, ps, sc 1 st, ch 1, turn

Row 93 :

Sc into all st and tie off, sew in both ends

β€” Border :

Prep Row :

Work a row of sc along the front left and right edge in the same shade as the main blanket colour, to give a nice edge for the border

Border Edging :

Work shell edge border in cream or any border of your choice around entire blanket

Assembly Instructions

  • After completing Row 93, tie off your yarn and weave in the starting tail from your foundation chain.
  • Work a preparatory row of single crochet along both the left and right side edges of the blanket in your main color to create clean edges.
  • Add your chosen border design around the entire perimeter of the blanket, working evenly into the edges you've prepared.
  • For the shell edge border shown in the pattern, use your contrast color and work consistently around all four sides.
  • Weave in all remaining yarn ends securely, ensuring they're hidden on the wrong side of the work.
  • Block the finished blanket gently if desired to even out the stitches and help the puff stitches pop forward uniformly.

Important Notes

  • πŸ’‘The puff stitches are worked on the wrong side of the blanket and will naturally pop forward to create texture on the right side
  • πŸ’‘Always count your stitches at the end of each row to ensure you have exactly 75 stitches before continuing
  • πŸ’‘The beginning chain 1 is not included in the total stitch count for each row
  • πŸ’‘For best results with the puff stitch definition, use a plain solid color yarn rather than variegated or multicolored yarn
  • πŸ’‘If your puff stitches aren't popping forward properly, work a tighter single crochet into the next stitch to help lock them down
  • πŸ’‘Adjust your hook size based on your personal tension to achieve the same finished measurements as shown in the pattern

This Sweet Arrival heart blanket pattern is designed to create a meaningful keepsake that celebrates the precious arrival of a new baby. The combination of soft colors and textured puff stitches creates a blanket that's both visually beautiful and wonderfully tactile for little hands to explore. Whether you're making it as a baby shower gift, nursery decoration, or special heirloom piece, this pattern guides you through creating something truly special. The hearts symbolize all the love surrounding a new arrival, making every stitch a celebration of new life and joy. Happy crocheting! πŸ§ΆπŸ’•βœ¨

You ask,

we answer.

FAQs

Can I use a different yarn weight for this pattern?

Yes, you can use different yarn weights, but you'll need to adjust your hook size accordingly. For light worsted (DK) yarn use a 4-5mm hook, and for worsted (aran) yarn use a 5-5.5mm hook. Your finished blanket size will vary depending on your yarn choice and tension.

Why aren't my puff stitches popping to the front of the blanket?

Puff stitches are worked on the wrong side and should naturally pop forward. Make sure you're pulling your loops up loosely enough when creating the stitch, and work a slightly tighter single crochet into the next stitch to lock the puff stitch down and help it pop forward.

Do I need to follow the exact stitch count or can I make the blanket larger?

The pattern is designed for 75 stitches per row to create the heart design properly. If you want a larger blanket, you would need to add more repeats of the heart motif which would require recalculating the pattern. It's best to follow the pattern as written for the design to work correctly.

What type of border works best for this blanket?

The pattern suggests a shell edge border in a contrasting cream color, but any border you prefer will work beautifully. Consider a simple single crochet border, picot edge, or scalloped border depending on your style preference.

How do I read the pattern if I prefer working from a chart?

The pattern mentions that it can be worked from a chart by reading from bottom to top and left to right. Add one stitch at the end of your foundation chain row and start the first row from the second chain from the hook, then chain 1 at the end of each row.