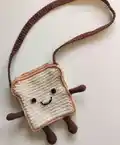
About This Toastie Bread Bag Crochet Pattern
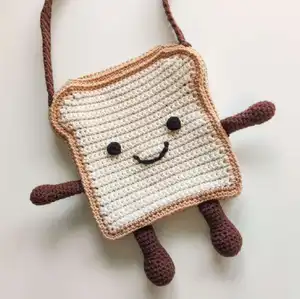
This pattern includes comprehensive diagrams and step-by-step instructions for forming the signature bread shape, joining two slices together to create the bag structure, and assembling all the adorable facial features and limbs. The adjustable strap makes it easy to hang and display your creation.
Why You'll Love This Toastie Bread Bag Crochet Pattern
I absolutely love this pattern because it transforms something as ordinary as bread storage into a conversation starter that never fails to make people smile! The combination of practical functionality with adorable character design means you're creating something that's both useful and display-worthy. I find the process of building the realistic bread crust with its curved edges incredibly satisfying, and seeing the personality emerge as you add the eyes and limbs is pure joy. This pattern lets you practice shaping techniques while creating something truly unique that adds warmth and humor to any kitchen space.
Switch Things Up
I love experimenting with different color combinations to create various bread types that match any kitchen aesthetic! Instead of traditional beige, try using white yarn with a light golden crust for white bread, or rich brown tones for whole wheat or pumpernickel versions. You could even create a fun rainbow bread by using pastel colors for a whimsical twist that kids would adore.
For added personality, I sometimes embroider different facial expressions - from sleepy morning faces to wide-awake cheerful grins - to match the bag's purpose or the recipient's personality. Adding a small bow tie or chef's hat as accessories takes the cuteness factor up another notch!
I've also played with the size by using different yarn weights - bulky yarn creates an oversized statement piece perfect for storing multiple loaves, while fingering weight yarn makes adorable mini versions ideal for rolls or bagels. Some makers even add pockets on the sides for storing butter knives or recipe cards.
The sling strap offers great customization opportunities too - try braiding multiple colors together, adding beads for texture, or crocheting it in a contrasting color that matches your kitchen theme. I've seen beautiful versions with adjustable straps using buttons or D-rings for versatile hanging options.
Common Mistakes & How to Fix Them
✗ Mistake: Not placing increases correctly along the curved portion, resulting in uneven bread shape - Solution: Follow the diagram carefully and count your stitches to ensure exactly 9 increases are made
✗ Mistake: Forgetting to skip one stitch in Step 6, causing stitch count imbalance between sides - Solution: Always mark the stitch to skip before continuing the vertical portion
✗ Mistake: Making corner turns too tight without proper stitch placement - Solution: Ensure you place 3 sc in the exact corner stitch and work loosely for smooth turns
✗ Mistake: Struggling with back loop only stitches causing uneven crust texture - Solution: Go through the back bumps as recommended and use your finger to guide the hook through for consistent tension