🧢 Beautiful ✨ Detailed πŸ’ Adorable

Twinkling Snowflakes Crochet Pattern

Twinkling Snowflakes Crochet Pattern
4.4β˜… Rating
1.5-2 Hours Time Needed
3.8K Made This
βœ‚οΈ

Intermediate Level

Ideal for those with basic knitting experience, featuring slightly more advanced stitches and techniques to expand your skills.

⏱️

Bite-Sized Project

Complete in under 2 hoursβ€”quick, fun, and perfect for a little creative escape.

❄️

Winter Warmth

Cozy layers for chilly nights that combine practical warmth with beautiful, intricate stitch patterns.

About This Twinkling Snowflakes Crochet Pattern

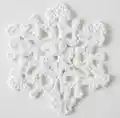
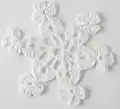
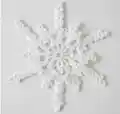
This enchanting snowflake pattern collection features three distinct designs that capture the delicate beauty of winter's most magical creation. Each snowflake is crafted using clusters, chains, and dimensional stitches to create stunning lacework that mimics nature's frozen artistry. The sparkly white yarn adds an extra touch of elegance, making these snowflakes perfect for holiday decorating, gift embellishments, or creating a winter wonderland display in your home.

Twinkling Snowflakes Crochet Pattern crochet pattern - detailed view of completed project

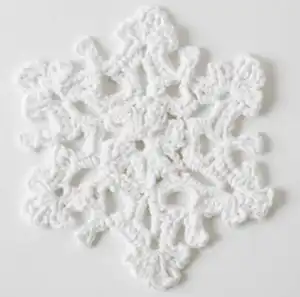
With sizes ranging from 7 to 10 inches in diameter, you can create a beautiful variety of snowflakes to suit any decorating need. The intermediate-level instructions guide you through creating intricate dimensional details that make each snowflake truly special.

Why You'll Love This Twinkling Snowflakes Crochet Pattern

I absolutely love how these snowflakes transform simple yarn into delicate winter magic that captures the ethereal beauty of real snowflakes. The way each design builds upon itself through carefully crafted rounds creates such satisfying dimensional texture and intricate detail. What really makes my heart sing is how versatile these patterns areβ€”you can make just one stunning centerpiece or create an entire winter wonderland collection. The sparkly yarn adds that perfect touch of shimmer that catches the light beautifully, and there's something incredibly peaceful about working through the rhythmic repetition of clusters and chains. Plus, knowing that one ball of yarn can create four gorgeous decorations makes this project both economical and endlessly creative for spreading holiday cheer.

Twinkling Snowflakes Crochet Pattern step 1 - construction progress Twinkling Snowflakes Crochet Pattern step 2 - assembly progress Twinkling Snowflakes Crochet Pattern step 3 - details and accessories Twinkling Snowflakes Crochet Pattern step 4 - final assembly and finishing

Switch Things Up

I love experimenting with these snowflake patterns by changing up the yarn colors to create completely different moods and styles. Instead of traditional white, I've made gorgeous navy blue snowflakes that look absolutely stunning against white backgrounds, and soft pastel versions in pink and lavender for a whimsical touch. You could also try working them in metallic gold or silver yarn for an extra luxurious feel during the holidays.

Another fun variation I enjoy is scaling the patterns up or down by changing hook sizesβ€”using a smaller hook creates delicate mini snowflakes perfect for earrings or gift tags, while a larger hook and bulky yarn makes oversized statement pieces. I've even combined multiple snowflakes by sewing them together to create a beautiful winter table runner or tree skirt.

For added dimension, I sometimes work only the first two rounds of Snowflake 3, then attach it to the center of a completed Snowflake 1 for a layered effect. Adding tiny beads or sequins to the points before blocking gives them extra sparkle and glamour. The possibilities are truly endless when you start playing with these versatile patterns!

Common Mistakes & How to Fix Them

βœ— Not counting stitches carefully in each round, which can throw off the symmetry and shape of the entire snowflake design βœ— Pulling clusters too tight or too loose, resulting in uneven texture and distorted snowflake points that don't lay flat properly βœ— Forgetting to fasten off before starting new rounds with joined yarn, causing confusion in the pattern progression and color transitions βœ— Skipping the blocking and starching step, which prevents the snowflake from holding its crisp shape and displaying its intricate details beautifully

Twinkling Snowflakes Crochet Pattern

Create stunning winter decorations with these three delicate snowflake designs that bring sparkle and elegance to your holiday decor. Each snowflake features intricate lacework and beautiful dimensional details, ranging from a dainty 7-inch design to an impressive 10-inch statement piece. These versatile ornaments are perfect for adorning your Christmas tree, decorating windows, or adding a festive touch to gift packages throughout the holiday season.

Intermediate 1.5-2 Hours

Materials Needed for Twinkling Snowflakes Crochet Pattern

β€” Main Fabric

  • 01
    Bernat Handicrafter Holidays yarn in White Sparkle (2.8 oz/80 g; 138 yds/126 m)
  • 02
    One ball makes approximately 4 snowflakes

β€” Tools Required

  • 01
    Crochet hook size U.S. F/5 (3.75 mm)
  • 02
    Scissors
  • 03
    Yarn needle for weaving in ends
  • 04
    Spray starch (optional)
  • 05
    Blocking pins
  • 06
    Iron for steam blocking

Progress Tracker

0% Complete

β€” Snowflake 1 :

Foundation :

Ch 6. Join with sl st to first ch to form a ring

Round 1 :

*Ch 4. [(Yoh) twice and draw up a loop in ring. (Yoh and draw through 2 loops on hook) twice] twice. Yoh and draw through all loops on hook - Tr cluster made. Ch 4. Sl st in ring. Rep from * 5 times more. Fasten off

Round 2 :

Ch 3. Join yarn with sl st to first Tr cluster. (Ch 9. Sl st in same sp as previous sl st. Ch 3. Sl st in next Tr cluster) 5 times. Ch 9. Sl st in same sp as previous sl st. Join with sl st to first ch

Round 3 :

Ch 1. *1 sc in each of next 3 ch. [(3 sc. Ch 3) 3 times. 3 sc] in next ch-9 loop. Rep from * 5 times more. Join with sl st to first sc. Fasten off

Round 4 :

Join yarn with sl st to first ch-3 sp. Ch 1. 2 sc in same sp as sl st. *1 sc in each of next 3 sc. (1 sc. Ch 3. 1 dc. Ch 3. Sl st. Ch 4. 2 tr. Ch 4. Sl st. Ch 3. 1 dc. Ch 3. 1 sc) all in next ch-3 sp. 1 sc in each of next 3 sc. 2 sc in next ch-3 sp. Ch 4. (1 hdc. Ch 2. Sl st) in 2nd ch from hook. Ch 2. Skip next 9 sc. 2 sc in next ch-3 sp. Rep from * 5 times more. Fasten off

β€” Snowflake 2 :

Foundation :

Ch 7. Join with sl st to first ch to form a ring

Round 1 :

Ch 1. (3 sc. Ch 9) 6 times in ring. Join with sl st to first sc. Fasten off

Round 2 :

Join yarn with sl st to any ch-9 loop. Ch 3. (2 dc. Ch 3. 3 dc) in same sp as sl st. [Ch 1. (3 dc. Ch 3. 3 dc) in next ch-9 loop] 5 times. Ch 1. Join with sl st to top of ch 3

Round 3 :

Sl st back into last ch-1 sp. Ch 1. 1 sc in same sp as sl st. *Ch 1. 6 dc in next ch-3 sp. Ch 6. Sl st to first ch. Turn. (Ch 4. 2 tr. Ch 4. Sl st) 3 times in last ch-6 sp made - top cluster made. Turn. 6 dc in same ch-3 sp as last 6 dc. Ch 1.** 1 sc in next ch-1 sp. Rep from * 4 times more, then from * to ** once. Join with sl st to first sc. Fasten off

β€” Snowflake 3 :

Foundation :

Ch 6. Join with sl st to first ch to form a ring

Round 1 :

Ch 6 (counts as dc and ch 3). (1 dc. Ch 3) 11 times in ring. Join with sl st to 3rd ch of ch 6. 12 ch-3 sps

Round 2 :

Sl st in next ch-3 sp. Ch 3. (Yoh and draw up a loop. Yoh and draw through 2 loops on hook) twice in same sp as last sl st. Yoh and draw through all loops on hook - beg cluster made. [Ch 5. (Yoh and draw up a loop. Yoh and draw through 2 loops on hook) 3 times in next ch-3 sp. Yoh and draw through all loops on hook - cluster made] 11 times. Ch 5. Join with sl st to top of first cluster

Round 3 :

(Sl st. Ch 1. 1 sc. Ch 5. 1 sc) in next ch-5 sp. *(Sl st. Ch 3. Cluster) in next cluster. (Ch 3. Cluster in top of cluster just made) twice. (Ch 3. Sl st. Ch 6. Sl st. Ch 3. Sl st) all in top of last cluster. Working down towards 2nd rnd, (Ch 3. Sl st to base of cluster) 3 times. (1 sc. Ch 5. 1 sc) in next ch-5 sp. (Sl st. Ch 3. Cluster) in next cluster. (Ch 3. Sl st. Ch 6. Sl st. Ch 3. Sl st) all in top of cluster. Working down towards 2nd rnd, ch 3. Sl st to base of cluster.** (1 sc. Ch 5. 1 sc) in next ch-5 sp. Rep from * 4 times more, then from * to ** once. Join with sl st to first sc. Fasten off

Assembly Instructions

  • Pin each completed snowflake to the specified measurements on a blocking board or towel-covered surface to maintain proper shape.
  • Apply spray starch liberally to the snowflake if you want a stiff, structured finish that will hold its shape permanently.
  • Steam iron lightly over the pinned snowflake, being careful not to touch the iron directly to the yarn to avoid melting or flattening.
  • Allow the snowflake to dry completely while still pinned before removing from the blocking surface for best results.
  • Weave in all yarn ends securely on the wrong side of the snowflake using a yarn needle.
  • Add a hanging loop by threading thin ribbon or fishing line through one of the outer points if using as ornaments.
  • For gift toppers, attach snowflakes to packages using hot glue or double-sided tape on the back surface.

Important Notes

  • πŸ’‘Gauge is not critical for this decorative project, but consistent tension will create more uniform snowflakes
  • πŸ’‘The sparkle yarn can split easily, so work slowly and check your hook frequently to avoid catching multiple strands
  • πŸ’‘Blocking is essential for these snowflakes to achieve the crisp, flat appearance and display intricate stitch details properly
  • πŸ’‘One ball of yarn makes approximately 4 snowflakes, making this an economical project for multiple decorations
  • πŸ’‘Consider using different sizes together for a more dynamic and visually interesting holiday display arrangement

These Twinkling Snowflakes bring the delicate beauty of winter's magic into your home with three gorgeous designs that showcase the art of dimensional crochet. Each pattern builds your skills while creating stunning decorations that will become cherished parts of your holiday traditions for years to come. Whether adorning your tree, decorating windows, or topping special gifts, these sparkling snowflakes add handmade elegance to every winter celebration. 🧢 Happy crocheting! βœ¨β„οΈ

You ask,

we answer.

FAQs

Can I use regular yarn instead of sparkle yarn for these snowflakes?

Absolutely! Any worsted weight yarn will work beautifully. The sparkle yarn adds festive shimmer, but solid white, cream, or even colored yarns create equally stunning snowflakes with a different aesthetic.

Do I really need to block and starch the snowflakes?

While not absolutely required, blocking and starching dramatically improves the final appearance by making the snowflakes lay flat and crisp, showcasing all the intricate details. Without blocking, they may appear limp and the beautiful stitch work won't be as visible.

Which snowflake design should I start with as an intermediate crocheter?

Snowflake 1 is the simplest of the three designs and makes an excellent starting point. Once you're comfortable with the cluster stitches and construction method, you can progress to the larger, more intricate Snowflakes 2 and 3.

How can I use these snowflakes beyond holiday decorating?

These versatile snowflakes work beautifully as coasters, doilies, appliques for winter clothing, or sewn onto pillows and blankets. You can also frame them as winter artwork or use them as elegant table scatter for winter weddings and events.

My clusters are coming out uneven in size. What am I doing wrong?

Uneven clusters usually result from inconsistent tension when drawing through the loops. Make sure you're drawing up loops to the same height each time and pulling through all loops on the hook with steady, even pressure for uniform cluster stitches throughout.