Autumn Crochet Pumpkin Door Hanging – Free Crochet Pattern
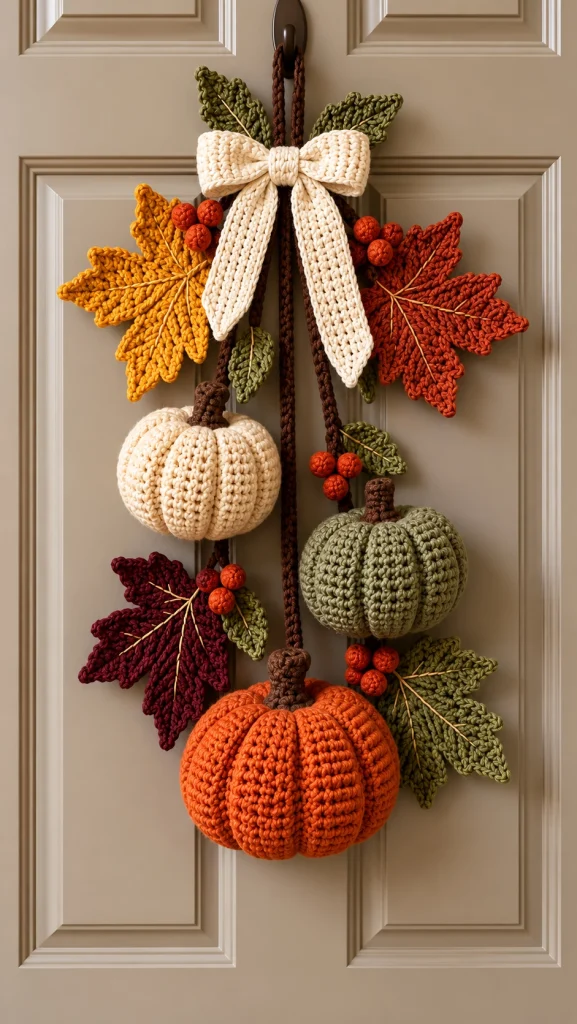
Welcome the beauty of fall into your home with this gorgeous autumn crochet pumpkin door hanging. Featuring three beautifully textured pumpkins in creamy ivory, muted sage green, and warm burnt orange, this handmade decoration captures the cozy charm of the autumn season.
Surrounded by golden yellow, rusty orange, burgundy, and olive green crochet maple leaves, the pumpkins hang from rich brown crocheted cords beneath an elegant cream bow. Small clusters of orange berries add the perfect finishing touch.
This charming vertical decoration is a lovely alternative to traditional autumn wreaths. Its cascading arrangement makes it perfect for decorating front doors, interior doors, entryways, and farmhouse-inspired spaces.
Follow this free crochet pattern to create your own beautiful fall pumpkin door decoration, complete with plush pumpkins, realistic leaves, decorative berries, hanging cords, and an oversized crochet bow.
Pattern Note: This is an original crochet interpretation inspired by the reference photograph. Exact stitch counts and assembly methods cannot be determined from the image alone.
Pattern Information
- Skill Level: Intermediate
- Finished Length: Approximately 65–75 cm (25.5–29.5 inches)
- Finished Width: Approximately 30–35 cm (12–14 inches)
- Large Pumpkin Diameter: Approximately 15 cm (6 inches)
- Medium Pumpkin Diameter: Approximately 12 cm (4.7 inches)
- Small Pumpkin Diameter: Approximately 11 cm (4.3 inches)
- Hook Size: 4 mm and 5 mm
- Yarn Weight: Worsted or aran-weight cotton yarn
- Terminology: US crochet terms
- Construction: Separate stuffed pumpkins, leaves, berries, bow, and braided hanging cords
- Estimated Time: 10–15 hours
Materials Needed
- Burnt orange cotton yarn for the large pumpkin
- Cream or ivory cotton yarn for the small pumpkin and bow
- Sage green cotton yarn for the medium pumpkin
- Dark brown yarn for pumpkin stems and hanging cords
- Mustard yellow yarn for autumn leaves
- Rust orange yarn for autumn leaves
- Burgundy yarn for autumn leaves
- Olive green yarn for foliage
- Orange and red yarn for decorative berries
- 4 mm crochet hook
- 5 mm crochet hook
- Polyester fiberfill stuffing
- Yarn needle
- Scissors
- Stitch markers
- Optional floral wire for shaping leaves
- Optional wooden beads
- Strong hanging cord or reinforced crochet loop
Crochet Abbreviations
- MR: Magic ring
- ch: Chain
- sc: Single crochet
- hdc: Half double crochet
- dc: Double crochet
- tr: Treble crochet
- sl st: Slip stitch
- inc: Two single crochet stitches in one stitch
- dec: Single crochet decrease
- BLO: Back loop only
- FLO: Front loop only
- st: Stitch
- FO: Fasten off
Part 1: Crochet the Large Burnt Orange Pumpkin
The large orange pumpkin forms the bottom centerpiece of the hanging decoration. Its pronounced ribbing creates a realistic, rounded pumpkin shape.
Use burnt orange yarn and a 5 mm crochet hook.
Round 1
Make a magic ring and work 6 sc into the ring.
(6 sc)
Round 2
Work 2 sc in each stitch around.
(12 sc)
Round 3
*Sc in the next stitch, inc in the next stitch.* Repeat around.
(18 sc)
Round 4
*Sc in the next 2 stitches, inc.* Repeat around.
(24 sc)
Round 5
*Sc in the next 3 stitches, inc.* Repeat around.
(30 sc)
Round 6
*Sc in the next 4 stitches, inc.* Repeat around.
(36 sc)
Round 7
*Sc in the next 5 stitches, inc.* Repeat around.
(42 sc)
Round 8
*Sc in the next 6 stitches, inc.* Repeat around.
(48 sc)
Round 9
*Sc in the next 7 stitches, inc.* Repeat around.
(54 sc)
Round 10
*Sc in the next 8 stitches, inc.* Repeat around.
(60 sc)
Rounds 11–19
Work 1 sc in each stitch around.
(60 sc per round)
Round 20
*Sc in the next 8 stitches, dec.* Repeat around.
(54 sc)
Round 21
*Sc in the next 7 stitches, dec.* Repeat around.
(48 sc)
Round 22
*Sc in the next 6 stitches, dec.* Repeat around.
(42 sc)
Round 23
*Sc in the next 5 stitches, dec.* Repeat around.
(36 sc)
Round 24
*Sc in the next 4 stitches, dec.* Repeat around.
(30 sc)
Begin stuffing the pumpkin firmly with polyester fiberfill.
Round 25
*Sc in the next 3 stitches, dec.* Repeat around.
(24 sc)
Round 26
*Sc in the next 2 stitches, dec.* Repeat around.
(18 sc)
Round 27
*Sc in the next stitch, dec.* Repeat around.
(12 sc)
Round 28
Dec around.
(6 sc)
FO, leaving a long tail. Close the opening securely.
Part 2: Shape the Pumpkin Ridges
The deep ridges are essential for creating the realistic pumpkin appearance shown in the reference image.
Step 1
Thread a long strand of matching orange yarn through a yarn needle.
Step 2
Insert the needle through the center of the pumpkin from top to bottom.
Step 3
Wrap the yarn around the outside of the pumpkin.
Step 4
Pull gently to create the first indentation.
Step 5
Repeat around the pumpkin, dividing it into approximately six to eight sections.
Step 6
Adjust the tension until the ridges are evenly spaced.
Step 7
Secure the yarn inside the pumpkin.
The finished pumpkin should have a plump, rounded body with clearly defined vertical sections.
Part 3: Crochet the Medium Sage Green Pumpkin
The sage green pumpkin hangs on the right side of the decoration and adds a soft, natural contrast to the autumn color palette.
Use sage green yarn and a 4 mm crochet hook.
Rounds 1–7
Follow the same increase sequence used for the large pumpkin, ending with 42 sc.
Rounds 8–14
Work 1 sc in each stitch around.
(42 sc)
Round 15
*Sc in the next 5 stitches, dec.* Repeat around.
(36 sc)
Round 16
*Sc in the next 4 stitches, dec.* Repeat around.
(30 sc)
Round 17
*Sc in the next 3 stitches, dec.* Repeat around.
(24 sc)
Stuff firmly.
Round 18
*Sc in the next 2 stitches, dec.* Repeat around.
(18 sc)
Round 19
*Sc in the next stitch, dec.* Repeat around.
(12 sc)
Round 20
Dec around.
(6 sc)
FO and close the opening.
Use matching sage green yarn to create six to eight vertical pumpkin ridges.
Part 4: Crochet the Small Ivory Pumpkin
The ivory pumpkin adds a beautiful light accent to the left side of the hanging decoration.
Use cream yarn and a 4 mm crochet hook.
Rounds 1–6
Follow the same increase sequence as the large pumpkin, ending with 36 sc.
Rounds 7–13
Work 1 sc in each stitch around.
(36 sc)
Round 14
*Sc in the next 4 stitches, dec.* Repeat around.
(30 sc)
Round 15
*Sc in the next 3 stitches, dec.* Repeat around.
(24 sc)
Round 16
*Sc in the next 2 stitches, dec.* Repeat around.
(18 sc)
Stuff the pumpkin.
Round 17
*Sc in the next stitch, dec.* Repeat around.
(12 sc)
Round 18
Dec around.
(6 sc)
FO and close the opening.
Create the pumpkin ridges using a long strand of matching ivory yarn.
Part 5: Crochet the Brown Pumpkin Stems
Make three dark brown stems, one for each pumpkin.
Round 1
With dark brown yarn, make a magic ring and work 6 sc.
(6 sc)
Rounds 2–6
Work 1 sc in each stitch around.
(6 sc)
Round 7
Work 2 sc in each stitch around.
(12 sc)
FO, leaving a long tail for sewing.
Lightly stuff the stem if necessary.
Sew each stem securely onto the top center of a pumpkin.
For the large orange pumpkin, add one or two extra rounds to make the stem slightly taller.
Part 6: Crochet the Autumn Maple Leaves
The colorful maple leaves create the beautiful layered arrangement surrounding the pumpkins.
Make approximately:
- 2 mustard yellow leaves
- 2 burnt orange leaves
- 2 burgundy leaves
- 3 olive green leaves
- 2 small sage green leaves
Leaf Foundation
With your chosen leaf color, ch 16.
Row 1
Sc in the second chain from the hook.
Hdc in the next 2 stitches.
Dc in the next 4 stitches.
Tr in the next 3 stitches.
Dc in the next 3 stitches.
Hdc in the next stitch.
Work 3 sc in the final chain.
Continue along the opposite side of the foundation chain, mirroring the stitch sequence.
Leaf Points
To create a maple-inspired silhouette, work decorative points along the outer edge.
*Sl st into the next edge stitch, ch 5, sl st into the second chain from the hook, sc in the next chain, hdc in the next chain, dc in the next chain, sl st into the next edge stitch.*
Repeat at selected positions along both sides of the leaf to form five distinct points.
Adjust the spacing to keep the leaf balanced.
Leaf Veins
Thread a yarn needle with a contrasting strand of golden brown or beige yarn.
Embroider one central vein and several smaller branching veins.
Use gentle tension to avoid puckering the leaf.
Leaf Stem
Attach yarn at the base of the leaf.
Ch 8 and sl st back along the chain.
FO, leaving a long tail for assembly.
Tip: For a realistic autumn arrangement, make leaves in slightly different sizes by adjusting the foundation chain and hook size.
Part 7: Crochet the Decorative Berry Clusters
The small berry clusters add texture and rich autumn color to the hanging arrangement.
Use orange, rust, and dark red yarn.
Round 1
Make a magic ring and work 6 sc.
(6 sc)
Round 2
Work 2 sc in each stitch around.
(12 sc)
Rounds 3–4
Work 1 sc in each stitch around.
(12 sc)
Round 5
Dec around.
(6 sc)
Add a small amount of stuffing if needed.
FO and close the opening.
Make approximately 12–15 berries.
Group the berries into clusters of three or four using yarn tails or covered floral wire.
Position them around the upper leaves and between the hanging pumpkins.
Part 8: Crochet the Oversized Cream Bow
The large ivory crochet bow is the elegant focal point at the top of the decoration.
Bow Main Piece
With cream yarn and a 5 mm crochet hook, ch 36.
Row 1
Hdc in the third chain from the hook and across.
Rows 2–12
Ch 2, turn, and hdc across.
Continue until the rectangle measures approximately 25 cm wide and 10 cm high.
FO and weave in the ends.
Shape the Bow
Fold the rectangle lengthwise into a bow shape.
Pinch the center firmly to create symmetrical loops.
Wrap cream yarn around the middle several times.
Secure the yarn on the back.
Bow Tails
Make two separate cream strips.
Ch 11.
Hdc in the third chain from the hook and across.
Ch 2, turn, and hdc across.
Repeat until each strip measures approximately 22–25 cm long.
For pointed ends, decrease one stitch at each side over the final few rows.
FO and weave in the ends.
Attach both strips behind the bow center, allowing them to hang naturally.
Bow Center Wrap
Ch 7.
Sc in the second chain from the hook and across.
Work 4–5 rows of sc.
Wrap the strip around the pinched center of the bow.
Sew the ends together at the back.
The finished bow should look full, soft, and neatly structured.
Part 9: Crochet the Brown Hanging Cords
The pumpkins hang from three dark brown crocheted cords of different lengths.
Main Hanging Loop
With dark brown yarn, ch 60.
Sl st in the second chain from the hook and across.
FO, leaving long tails.
Fold the cord in half to form a hanging loop.
Pumpkin Cord 1
Ch 35 with dark brown yarn.
Sl st back along the chain.
This cord will support the small ivory pumpkin.
Pumpkin Cord 2
Ch 45.
Sl st back along the chain.
This cord will support the medium sage green pumpkin.
Pumpkin Cord 3
Ch 65.
Sl st back along the chain.
This longer cord will support the large orange pumpkin at the bottom.
Important: Reinforce each hanging cord with strong cotton twine or a doubled strand of yarn. Secure the cords through the pumpkin bodies rather than attaching them only to the stems.
Part 10: Assemble the Autumn Door Hanging
Step 1
Lay the main hanging loop flat on your work surface.
Step 2
Position the large cream bow at the top of the hanging loop.
Step 3
Secure the bow firmly around the hanging cords.
Step 4
Attach the small ivory pumpkin to the left hanging cord.
Step 5
Attach the medium sage green pumpkin to the right hanging cord.
Step 6
Attach the large orange pumpkin to the longest center cord.
Step 7
Arrange the mustard yellow leaves behind the bow on the upper left side.
Step 8
Position the rusty orange leaves behind the bow on the upper right side.
Step 9
Attach olive green leaves around the upper corners and between the pumpkins.
Step 10
Add burgundy leaves near the lower left side of the ivory pumpkin.
Step 11
Position smaller sage green leaves near the medium pumpkin.
Step 12
Attach the orange berry clusters between the leaves and along the hanging cords.
Step 13
Check that the pumpkins hang at three different heights.
Step 14
Adjust the leaves to create a balanced, cascading arrangement.
Step 15
Secure all components with strong yarn stitches.
The finished arrangement should be fuller at the top, with the three pumpkins cascading downward and the large orange pumpkin creating a beautiful focal point at the bottom.
Part 11: Final Finishing
Step 1
Weave in all loose yarn ends.
Step 2
Inspect the pumpkin ridges and adjust their shape.
Step 3
Make sure each pumpkin stem is firmly attached.
Step 4
Check the hanging cords for strength.
Step 5
Shape the maple leaves gently with your hands.
Step 6
Arrange the berry clusters naturally between the leaves.
Step 7
Fluff and straighten the cream bow.
Step 8
Check that the decoration hangs evenly.
Step 9
Secure any loose decorative pieces.
Step 10
Hang the finished decoration on a sturdy door hook.
Beautiful Autumn Color Variations
Classic Harvest
Use burnt orange, mustard yellow, burgundy, olive green, and ivory for a traditional fall look.
Neutral Farmhouse
Combine cream, beige, taupe, caramel, and muted sage green for an elegant farmhouse decoration.
Rustic Woodland
Choose dark brown, forest green, copper, and golden yellow for a warm woodland-inspired arrangement.
Soft Cottagecore
Use dusty rose, ivory, pale sage, and soft mustard for a romantic cottage-style door hanging.
Elegant Burgundy
Combine deep burgundy, cream, olive green, and antique gold for a sophisticated autumn palette.
Thanksgiving Harvest
Choose pumpkin orange, cranberry red, golden yellow, ivory, and warm brown for a festive Thanksgiving decoration.
Minimalist Autumn
Use only cream, muted green, and caramel for a clean, understated seasonal look.
Helpful Crochet Tips
- Use firm stitches for the pumpkins to prevent stuffing from showing.
- Stuff each pumpkin evenly for a rounded appearance.
- Pull the ridge yarn gently to create realistic pumpkin sections.
- Use matching yarn for the pumpkin ridges.
- Make leaves in different sizes for a natural arrangement.
- Embroider leaf veins for added realism.
- Keep the bow symmetrical and well-shaped.
- Reinforce all hanging cords for durability.
- Attach pumpkins through their bodies rather than only their stems.
- Arrange leaves in overlapping layers.
- Place berry clusters between leaves to add depth.
- Use a sturdy hook for hanging.
- Keep the decoration away from direct rain and prolonged moisture.
- Store flat in a dry place between seasons.
Frequently Asked Questions
Is this autumn crochet door hanging beginner-friendly?
This project is best suited for intermediate crocheters. The pumpkins use basic amigurumi techniques, while the leaves, bow, and final assembly require additional attention to detail.
What yarn is best for this project?
Worsted or aran-weight cotton yarn works well because it provides clear stitch definition and helps the pumpkins and leaves maintain their shape.
Can I use acrylic yarn?
Yes. Acrylic yarn can be used, although cotton yarn generally produces a firmer finish.
How can I make the pumpkins larger?
Add more increase rounds before working the straight body rounds. Add corresponding decrease rounds when closing the pumpkin.
Can I make the decoration shorter?
Yes. Shorten the hanging cords and position the pumpkins closer together.
Can I make the decoration without the bow?
Absolutely. Replace the cream bow with a simple crocheted hanging loop or a small decorative ribbon.
How do I keep the leaves from curling?
Use consistent tension and gently block the finished leaves. Optional covered floral wire can help larger leaves maintain their shape.
Can I use this decoration outdoors?
It is best displayed indoors or on a well-protected covered porch. Exposure to rain and strong sunlight may damage or fade the yarn.
Can I make this for Thanksgiving?
Yes. The pumpkin and autumn leaf design makes it a lovely handmade Thanksgiving decoration.
Can I sell finished decorations made from this pattern?
Yes. You may sell handmade decorations created using this pattern. Credit to the pattern designer is appreciated.
Care Instructions
- Dust gently with a soft brush.
- Spot clean when necessary.
- Use mild detergent and cool water.
- Avoid soaking if floral wire or other metal supports are used.
- Do not wring or twist the pumpkins.
- Reshape the leaves while damp.
- Allow the decoration to air dry completely.
- Keep away from direct heat.
- Avoid prolonged exposure to sunlight.
- Store in a clean, dry container.
- Use tissue paper to support the bow and pumpkins during storage.
- Inspect the hanging cords before each seasonal display.
Final Thoughts
This autumn crochet pumpkin door hanging is a beautiful handmade decoration that brings warmth, texture, and seasonal charm to your home. The three colorful pumpkins, realistic maple leaves, delicate berries, and oversized cream bow create a stunning cascading arrangement that celebrates everything wonderful about fall.
Whether displayed on your front door, in your entryway, or as part of your Thanksgiving decorations, this crochet project adds a cozy handmade touch to any space.
With its warm harvest colors and timeless farmhouse appeal, it also makes a thoughtful handmade gift for friends and family who love autumn decorating.
Love this fall crochet project? Save this free autumn crochet pumpkin door hanging pattern to Pinterest and share it with your crochet friends for more beautiful seasonal inspiration!