Elegant Camel Brown Floral Crochet Tote Bag – Free Crochet Pattern
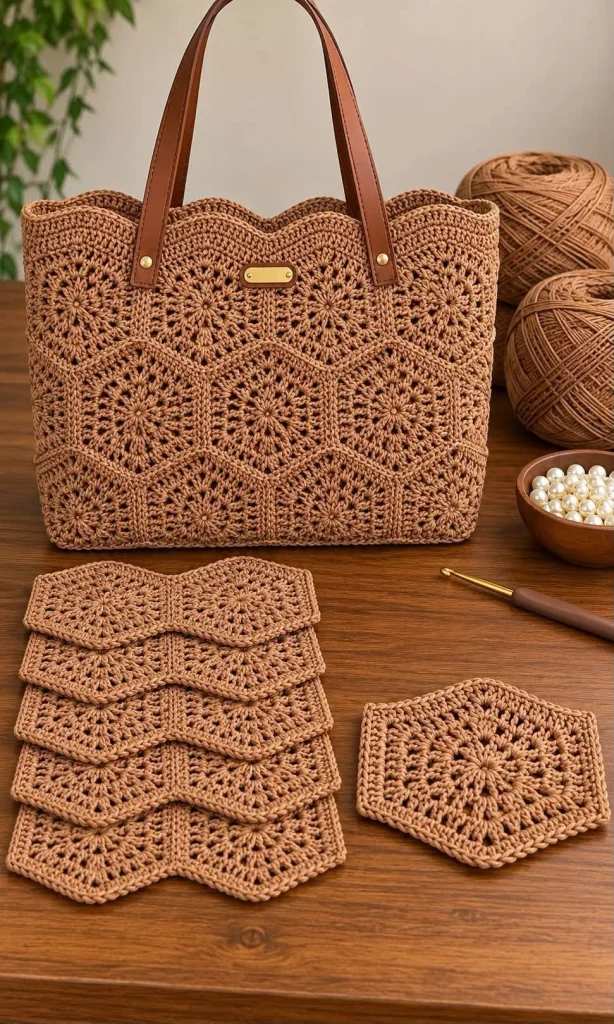
Create a timeless handmade accessory with this beautiful camel brown floral crochet tote bag. Featuring intricate flower-inspired hexagon motifs, a gently scalloped top edge, structured rectangular construction, and elegant brown leather handles, this crochet handbag combines classic craftsmanship with everyday sophistication.
The warm caramel-brown color makes this bag easy to pair with neutral outfits, summer dresses, casual jeans, and autumn wardrobes. Its delicate floral motifs create a lace-like texture while maintaining a practical, structured shape.
This free crochet pattern also includes instructions for making a matching floral crochet pouch, creating a coordinated handmade accessory set.
Design Note: This original pattern is inspired by the reference photograph. It recreates the overall appearance using joined floral hexagon motifs, a reinforced base, and decorative finishing. Exact proportions and motif placement may vary with yarn and tension.
Pattern Information
- Skill Level: Intermediate to Advanced
- Finished Bag Width: Approximately 36–40 cm (14–16 inches)
- Finished Bag Height: Approximately 29–32 cm (11.5–12.5 inches)
- Bag Depth: Approximately 10–12 cm (4–4.75 inches)
- Matching Pouch: Approximately 20 × 14 cm (8 × 5.5 inches)
- Yarn Weight: DK cotton or cotton-blend yarn
- Hook Size: 3.5 mm or 4 mm
- Terminology: US crochet terms
- Main Color: Camel brown, caramel, or warm tan
- Construction: Joined floral hexagon motifs with a reinforced base, lining, and leather handles
- Estimated Time: 12–18 hours
Materials Needed
- 450–600 g camel brown DK cotton yarn
- 3.5 mm crochet hook
- 4 mm crochet hook
- Two brown leather bag handles, approximately 55–65 cm long
- Four metal rivets or suitable handle fasteners
- Optional gold-tone decorative label
- Matching cotton lining fabric
- Optional lightweight interfacing
- Optional plastic canvas for the base
- Yarn needle
- Stitch markers
- Scissors
- Measuring tape
- Sewing needle and matching thread
- Optional magnetic snap closure
- Optional zipper for the matching pouch
Crochet Abbreviations
- ch: Chain
- sc: Single crochet
- hdc: Half double crochet
- dc: Double crochet
- tr: Treble crochet
- sl st: Slip stitch
- st: Stitch
- sp: Space
- MR: Magic ring
- FO: Fasten off
- RS: Right side
- WS: Wrong side
Part 1: Crochet the Floral Hexagon Motif
The floral hexagon is the main decorative element of this tote bag. Each motif features a raised flower center surrounded by openwork stitches and a six-sided border.
Use camel brown yarn and a 3.5 mm crochet hook.
Round 1: Flower Center
Make a magic ring.
Ch 3 (counts as the first dc), work 11 dc into the ring.
Pull the ring closed and sl st into the top of the beginning ch 3. (12 dc)
Round 2: Flower Petal Foundations
Ch 1, sc in the same stitch.
*Ch 3, skip the next stitch, sc in the following stitch.* Repeat around.
Finish with ch 3 and sl st into the first sc. (6 ch-3 spaces)
Round 3: Raised Flower Petals
Sl st into the first ch-3 space.
Work (sc, hdc, 3 dc, hdc, sc) into the space.
Repeat in each remaining ch-3 space.
Sl st into the first sc. (6 petals)
Round 4: Openwork Foundation
Working behind the petals, join yarn around a Round 2 sc anchor.
Ch 4, then sc around the next Round 2 sc anchor.
Repeat around to form six ch-4 spaces behind the flower.
Sl st to join.
Round 5: Hexagon Formation
Sl st into the first ch-4 space.
Ch 3, work 2 dc, ch 2, and 3 dc into the same space.
*Ch 1, work (3 dc, ch 2, 3 dc) into the next ch-4 space.* Repeat around.
Ch 1 and sl st into the beginning ch 3.
You now have six clearly defined corners.
Round 6: Hexagon Border
Sl st across to the first corner space.
Ch 3, work (2 dc, ch 2, 3 dc) into the corner.
Work dc evenly along the side, placing one dc in each available stitch and chain space.
At every corner, work (3 dc, ch 2, 3 dc).
Continue around and sl st to join.
Round 7: Final Edging
Ch 1 and work sc evenly around the hexagon.
Work 3 sc into each corner space.
Sl st to join.
FO, leaving a long tail if sewing the motifs together.
Lightly block the motif to emphasize its six-sided shape.
Part 2: Make the Floral Motifs
Create enough hexagon motifs to form the front, back, and side panels.
For the suggested bag size, begin with approximately 24–30 motifs.
The exact number depends on the size of your finished motifs and the desired bag dimensions.
Step 1
Crochet one complete floral hexagon.
Step 2
Measure the motif from one side to the opposite side.
Step 3
Make additional motifs using the same hook and yarn tension.
Step 4
Block all motifs to a consistent size.
Step 5
Arrange them into a rectangular panel with staggered rows.
The reference design features a repeating floral pattern with diagonal seams between the hexagons.
Part 3: Assemble the Front Panel
Step 1
Lay the floral motifs flat with the right sides facing upward.
Step 2
Arrange the motifs in staggered rows to create the desired rectangular front panel.
Step 3
Join neighboring hexagons using slip stitches through the back loops, or sew them together with a mattress stitch.
Step 4
Continue joining motifs until the front panel reaches approximately 36–40 cm in width.
Step 5
Use partial motifs or small filler sections to straighten the sides and lower edge.
Step 6
Weave in all joining ends.
The finished front panel should display an even floral pattern with visible diagonal motif lines.
Part 4: Assemble the Back Panel
Repeat the same process used for the front panel.
Step 1
Arrange an identical number of motifs.
Step 2
Match the front panel dimensions.
Step 3
Join the motifs securely.
Step 4
Block the finished panel.
Both panels should have matching width, height, and overall shape.
Part 5: Crochet the Structured Bag Base
The rectangular base provides stability and helps the tote maintain its shape.
Use camel brown yarn and a 3.5 mm crochet hook.
Row 1
Ch 16.
Row 2
Sc in the second chain from the hook and across. (15 sc)
Rows 3 onward
Ch 1 and turn. Sc in each stitch across.
Continue until the base measures approximately 36–40 cm long.
Adjust the starting chain if you want a wider or narrower bag base.
Base Border
Work one round of sc evenly around the rectangle.
Place 3 sc into each corner to prevent curling.
FO and weave in the ends.
For a firmer bag, insert a piece of plastic canvas between the crochet base and the lining.
Part 6: Crochet the Side Panels
Make two side panels to give the tote its rectangular depth.
Row 1
Chain enough stitches to match the desired bag depth, approximately 10–12 cm.
Row 2
Sc in the second chain from the hook and across.
Following Rows
Ch 1 and turn. Sc across.
Continue until the side panel matches the height of the front and back panels.
Repeat for the second side panel.
FO and weave in the ends.
Part 7: Join the Bag Body
Step 1
Place the front panel, back panel, side panels, and base on a flat surface.
Step 2
With right sides facing, join the front panel to the base using slip stitches or mattress stitch.
Step 3
Attach the back panel to the opposite long edge of the base.
Step 4
Attach both side panels to the short edges of the base.
Step 5
Join the vertical side seams.
Step 6
Turn the bag right side out.
Step 7
Check that the bag stands evenly and the corners are aligned.
Part 8: Crochet the Scalloped Top Border
The softly scalloped upper edge is one of the most distinctive features of this tote bag.
Round 1
Join camel brown yarn at the top edge of the bag.
Work sc evenly around the entire opening.
Sl st to join.
Round 2
Ch 1 and work sc in every stitch around.
Sl st to join.
Round 3: Scallop Foundation
*Skip 2 stitches, work 5 dc in the next stitch, skip 2 stitches, sl st in the next stitch.* Repeat around, adjusting the spacing near the end as needed.
Round 4: Decorative Finish
Work a gentle sc border along the scallops, placing stitches evenly to maintain the curved shape.
FO and weave in the ends.
Block the scalloped border gently to create smooth, even waves.
Part 9: Reinforce the Upper Edge
Because the bag will carry everyday items, the upper edge should be reinforced before attaching the handles.
Step 1
Work an additional row of slip stitches along the inside of the upper edge, beneath the scallops.
Step 2
Use firm tension to prevent excessive stretching.
Step 3
Reinforce the handle attachment areas with extra rows of sc or a small fabric backing.
Step 4
Check that the reinforced areas are strong enough to support the bag’s intended contents.
Part 10: Attach the Leather Handles
The brown leather handles give the tote a polished, professional appearance.
Step 1
Position the first handle symmetrically on the front panel.
Step 2
Mark the attachment points approximately 8–10 cm from each side edge.
Step 3
Repeat the same measurements on the back panel.
Step 4
Attach the leather handles using suitable rivets or strong sewing thread, according to the handle manufacturer’s instructions.
Step 5
Use reinforced fabric or leather backing patches inside the bag at each attachment point.
Step 6
Check that both handles are level and securely attached.
For a coordinated look, choose medium-brown leather handles with gold-tone hardware.
Part 11: Add the Fabric Lining
A fabric lining improves durability and prevents smaller belongings from slipping through the decorative crochet openings.
Step 1
Measure the inside width, height, and depth of the finished bag.
Step 2
Cut matching cotton fabric panels, allowing approximately 1 cm for seam allowances.
Step 3
Sew the fabric panels together to create a bag-shaped lining.
Step 4
Optional: Add an interior pocket for keys, a phone, or small accessories.
Step 5
Insert the lining into the crochet bag with wrong sides facing.
Step 6
Fold the upper fabric edge inward.
Step 7
Hand-sew the lining to the inside of the bag, just below the scalloped border.
Step 8
Keep the stitches small and discreet.
Part 12: Add the Optional Gold-Tone Label
The reference design features a small gold-tone decorative label at the center of the bag.
Step 1
Mark the center of the upper front panel.
Step 2
Position a small rectangular metal label below the scalloped edge.
Step 3
Attach the label according to the manufacturer’s instructions.
Step 4
Make sure the attachment does not damage or pull the crochet stitches.
This small detail gives the finished tote a boutique-inspired appearance.
Part 13: Crochet the Matching Floral Pouch
The matching pouch uses the same floral hexagon motif as the tote bag.
It is perfect for storing cosmetics, keys, small accessories, or crochet tools.
Step 1: Make the Motifs
Crochet 6–8 floral hexagons using the instructions from Part 1.
Step 2: Arrange the Panels
Arrange the motifs into two matching rectangular panels.
Step 3: Join the Motifs
Use slip stitches or mattress stitch to join the motifs.
Step 4: Shape the Edges
Work sc along the outer edges to create straight sides.
Step 5: Join the Pouch
Place the two panels with right sides facing.
Join the sides and bottom using sc or slip stitches.
Step 6: Turn Right Side Out
Turn the pouch right side out and gently shape the corners.
Step 7: Add the Closure
Sew a small zipper along the upper opening, or create a simple crochet flap with a button closure.
Step 8: Add the Lining
Optional: Sew a matching fabric lining inside the pouch.
Part 14: Final Finishing
Step 1
Weave in all remaining yarn ends.
Step 2
Inspect all motif joins and seams.
Step 3
Check that the base is flat and stable.
Step 4
Adjust the scalloped border to create even curves.
Step 5
Check that both leather handles are securely attached.
Step 6
Ensure the lining fits smoothly inside the bag.
Step 7
Lightly steam-block the crochet fabric if appropriate for your yarn, keeping heat away from leather and hardware.
Step 8
Allow the bag to dry completely before use.
Beautiful Color Variations
Classic Camel Brown
Use warm caramel or camel yarn with cognac leather handles and gold-tone hardware.
Chocolate Brown
Choose deep chocolate yarn with dark-brown leather handles for an elegant autumn handbag.
Ivory and Beige
Combine soft ivory crochet with beige leather handles for a timeless neutral accessory.
Olive Green
Use muted olive-green cotton yarn with tan leather handles for a natural botanical look.
Dusty Rose
Choose dusty pink yarn with cream or tan handles for a soft romantic style.
Classic Black
Use black cotton yarn with matching leather handles and gold hardware for a sophisticated everyday bag.
Terracotta
Choose earthy terracotta yarn with brown leather handles for a warm bohemian look.
Mocha and Cream
Alternate mocha and cream floral motifs for a subtle two-tone design.
Helpful Crochet Tips
- Use cotton yarn for better stitch definition and durability.
- Maintain consistent tension when making floral motifs.
- Block all hexagons before assembly.
- Arrange the motifs before joining them.
- Use stitch markers to identify corners.
- Keep all hexagons approximately the same size.
- Use a smaller hook for a firmer bag structure.
- Reinforce the base for everyday use.
- Choose sturdy leather handles.
- Reinforce handle attachment points.
- Add a fabric lining to protect belongings.
- Use matching thread for invisible seams.
- Keep the scalloped border evenly spaced.
- Avoid overstretching the motifs during assembly.
- Measure the bag regularly while working.
- Use a magnetic snap for an optional closure.
- Keep metal hardware away from delicate yarn strands.
- Make a matching pouch with leftover yarn.
- Test the bag with lightweight contents before regular use.
- Store the finished bag without overfilling it.
Frequently Asked Questions
Is this crochet tote bag beginner-friendly?
This pattern is best suited to intermediate crocheters who are comfortable making motifs, joining panels, and assembling bags.
What yarn is best for this crochet bag?
DK cotton yarn or a sturdy cotton blend works well because it offers durability and clear stitch definition.
Can I use acrylic yarn?
Yes, but acrylic yarn may stretch more than cotton. A lining and reinforced base are recommended.
Can I make the bag larger?
Yes. Add more floral hexagon motifs to increase the width or height, and adjust the base and side panels accordingly.
Can I make a smaller handbag?
Absolutely. Use fewer motifs and shorten the handles to create a compact shoulder bag.
Do I need leather handles?
No. You can crochet sturdy straps using tight single crochet stitches or reinforced thermal stitch.
How do I prevent the bag from stretching?
Use firm cotton yarn, reinforce the upper edge, add a lining, and secure the handles with strong backing patches.
Can I add a zipper?
Yes. A zipper can be sewn into a fabric lining or attached to a reinforced crochet opening.
Can I wash the bag?
Spot cleaning is recommended, especially when using leather handles and metal hardware.
Can I sell finished bags made from this pattern?
Yes. You may sell handmade bags created using this original pattern. Credit to the designer is appreciated.
Care Instructions
- Spot clean with mild detergent and cool water.
- Avoid soaking leather handles.
- Do not use bleach.
- Gently blot excess moisture with a towel.
- Reshape the bag while damp.
- Air dry away from direct sunlight.
- Do not tumble dry.
- Avoid carrying excessively heavy objects.
- Check handle fasteners regularly.
- Store the bag upright or lightly stuffed to maintain its shape.
Final Thoughts
This camel brown floral crochet tote bag is a beautiful example of how traditional crochet motifs can be transformed into an elegant modern accessory.
The intricate flower-inspired hexagons, warm caramel color, gently scalloped border, and sophisticated leather handles create a timeless handbag that is both decorative and practical.
With its matching floral pouch, this handmade crochet set is perfect for everyday use, thoughtful gifts, craft fairs, or a stylish addition to your personal accessories collection.
Choose your favorite yarn color, crochet the floral motifs, and enjoy creating a unique handbag with a classic boutique-inspired finish.
Love this crochet tote bag? Save this free floral crochet bag pattern to Pinterest and share it with your crochet friends for more beautiful handmade accessory ideas!