Sage Green and Cream Crochet Granny Square Bedspread – Free Crochet Pattern
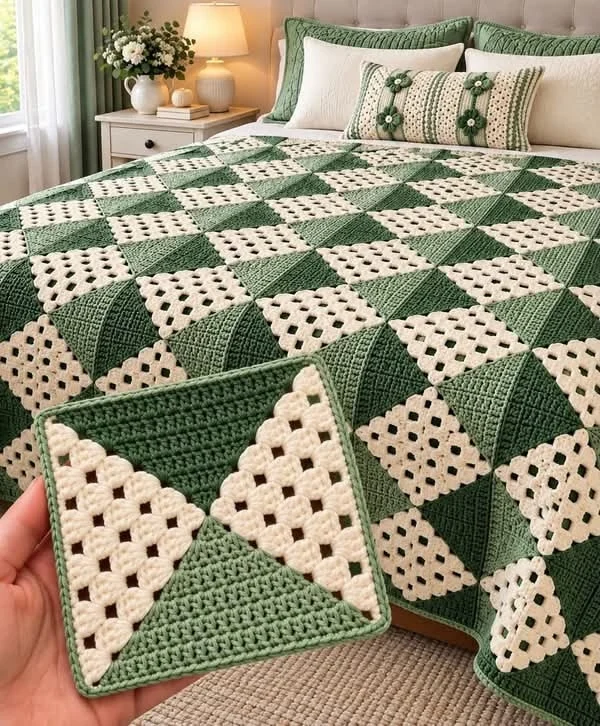
Transform your bedroom with this elegant sage green and cream crochet bedspread, featuring a beautiful geometric patchwork design made from contrasting solid crochet triangles and delicate openwork granny-stitch triangles.
This handmade crochet bedspread combines soft sage green with warm ivory cream, creating a timeless color palette that complements farmhouse, cottage, vintage, and modern bedrooms. The repeating diamond-like arrangement gives the blanket a sophisticated quilt-inspired appearance, while the textured crochet stitches add warmth and character.
Each square is divided diagonally into contrasting triangular sections. The solid sage-green triangles create structure, while the openwork cream sections add lightness and decorative detail. A coordinating green crochet border neatly frames the finished blanket.
The matching pillow accents complete the coordinated bedroom look, making this project especially appealing for anyone who loves handmade home décor.
In this free crochet tutorial, you’ll learn how to make the individual geometric squares, create the contrasting stitch textures, join the motifs, add the border, and customize the finished bedspread to fit your bed.
Pattern Note: This is an original crochet pattern inspired by the reference photograph. The design below recreates the overall geometric appearance using a practical modular construction. It is not an exact reconstruction of an unpublished original pattern.
Pattern Information
- Skill Level: Intermediate
- Finished Size: Approximately 220 × 240 cm (87 × 94 inches)
- Motif Size: Approximately 20 × 20 cm (8 × 8 inches), after blocking
- Construction: Individual geometric crochet squares joined into a large bedspread
- Main Colors: Sage green and ivory cream
- Yarn Weight: Worsted-weight cotton or acrylic yarn
- Hook Size: 4.5 mm crochet hook
- Terminology: US crochet terms
- Estimated Time: Several weeks, depending on experience
Materials Needed
- Approximately 2,000–2,500 g sage-green worsted-weight yarn
- Approximately 1,500–2,000 g ivory-cream worsted-weight yarn
- 4.5 mm crochet hook
- Yarn needle
- Scissors
- Stitch markers
- Measuring tape
- Blocking mats
- Rust-resistant blocking pins
- Optional 4 mm crochet hook for a firmer border
- Optional matching yarn for decorative pillow covers
Yarn Tip: Yarn requirements depend on your gauge, yarn thickness, stitch density, and finished dimensions. Make and weigh one complete square before purchasing the full quantity.
Crochet Abbreviations
- ch: Chain
- sc: Single crochet
- hdc: Half double crochet
- dc: Double crochet
- tr: Treble crochet
- sl st: Slip stitch
- st: Stitch
- sp: Space
- inc: Increase
- dec: Decrease
- FO: Fasten off
- RS: Right side
- WS: Wrong side
Understanding the Geometric Square Design
The bedspread is assembled from repeated square motifs containing four triangular sections.
Two opposite triangles are worked in sage green using solid crochet stitches.
The remaining two triangles are worked in cream using openwork granny-style clusters.
When the motifs are arranged together, the contrasting triangles create a repeating geometric pattern across the entire bedspread.
The sample motif shown in the reference image features:
- A sage-green solid triangle at the top
- A sage-green solid triangle at the bottom
- A cream openwork triangle on the left
- A cream openwork triangle on the right
- A narrow sage-green border around the square
The finished motifs can be rotated to create different geometric arrangements.
Part 1: Crochet the Solid Sage-Green Triangle
Begin with sage-green yarn and a 4.5 mm crochet hook.
This triangle is worked from the narrow tip toward the wide edge.
Row 1
Ch 2. Work 2 sc into the second chain from the hook. Ch 1 and turn. (2 sc)
Row 2
Work 2 sc in the first stitch and 2 sc in the last stitch. Ch 1 and turn. (4 sc)
Row 3
Work 2 sc in the first stitch, sc in the next 2 stitches, and 2 sc in the last stitch. Ch 1 and turn. (6 sc)
Row 4
Work 2 sc in the first stitch, sc across until one stitch remains, and 2 sc in the final stitch. Ch 1 and turn. (8 sc)
Rows 5–20
Continue increasing by one stitch at the beginning and end of every row.
At the end of Row 20, you should have 40 stitches.
FO and leave a long tail for joining.
The finished triangle should have two diagonal sides and one straight edge.
Make a second identical sage-green triangle.
Part 2: Crochet the Cream Openwork Triangle
The cream triangles create the beautiful lace-like contrast visible throughout the bedspread.
Use ivory-cream yarn and a 4.5 mm crochet hook.
Row 1
Ch 4. Work 3 dc into the fourth chain from the hook. Ch 3 and turn.
Row 2
Work 3 dc into the first stitch, ch 1, and work 3 dc into the last stitch. Ch 3 and turn.
Row 3
Work 3 dc into the first stitch, ch 1, work 3 dc into the center chain space, ch 1, and work 3 dc into the last stitch. Ch 3 and turn.
Row 4
Work a 3-dc cluster at the beginning of the row.
Ch 1 between each cluster.
Work one 3-dc cluster into each available chain space.
Finish with a 3-dc cluster at the end of the row.
Ch 3 and turn.
Rows 5–12
Repeat the established granny-cluster pattern, adding one additional cluster in each new row.
Continue until the cream triangle matches the dimensions of the sage-green triangle.
FO and leave a long tail for joining.
Make a second identical cream triangle.
Important: The solid and openwork triangles may grow at different rates. Use your gauge swatch to adjust the number of rows so the pieces fit together without stretching. The row counts above are a starting point, not a guaranteed exact match.
Part 3: Assemble the Four-Triangle Square
Lay the four triangles on a flat surface.
Step 1
Position one sage-green triangle with its point facing downward.
Step 2
Position the second sage-green triangle with its point facing upward.
Step 3
Place one cream openwork triangle on the left.
Step 4
Place the second cream triangle on the right.
Step 5
Align the diagonal edges so the four triangle tips meet at the center.
Step 6
Using a yarn needle and matching yarn, sew the diagonal edges together with a mattress stitch.
Step 7
Check that the seams lie flat.
Step 8
Gently block the assembled motif into a square.
The finished square should have two opposite green triangles and two opposite cream triangles.
Part 4: Add the Sage-Green Square Border
The green border gives each motif a clean, structured appearance.
Round 1
Join sage-green yarn at any corner.
Work sc evenly around the square, placing 3 sc in each corner.
Sl st to join.
Round 2
Ch 1.
Work sc in each stitch around, placing 3 sc in the center stitch of each corner.
Sl st to join.
Round 3
Repeat Round 2 if a thicker border is desired.
FO and weave in the ends.
Block the finished square to approximately 20 × 20 cm.
Repeat the process until you have enough motifs for your desired bedspread size.
Part 5: Calculate the Number of Squares
For a bedspread measuring approximately 220 × 240 cm, use 20 cm square motifs.
A suggested arrangement is:
- 11 squares across the width
- 12 squares along the length
- 132 squares in total
This creates a motif panel measuring approximately 220 × 240 cm before the outer border.
For smaller beds, reduce the number of squares.
For larger beds, add additional rows and columns.
Always measure the finished motifs after blocking before calculating the final quantity.
Part 6: Arrange the Geometric Pattern
Lay all completed squares on a large flat surface.
Rotate alternating motifs to create the geometric arrangement shown in the reference image.
The green triangles should form a repeating diagonal rhythm across the blanket.
The cream openwork sections should create contrasting diamond-like shapes.
Experiment with the arrangement before joining.
For a balanced appearance, keep the pattern symmetrical across the width of the bedspread.
Take a photograph of the arrangement before assembling the blanket so you can easily follow the layout.
Part 7: Join the Crochet Squares
There are several methods for joining crochet squares.
For this design, a flat slip-stitch join or mattress-stitch seam works particularly well.
Step 1
Arrange two squares with the right sides facing upward.
Step 2
Align the edges and corners carefully.
Step 3
Using sage-green yarn, join the squares through the corresponding edge stitches.
Step 4
Continue joining squares across each row.
Step 5
Once all horizontal rows are completed, join the rows together.
Step 6
Check the blanket regularly to make sure the seams remain straight.
Step 7
Weave in yarn ends as you work.
A flat joining method helps preserve the clean geometric appearance of the bedspread.
Part 8: Crochet the Outer Bedspread Border
Once all motifs are joined, add a continuous sage-green border.
Round 1
Join sage-green yarn at any corner.
Work sc evenly around the entire blanket.
Place 3 sc in each corner.
Sl st to join.
Round 2
Ch 1.
Work 1 sc in each stitch around, placing 3 sc in the center stitch of each corner.
Sl st to join.
Round 3
Ch 2.
Work 1 hdc in each stitch around.
Place 3 hdc in each corner.
Sl st to join.
Round 4
Ch 1.
Work 1 sc in each stitch around, maintaining the corner increases.
Sl st to join.
FO and weave in the ends.
The finished border creates a polished frame around the geometric motifs.
Part 9: Make Matching Crochet Pillow Covers
Matching pillows create a beautiful coordinated bedroom set.
The reference image features decorative pillows with cream backgrounds, green textured stripes, and small floral accents.
Basic Pillow Panel
Using cream yarn, ch enough stitches to match the width of your pillow insert.
Work rows of hdc until the panel reaches the desired height.
Make two identical panels.
Decorative Green Stripes
Use sage-green yarn to crochet several narrow textured strips.
Sew the strips vertically onto the front pillow panel.
Small Crochet Flowers
Using cream yarn, make a magic ring.
Work 5 sc into the ring.
For each petal, work:
Sl st, ch 2, 3 dc, ch 2, sl st into the same stitch.
Repeat around to create five petals.
FO and weave in the ends.
Attach the flowers to the green decorative strips.
Add a small green center or decorative button if desired.
Pillow Assembly
Place the two pillow panels together with right sides facing.
Join three sides using sc or mattress stitch.
Insert the pillow form.
Close the remaining side securely.
Repeat to create a matching pair.
Part 10: Blocking and Finishing
Blocking helps the crochet motifs maintain a consistent shape and creates a professional finish.
Step 1
Lay the finished bedspread flat.
Step 2
Lightly dampen the fabric using a spray bottle.
Step 3
Gently straighten the square motifs and joining seams.
Step 4
Use blocking pins to secure the edges if necessary.
Step 5
Allow the bedspread to dry completely.
Step 6
Remove the pins and check the finished dimensions.
Step 7
Weave in any remaining loose ends.
Your handmade sage-green and cream crochet bedspread is now ready to display.
Beautiful Color Variations
Sage Green and Ivory
The original combination creates a calm, elegant, nature-inspired bedroom aesthetic.
Dusty Blue and White
Perfect for coastal, cottage, and classic bedroom décor.
Chocolate Brown and Cream
A warm, sophisticated combination for neutral interiors.
Terracotta and Beige
Ideal for cozy autumn-inspired bedrooms.
Blush Pink and Ivory
A soft, romantic combination for feminine bedroom décor.
Olive Green and Oatmeal
A beautiful earthy palette for rustic farmhouse interiors.
Charcoal and White
A modern, high-contrast option for minimalist bedrooms.
Helpful Crochet Tips
- Make a complete sample square before starting the bedspread.
- Measure every motif after blocking.
- Use the same crochet hook throughout the project.
- Maintain consistent yarn tension.
- Count stitches carefully when increasing the triangles.
- Keep the diagonal edges straight.
- Adjust the cream openwork rows to match the green triangles.
- Use stitch markers to identify the corners.
- Block motifs before joining.
- Arrange all motifs before sewing them together.
- Take a photograph of the layout.
- Join squares with matching sage-green yarn.
- Check that the joining seams remain flat.
- Weave in ends regularly.
- Work the outer border with consistent tension.
- Avoid pulling the border too tightly.
- Use washable yarn for a practical bedspread.
- Keep extra yarn for future repairs.
- Store unfinished motifs in a clean project bag.
- Take breaks during large crochet projects to prevent hand fatigue.
Frequently Asked Questions
Is this crochet bedspread suitable for beginners?
This pattern is best for intermediate crocheters because it involves shaping triangular motifs, joining pieces, and maintaining consistent dimensions. Beginners with experience in basic crochet stitches can also try it.
How many crochet squares do I need?
The suggested 220 × 240 cm bedspread uses approximately 132 squares measuring 20 × 20 cm each, before adding the outer border.
Can I make this blanket for a single bed?
Yes. Simply reduce the number of motifs to match the desired width and length.
What yarn is best for this crochet bedspread?
Worsted-weight cotton, acrylic, or a cotton-acrylic blend works well. Choose yarn that is comfortable, durable, and easy to wash.
Can I use different colors?
Absolutely. This geometric design works beautifully with neutral, pastel, earthy, and contrasting color combinations.
Do I need to block the squares?
Blocking is strongly recommended because it helps the triangular sections and assembled squares maintain consistent dimensions.
Can I use the same pattern to make a throw blanket?
Yes. Make fewer motifs and arrange them into a smaller rectangle suitable for a sofa or armchair.
Can I add a decorative edging?
Yes. A scalloped, picot, or shell-stitch edging can be added if you prefer a more decorative finish.
How do I keep the blanket from becoming uneven?
Maintain consistent tension, measure your motifs, block them before joining, and avoid pulling the joining seams too tightly.
Can I sell blankets made from this pattern?
Yes. You may sell handmade blankets created using this original pattern. Credit to the designer is appreciated.
Care Instructions
- Follow the care instructions on your yarn label.
- Wash gently in cool water.
- Use mild detergent.
- Avoid bleach and harsh chemicals.
- Use a gentle machine cycle only if the yarn permits it.
- Place the bedspread in a large mesh laundry bag if appropriate.
- Avoid twisting or wringing the fabric.
- Support the blanket when lifting it while wet.
- Lay flat to dry whenever possible.
- Reshape the edges while damp.
- Avoid direct heat.
- Store clean and completely dry.
Final Thoughts
This sage green and cream crochet granny square bedspread is a beautiful handmade home décor project that combines classic crochet techniques with an elegant geometric design.
The contrasting solid green triangles and delicate cream openwork sections create a striking patchwork effect, while the coordinated pillows and neat border complete the sophisticated bedroom look.
Whether you’re creating a statement bedspread for your own bedroom, making a thoughtful handmade gift, or exploring new geometric crochet techniques, this free pattern offers plenty of opportunities for creativity and customization.
Choose your favorite color combination, crochet your motifs, and enjoy creating a timeless handmade bedspread that can be treasured for years.
Love this crochet bedspread? Save this free sage-green and cream crochet pattern to Pinterest and share it with your crochet friends for more handmade home décor inspiration!