Christmas Poinsettia Crochet Door Swag – Free Crochet Pattern
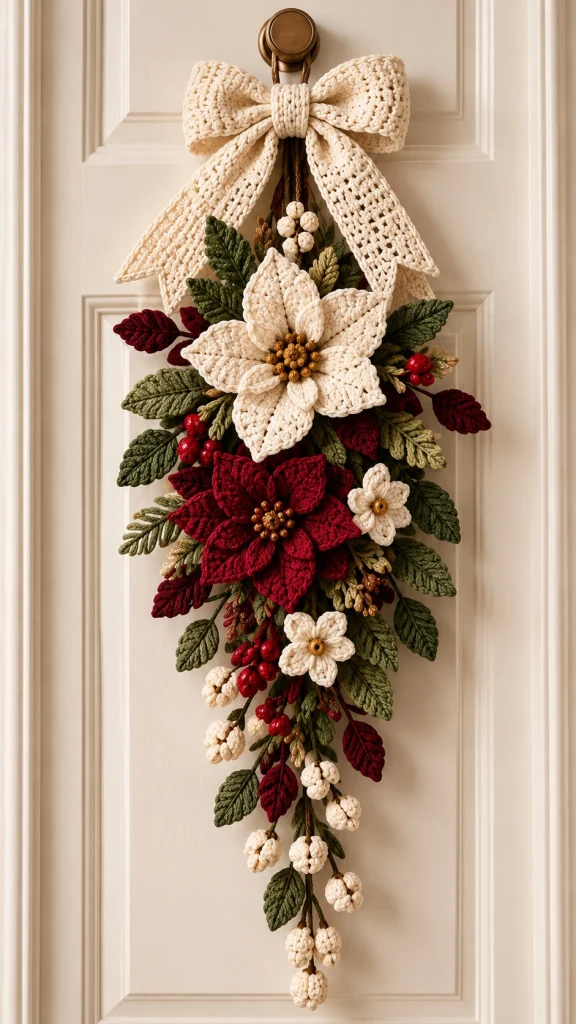
Bring timeless Christmas elegance to your home with this beautiful crochet poinsettia door swag. Featuring a large ivory crochet bow, delicate cream and deep burgundy poinsettias, textured green foliage, festive berries, and cascading winter branches, this handmade decoration creates a stunning seasonal display.
Unlike traditional circular Christmas wreaths, this elegant door hanging features a graceful vertical arrangement that looks beautiful on front doors, interior doors, entryways, and festive wall displays.
The combination of warm ivory, rich burgundy, forest green, and subtle golden accents creates a sophisticated Christmas color palette. Every crocheted flower, leaf, and berry adds depth and texture to the arrangement, while the oversized bow provides a charming finishing touch.
This free crochet pattern guides you through creating the individual decorative elements and assembling them into a beautiful Christmas door swag inspired by the reference image.
Pattern Note: This is an original, adaptable pattern inspired by the photograph. Exact stitch counts and construction methods cannot be determined from the image alone. The instructions below provide a practical way to recreate a similar arrangement.
Pattern Information
- Skill Level: Intermediate to Advanced
- Finished Length: Approximately 65–80 cm (25.5–31.5 inches)
- Finished Width: Approximately 28–35 cm (11–14 inches)
- Main Colors: Ivory, burgundy, forest green, olive green, and red
- Accent Colors: Gold and cream
- Hook Sizes: 2.5 mm, 3 mm, and 3.5 mm
- Yarn Weight: DK or light worsted-weight cotton yarn
- Terminology: US crochet terms
- Construction: Individual flowers, leaves, berries, bow, and hanging branches assembled onto a support
- Estimated Time: 12–18 hours
Materials Needed
- 100–150 g ivory cotton yarn
- 80–120 g deep burgundy cotton yarn
- 100–150 g forest green cotton yarn
- 50–80 g olive green cotton yarn
- 30–50 g red cotton yarn
- Small amount of golden-yellow yarn
- Small amount of brown yarn for stems
- 2.5 mm crochet hook
- 3 mm crochet hook
- 3.5 mm crochet hook
- Yarn needle
- Scissors
- Stitch markers
- Polyester fiberfill for berries
- Optional gold beads for flower centers
- Floral wire or flexible craft wire
- Floral tape
- Strong cotton cord
- Small felt backing or lightweight mesh support
- Optional hot glue for attaching decorative elements
- Measuring tape
Crochet Abbreviations
- ch: Chain
- sc: Single crochet
- hdc: Half double crochet
- dc: Double crochet
- tr: Treble crochet
- sl st: Slip stitch
- st: Stitch
- inc: Increase
- dec: Decrease
- MR: Magic ring
- BLO: Back loop only
- FLO: Front loop only
- FO: Fasten off
Part 1: Crochet the Large Ivory Poinsettia
The large ivory poinsettia forms the main focal point of the Christmas arrangement.
Use ivory cotton yarn and a 3 mm crochet hook.
You will create 10 individual petals arranged in two layers.
Large Petal – Make 5
Row 1
Ch 17.
Row 2
Sc in the second chain from the hook.
Hdc in the next 2 stitches.
Dc in the next 9 stitches.
Hdc in the next 2 stitches.
Sc in the final 2 stitches.
Row 3
Ch 1 and turn.
Sc in the first 2 stitches.
Hdc in the next 2 stitches.
Dc in the next 8 stitches.
Hdc in the next 2 stitches.
Sc in the final 2 stitches.
Row 4
Ch 1 and turn.
Work 1 sc in each stitch across.
FO, leaving a long tail for assembly.
For a more dimensional petal, work a surface slip-stitch line along the center using the same ivory yarn.
Small Petal – Make 5
Row 1
Ch 13.
Row 2
Sc in the second chain from the hook.
Hdc in the next 2 stitches.
Dc in the next 6 stitches.
Hdc in the next 2 stitches.
Sc in the final stitch.
Row 3
Ch 1 and turn.
Work 1 sc in each stitch across.
FO, leaving a long tail.
Assemble the Ivory Poinsettia
Arrange the five large petals in a circular formation.
Overlap the bases slightly and sew them together securely.
Position the five smaller petals on top, rotating them so they sit between the larger petals.
Sew the smaller petals into place.
Add a small cluster of golden-yellow crochet bobbles or gold beads to the center.
Gently shape the petals to create a natural, layered flower.
Part 2: Crochet the Burgundy Poinsettia
The burgundy poinsettia provides a beautiful contrast to the ivory flower.
Use deep burgundy cotton yarn and a 3 mm crochet hook.
Large Petals – Make 5
Repeat the large ivory petal instructions from Part 1.
Small Petals – Make 5
Repeat the small ivory petal instructions from Part 1.
Assembly
Arrange the large burgundy petals in a circular shape.
Sew them together at the base.
Layer the smaller petals over the larger petals.
Add a golden center using small crochet bobbles or decorative beads.
Shape the petals gently to create a full poinsettia bloom.
Part 3: Crochet the Small Ivory Flowers
The reference arrangement includes smaller ivory flowers that add delicate detail around the main poinsettias.
Make 2–3 small flowers.
Use ivory yarn and a 2.5 mm hook.
Round 1
Make a magic ring.
Work 6 sc into the ring.
Join with a sl st.
Round 2
*Ch 3, work 2 dc into the same stitch, ch 3, sl st into the same stitch.*
Repeat in each of the remaining 5 stitches.
You should have 6 small petals.
FO, leaving a long tail.
Flower Center
Attach a small golden bead or crochet a tiny yellow bobble.
Secure it in the center of the flower.
Make the remaining flowers in the same way.
Part 4: Crochet the Textured Green Leaves
The lush foliage is essential for creating the elegant cascading appearance of the door swag.
Use forest green and olive green yarn with a 3 mm hook.
Make approximately 16–22 leaves in different sizes.
Large Leaf – Make 10–12
Row 1
Ch 19.
Row 2
Sc in the second chain from the hook.
Hdc in the next 3 stitches.
Dc in the next 10 stitches.
Hdc in the next 3 stitches.
Sc in the final stitch.
Row 3
Ch 1 and turn.
Work 1 sc in each stitch across.
Row 4
Ch 1 and turn.
Sc in the first 2 stitches.
Hdc in the next 3 stitches.
Dc in the next 8 stitches.
Hdc in the next 3 stitches.
Sc in the final 2 stitches.
FO, leaving a long tail.
Small Leaf – Make 6–10
Ch 13.
Sc in the second chain from the hook.
Hdc in the next 2 stitches.
Dc in the next 6 stitches.
Hdc in the next 2 stitches.
Sc in the final stitch.
FO, leaving a long tail.
Add Leaf Veins
Use a yarn needle and matching or slightly lighter green yarn.
Embroider a central vein from the base toward the tip.
Add smaller diagonal veins on both sides.
For a more structured leaf, attach a thin piece of floral wire along the back and cover it securely with yarn or floral tape.
Part 5: Crochet the Winter Berry Clusters
Small red and ivory berries add beautiful seasonal detail to the arrangement.
Make approximately 20–30 berries in different colors.
Use a 2.5 mm crochet hook.
Round 1
Make a magic ring.
Work 6 sc into the ring.
Round 2
Work 2 sc in each stitch around.
(12 sc)
Round 3
Work 1 sc in each stitch around.
(12 sc)
Round 4
*Sc in the next stitch, dec.* Repeat 4 times.
(8 sc)
Add a small amount of polyester fiberfill.
Round 5
Work 4 decreases around.
(4 sc)
FO and close the opening.
Assemble Berry Clusters
Attach 3–5 berries to short yarn-covered stems.
Combine red and ivory berries in separate clusters.
Make several small groups to position between the flowers and leaves.
Part 6: Crochet the Cascading Branches
The long trailing branches create the distinctive vertical shape of this Christmas door hanging.
Use brown, olive green, and forest green yarn.
Step 1: Create the Main Stems
Cut several lengths of flexible floral wire measuring approximately 25–55 cm.
Cover each wire with brown or green yarn using tightly wrapped stitches or floral tape.
Step 2: Attach Small Leaves
Position small crocheted leaves along the stems.
Alternate their direction for a natural appearance.
Secure each leaf with matching yarn.
Step 3: Add Berries
Attach small ivory and red berry clusters at different points.
Keep the clusters unevenly spaced to create a natural arrangement.
Step 4: Shape the Branches
Gently bend the stems to create soft curves.
Make the central branches longer than the outer branches.
This creates a graceful tapered silhouette.
Part 7: Crochet the Oversized Ivory Bow
The large ivory bow is one of the most eye-catching features of this design.
Use ivory cotton yarn and a 3.5 mm hook.
Bow Loops
Row 1
Ch 19.
Row 2
Hdc in the third chain from the hook and across.
(17 hdc)
Rows 3–34
Ch 2 and turn.
Hdc across.
(17 hdc per row)
FO, leaving a long tail.
Fold the rectangle so the short ends meet at the center.
Sew the ends together.
Pinch the center to create two rounded bow loops.
Bow Center Wrap
Row 1
Ch 9.
Row 2
Sc in the second chain from the hook and across.
(8 sc)
Rows 3–12
Ch 1 and turn.
Sc across.
FO, leaving a long tail.
Wrap this piece around the center of the bow.
Sew securely at the back.
Bow Tails – Make 2
Row 1
Ch 15.
Row 2
Hdc in the third chain from the hook and across.
(13 hdc)
Rows 3–38
Ch 2 and turn.
Hdc across.
(13 hdc per row)
FO, leaving a long tail.
Repeat for the second tail.
Shape the Bow Tails
Fold the bottom corners inward slightly to create tapered ends.
Sew the folded edges securely.
Attach both tails behind the bow loops.
Position them so they hang diagonally downward.
Gently shape the bow to create a soft, elegant appearance.
Part 8: Create the Hanging Support
The finished arrangement needs a secure support to hold the weight of the flowers and foliage.
Step 1
Cut a piece of strong cotton cord approximately 35–45 cm long.
Step 2
Fold it in half to create a hanging loop.
Step 3
Secure the ends to the upper portion of a lightweight felt or mesh backing.
Step 4
Reinforce the attachment with several stitches.
Step 5
Check that the loop is centered.
The hanging loop should be strong enough to support the complete arrangement.
Part 9: Assemble the Christmas Door Swag
Arrange all the crocheted pieces on a flat surface before attaching them permanently.
Step 1: Position the Main Foliage
Place the largest green leaves near the center and upper portion of the backing.
Angle some leaves outward to create fullness.
Step 2: Attach the Ivory Poinsettia
Position the large ivory poinsettia in the upper-middle section.
Secure it firmly to the backing.
Step 3: Attach the Burgundy Poinsettia
Place the burgundy poinsettia slightly below and to one side of the ivory flower.
Allow the petals to overlap the surrounding foliage naturally.
Step 4: Add Small Ivory Flowers
Position the smaller ivory flowers around the lower and side sections.
Use them to balance the larger poinsettias.
Step 5: Add Additional Leaves
Fill the spaces between the flowers with textured green leaves.
Alternate forest green and olive green for depth.
Step 6: Attach the Berry Clusters
Position red berry clusters near the burgundy flower.
Add ivory berries around the upper and lower sections.
Step 7: Add Cascading Branches
Attach the longest branches at the bottom center.
Position shorter branches toward the sides.
Allow the branches to hang naturally.
Step 8: Attach the Oversized Bow
Position the ivory bow at the top of the arrangement.
Secure it over the hanging support.
Arrange the tails so they frame the upper poinsettia.
Step 9: Adjust the Shape
Gently reposition the leaves, flowers, and trailing branches.
Make sure the arrangement has a balanced, tapered silhouette.
Step 10: Final Inspection
Check all attachment points.
Make sure the flowers and berries are securely fastened.
Hang the decoration and make any final adjustments.
Beautiful Color Variations
Classic Christmas
Use ivory, burgundy, forest green, and gold for an elegant traditional Christmas decoration.
Winter White
Make both poinsettias ivory and use frosted sage-green leaves with pearl accents.
Rustic Farmhouse
Combine cream flowers, muted olive foliage, cinnamon-brown stems, and a natural beige bow.
Luxury Burgundy
Use deep burgundy flowers, dark green leaves, and antique gold details.
Soft Vintage Christmas
Choose dusty rose, cream, muted sage, and champagne-colored accents.
Traditional Red and Green
Make bright red poinsettias with emerald-green foliage and a cream bow.
Elegant Gold and Ivory
Use ivory flowers, champagne-gold centers, and warm green foliage.
Helpful Crochet Tips
- Use cotton yarn for clearly defined stitches.
- Keep flower petals consistent in size.
- Use a smaller hook for berries and delicate details.
- Make the large flowers before arranging the smaller elements.
- Use different shades of green for natural-looking foliage.
- Shape the petals gently for added dimension.
- Attach floral wire carefully and cover any exposed ends.
- Keep the heaviest elements near the center of the backing.
- Arrange the foliage before securing the flowers.
- Make the central trailing branches longer than the side branches.
- Use small berry clusters rather than placing berries individually.
- Keep the ivory bow proportional to the floral arrangement.
- Secure every decorative element firmly.
- Test the hanging support before displaying the decoration.
- Use a covered-door location to protect the crochet work from moisture.
Frequently Asked Questions
Is this crochet Christmas door hanging suitable for beginners?
This project is best suited to intermediate or advanced crocheters because it involves making multiple decorative elements and assembling them into a structured arrangement.
Can I make the door swag smaller?
Yes. Use smaller flowers, fewer leaves, and shorter trailing branches to create a compact version.
Can I use acrylic yarn?
Yes. Acrylic yarn works well for indoor decorations, although cotton yarn generally provides better stitch definition.
How do I keep the poinsettia petals in shape?
Use firm crochet tension and optional lightweight floral wire along the back of each petal.
Can I use this decoration outdoors?
It is best displayed indoors or on a covered porch protected from rain, snow, and strong winds.
How do I attach the flowers securely?
Use long yarn tails to sew the flowers to a sturdy backing. Reinforce the larger flowers with additional stitches.
Can I make the arrangement without floral wire?
Yes, but the leaves and branches will have a softer appearance and may not hold their shape as firmly.
Can I change the flower colors?
Absolutely. Ivory, red, burgundy, pink, and champagne tones all work beautifully for Christmas poinsettias.
How do I store the decoration after Christmas?
Place it flat in a clean storage box, gently supporting the flowers and bow to prevent crushing.
Can I sell finished decorations made from this pattern?
Yes. You may sell handmade decorations created using this original pattern. Credit to the pattern designer is appreciated.
Care Instructions
- Keep the decoration away from heavy moisture.
- Dust gently with a soft brush.
- Spot clean with a damp cloth when necessary.
- Avoid soaking if floral wire or decorative beads are used.
- Do not machine wash the assembled arrangement.
- Allow any damp areas to air dry completely.
- Avoid direct heat and prolonged sunlight.
- Store in a dry, clean container.
- Protect the bow and flowers from crushing.
- Check attachment points before displaying each season.
Final Thoughts
This Christmas poinsettia crochet door swag is a beautiful handmade alternative to traditional holiday wreaths. Its cascading arrangement, elegant ivory bow, rich burgundy poinsettia, cream flowers, textured green foliage, and delicate winter berries create a festive decoration filled with warmth and timeless charm.
Whether you’re decorating your front door, adding a seasonal accent to your entryway, or making a thoughtful handmade Christmas gift, this crochet project offers a wonderful opportunity to create something truly special.
The combination of traditional Christmas colors and detailed crochet textures makes this decoration a lovely addition to farmhouse, classic, rustic, and elegant holiday interiors.
Love this Christmas crochet idea? Save this free poinsettia crochet door hanging pattern to Pinterest and share it with your crochet friends for more beautiful handmade holiday inspiration!