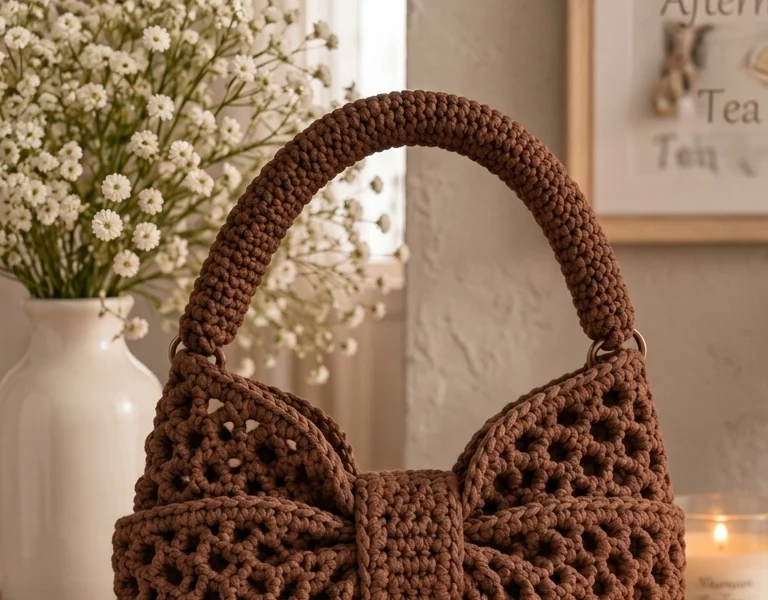
Crochet Bow Handbag Pattern
This crochet bow handbag pattern creates a beautiful structured purse with one very special detail: an oversized textured crochet bow covering almost the entire front of the bag.
The design combines a dense chocolate-brown crochet body with two openwork bow panels, a thick rounded handle and a wide center band. The contrast between the solid bag and airy bow gives the finished piece an elegant boutique-style appearance.
The bag is designed to hold its shape while still having the soft handmade texture of crochet. It works beautifully as an everyday handbag, brunch bag or handmade gift.
Materials
- Bulky cotton cord or firm macramé-style yarn in chocolate brown approximately 450-550 g
- 5.0 mm crochet hook main bag
- 4.5 mm crochet hook optional for tighter edging
- 2 metal D-rings or round handle rings approximately 25-30 mm
- Plastic canvas or bag stabilizer optional
- Fabric lining optional
- Magnetic snap optional closure
- Small handmade label optional
- Yarn needle assembly
- Stitch markers 4-6
- Scissors 1 pair
Abbreviations
MRmagic ringchchainsl stslip stitchscsingle crochethdchalf double crochetdcdouble crochettrtreble crochetspspaceinc2 stitches in same stitchdeccrochet 2 stitches togetherBLOback loop onlyFOfasten offBag Base
- Ch 31.
- Round 1: Sc in second ch from hook and in each ch across. Work 3 sc in final ch.
- Continue along the opposite side of the foundation chain, working 1 sc in each ch.
- Work 2 additional sc in the first chain. Join with sl st.
- Round 2: Ch 1. Sc around, working 2 sc in each of the three stitches at both curved ends.
- Round 3: Sc around, increasing evenly around both ends.
- Round 4: Repeat once more if a wider base is desired.
The finished oval base should measure approximately 28 cm x 9 cm.
Main Bag Body
- Work one round of BLO sc around the base. This creates a defined fold between the bottom and sides.
- Continue working sc in continuous rounds without increasing.
- Use a stitch marker to identify the beginning of each round.
- Continue until the body measures approximately 18 cm from the base.
- For a slightly tapered handbag shape, decrease 2 stitches evenly on each side during the final 4 rounds.
- Work one final round of tight sc around the upper edge.
- FO and weave in the yarn end.
Front Structure Panel
The large bow needs a stable surface behind it. A small reinforcement panel helps the bag keep the clean shape shown in the finished design.
- Ch 25.
- Row 1: Sc in second ch from hook and across. (24)
- Rows 2-12: Ch 1, turn, sc across.
- FO leaving a long sewing tail.
- Center this rectangle against the inside front of the bag.
- Sew around the perimeter using small hidden stitches.
If desired, place a thin piece of plastic canvas between the panel and bag body before sewing.
Large Crochet Bow – Left Panel
- Ch 28.
- Row 1: Dc in 4th ch from hook and across.
- Row 2: Ch 4, turn, skip 1 st, dc in next st, *ch 1, skip 1 st, dc in next st*. Repeat across.
- Row 3: Ch 3, turn, work 2 dc into each ch-1 sp across.
- Row 4: Ch 5, turn, sc into first space, *ch 4, sc into next space*. Repeat across.
- Row 5: Ch 3, work 3 dc into each ch-4 space.
- Row 6: Repeat Row 4.
- Row 7: Repeat Row 5.
- Continue alternating open mesh and shell-style rows until the panel measures approximately 20 cm.
Shaping the Bow
- Begin decreasing one pattern repeat at each side over the next 3 rows.
- The inner edge should become narrower while the outer edge remains broad and rounded.
- Work one final row of sc around the complete panel.
- At each outer corner work 3 sc in the same stitch.
- FO leaving a long sewing tail.
Large Crochet Bow – Right Panel
Repeat the instructions for the left bow panel.
Before fastening off, place both pieces beside each other and confirm that they are approximately the same size. Minor differences can be corrected during blocking.
Bow Edge Definition
- Join yarn at one corner of a bow panel.
- Work sc evenly around the complete outer edge.
- At rounded outer corners, work 2-3 sc into the same stitch to prevent curling.
- Work sl sts around the narrow inner edge for extra firmness.
- Repeat on the second panel.
- FO and weave in ends.
Bow Center Band
- Ch 11.
- Row 1: Sc in second ch from hook and across. (10)
- Rows 2-20: Ch 1, turn, sc across.
- Continue until the band measures approximately 14-16 cm.
- FO leaving a long tail.
The center band should be wide enough to visually separate the two bow loops while covering their inner edges.
Assembling the Oversized Bow
- Block both bow panels before assembly.
- Place the left panel across the upper-left front of the handbag.
- Angle the outer edge slightly downward.
- Position the right panel as a mirror image.
- Overlap the narrow inner edges at the center.
- Pin both panels securely.
- Sew the inner portions firmly to the handbag.
- Add several hidden stitches along the lower and upper edges.
- Do not sew every part completely flat; leaving some openwork slightly raised gives the bow more dimension.
- Wrap the solid center band vertically over the middle.
- Sew the band firmly to the bag through all layers.
Rounded Crochet Handle
The handle is made as a dense tube so it remains thick, rounded and comfortable.
- Make an MR.
- Round 1: Work 8 sc into MR. (8)
- Do not join.
- Round 2 onward: Sc continuously around.
- Continue until the tube measures approximately 48-52 cm.
- Stuff very lightly with cotton cord scraps as you work if additional structure is required.
- Do not overstuff; the handle must remain flexible enough to curve naturally.
- FO leaving a long tail.
Alternative Flat Handle
If you prefer not to crochet a tube:
- Ch 51.
- Row 1: Sc in second ch from hook and across. (50)
- Rows 2-5: Ch 1, turn, sc across.
- Fold the strip lengthwise.
- Sl st or sew the long edges together.
- Insert a cotton cord inside before closing if extra structure is desired.
Attaching the Handle Rings
- Place one metal ring approximately 4 cm from the left side of the upper edge.
- Place the second ring symmetrically on the right.
- Using doubled yarn, sew each ring firmly to the bag.
- Pass each end of the crochet handle through its corresponding ring.
- Fold approximately 3 cm of the handle end back against itself.
- Sew firmly using several passes through the handle.
- Repeat on the opposite side.
Optional Magnetic Closure
- Mark the center of the front and back upper edges.
- Attach one half of the magnetic snap to the front.
- Attach the matching half directly opposite on the back.
- If using a fabric lining, install the magnetic closure before sewing the lining into the bag.
Optional Fabric Lining
- Measure the inside width, height and base of your completed handbag.
- Cut two fabric rectangles slightly larger than the measurements.
- Add approximately 1 cm seam allowance around all sides.
- Sew the sides and bottom together.
- Box the lower corners to match the crochet base.
- Fold the upper raw edge inward.
- Insert the lining into the handbag.
- Hand-sew it just below the upper crochet edge using small invisible stitches.
Optional Interior Pocket
- Cut a fabric rectangle approximately 18 cm x 15 cm.
- Fold all raw edges inward and press.
- Hem the upper edge.
- Position the pocket against the lining.
- Sew around both sides and the bottom.
- For two compartments, sew one vertical line through the center.
Finishing the Bag
- Weave in all remaining yarn ends.
- Check the bow from the front and adjust both loops until symmetrical.
- Steam-block the bow lightly if necessary.
- Avoid pressing directly onto synthetic cord.
- Shape the handle into a smooth arch.
- Check that both handle attachments sit at equal heights.
- Add an optional handmade label below the center of the bow.
Tips for Success
- Choose firm yarn: Cotton cord gives the bag significantly more structure than soft acrylic yarn.
- Keep your tension tight: Dense stitches help prevent stretching.
- Block the bow separately: This makes it much easier to achieve matching left and right loops.
- Reinforce the handle: The attachment points carry the weight of the entire handbag.
- Use lining: A lining gives the finished bag a more polished interior and prevents small items from pushing through stitches.
- Pin before sewing: Position the complete bow before permanently attaching either side.
Common Mistakes to Avoid
- Using stretchy yarn: The handbag can lose its structured shape.
- Making the bow too small: The oversized bow is intentionally the dominant design feature.
- Attaching the bow completely flat: A little dimension makes the lace texture more visible.
- Weak handle attachment: Reinforce both rings with multiple passes of yarn.
- Skipping the reinforcement panel: Heavy bow panels may pull the front of a soft bag inward.
- Overstuffing the handle: It should remain flexible enough to form a smooth arch.
Ways to Customize This Handbag
- Use cream or beige yarn for a soft bridal-inspired version.
- Make it in burgundy for an elegant autumn handbag.
- Use black yarn with gold hardware for an evening version.
- Make the bow in a contrasting color while keeping the bag body neutral.
- Add pearl beads around the center band for a feminine finish.
- Replace the crochet handle with bamboo handles for a vintage look.
- Add a detachable shoulder strap using additional D-rings.
Frequently Asked Questions
How big is the finished crochet bow handbag?
Using bulky cotton cord and a 5.0 mm hook, the finished handbag measures approximately 30 cm wide and 23 cm high, excluding the handle. The exact size will depend on your yarn and tension.
Is this crochet handbag beginner friendly?
The basic body uses simple stitches, but the structured construction, openwork bow, handle and assembly require careful shaping. The project is best suited to intermediate crocheters or confident advanced beginners.
What yarn should I use?
A firm cotton cord, tube yarn or macramé-style crochet yarn works particularly well. The material should have enough body to hold the rectangular shape without becoming excessively stiff.
Does the bag need a lining?
A lining is optional, but recommended. It gives the handbag a cleaner interior, improves durability and prevents small objects from stretching the crochet fabric.
Can I make the bow in another color?
Yes. A contrasting bow can completely change the style. Cream on brown creates a vintage look, pink on cream gives a softer romantic appearance, and black with beige creates a more neutral design.
How can I make the bag more rigid?
Add plastic canvas or firm bag stabilizer between the crochet body and fabric lining. Reinforcing the base and front panel is usually enough to give the handbag a structured shape.
Can I add a shoulder strap?
Yes. Add two additional D-rings near the side seams and attach a removable crochet, leather or fabric strap with swivel clasps.
Leave a Reply