About This Amigurumi Holiday Lights Pattern
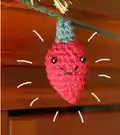
This charming Amigurumi Holiday Lights pattern creates adorable miniature light bulbs that capture the magic of the festive season. Each bulb is worked in the round using simple stitches, making it accessible for crocheters of all skill levels. The pattern includes instructions for creating individual bulbs in your choice of vibrant colors, plus guidance on stringing them together into a beautiful garland. You can personalize each bulb with safety eyes and embroidered smiles, or keep them simple for a more modern aesthetic.

The finished bulbs are approximately 2-3 inches tall and can be made in any color combination you desire. They work up quickly, making this an ideal project for using up yarn scraps while creating something truly special for your holiday decorating.
Why You'll Love This Amigurumi Holiday Lights Pattern
I absolutely love this pattern because it combines simplicity with endless creative possibilities! There's something magical about transforming basic yarn into these cheerful little light bulbs that bring so much joy to any space. I find it incredibly satisfying to work through each bulb quickly and watch my festive garland grow. The best part is being able to customize the colors to match my décor perfectly—whether I want traditional reds and greens or a modern rainbow palette. I also appreciate that this project is perfect for mindless crocheting while watching holiday movies, yet the result looks impressively detailed and handcrafted. These little lights never fail to bring smiles to everyone who sees them!
Switch Things Up
I love experimenting with different color combinations for these adorable light bulbs! Instead of traditional holiday colors, I sometimes create an entire garland in pastel shades for a dreamy, vintage-inspired look that works beautifully for spring celebrations or baby showers. You could also make them in your favorite sports team colors or school colors for year-round decorating.
For a more whimsical approach, I enjoy adding different facial expressions to each bulb—some smiling, some winking, some with surprised looks—to create a garland full of personality. You can also vary the cap color by using different shades of green or even experimenting with metallic yarns for a glamorous touch.
If you want to make these bulbs more functional, consider adding a small loop at the top of each green cap so they can be used as individual ornaments on your tree. I've also stuffed some with dried lavender instead of Polyfil to create sachets that smell wonderful while decorating. Another fun variation is to make them in gradient colors, transitioning from light to dark across your garland for an ombre effect that looks stunning!
Common Mistakes & How to Fix Them
✗ Not stuffing the bulb firmly enough before closing, which results in a floppy light bulb that loses its shape
✗ Pulling the magic ring too tight at the beginning, making it difficult to work the first round of increases evenly
✗ Forgetting to attach safety eyes before stuffing and closing the bulb, requiring you to reopen the finished piece
✗ Switching to green yarn too early or too late, creating an uneven cap that doesn't proportion well with the bulb body