🧢 Beautiful ✨ Detailed πŸ’ Adorable

Pumpkin Plush Hat Pattern

Pumpkin Plush Hat Pattern
4.9β˜… Rating
8-10 Hours Time Needed
4.0K Made This
βœ‚οΈ

Intermediate Level

Ideal for those with basic knitting experience, featuring slightly more advanced stitches and techniques to expand your skills.

⏱️

All-Day Adventure

Requires 8-10 hours, ideal for a full day of immersive knitting.

πŸŽƒ

Holiday Cheer

Festive fun for the season, bringing handmade magic to celebrations and creating new family traditions.

About This Pumpkin Plush Hat Pattern

Pumpkin Plush Hat Pattern crochet pattern - detailed view of completed project

Perfect for Halloween festivities, fall photo shoots, or anyone who loves celebrating autumn in style. This hat makes a wonderful gift for pumpkin enthusiasts of all ages.

Why You'll Love This Pumpkin Plush Hat Pattern

I absolutely love how this pattern transforms bulky yarn into a three-dimensional wearable pumpkin! The ribbing technique creates such satisfying texture, and watching the pumpkin shape come to life as you stuff and gather the edges feels magical. I appreciate that it's sized for teens and adults, making it perfect for coordinating family autumn outfits. The little vine tendrils on the stem add such a playful touch that makes me smile every time. Plus, working with super bulky yarn means this impressive-looking project comes together faster than you'd expect!

Pumpkin Plush Hat Pattern step 1 - construction progress Pumpkin Plush Hat Pattern step 2 - assembly progress Pumpkin Plush Hat Pattern step 3 - details and accessories Pumpkin Plush Hat Pattern step 4 - final assembly and finishing

Switch Things Up

I love experimenting with this pumpkin hat pattern to create unique variations! For a spookier Halloween vibe, I've tried using black yarn for the base with an orange stem, creating a reverse color scheme that looks incredibly striking. You could also play with the stem design by making it shorter and stubbier for a baby pumpkin look, or longer and more dramatic for a decorative gourd effect.

Consider adding embroidered faces or felt features to turn your pumpkin hat into a jack-o'-lantern character. I've sewn on triangle eyes and a zigzag mouth using black felt, which adds so much personality! For a more elegant autumn aesthetic, try using cream or rust-colored yarn with a brown stem, giving it a sophisticated harvest feel rather than a Halloween costume vibe.

The vine tendrils offer another opportunity for creativity - I sometimes make them different lengths or add small leaf shapes crocheted in green yarn and sewn along the tendrils. You could even create multiple smaller tendrils instead of just two for a fuller, more whimsical appearance. Some crafters skip the stuffing entirely and work the pattern flat for a slouchy beanie style, though you'd need to adjust the construction method. The ribbing technique itself could be adapted to other projects like pillows or bags if you fall in love with that dimensional pumpkin texture!

Common Mistakes & How to Fix Them

βœ— Overstuffing the hat which makes it too stiff and uncomfortable to wear on your head βœ— Not checking the hat's concave shape while stuffing, resulting in poor fit and the hat sliding off βœ— Skipping stitch markers during the ribbing rows, causing misaligned ridges and uneven pumpkin texture throughout βœ— Forgetting to work in back loops only during ribbing sections, which eliminates the dimensional ridge effect βœ— Not matching foundation chain length to cap height, creating gaps or bunching in the finished ribbing βœ— Pulling gathering stitches too tight at the top, distorting the pumpkin shape and creating an awkward peak

Pumpkin Plush Hat Pattern

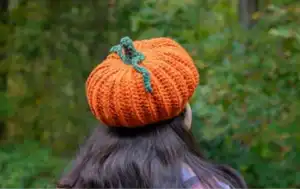
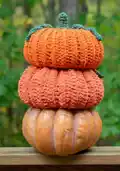
Create this adorable stuffed pumpkin hat perfect for fall festivities and everyday wear! This cozy design features textured ribbing that mimics a real pumpkin's ridges, complete with a charming green stem and whimsical vine tendrils. Whether you're getting ready for autumn celebrations or just want a unique handmade accessory, this plush hat combines warmth with playful style. The stuffed design adds dimension and personality while maintaining comfort for all-day wear.

Intermediate 8-10 Hours

Materials Needed for Pumpkin Plush Hat Pattern

β€” Main Fabric

  • 01
    Lion Brand Wool Ease Thick And Quick Yarn in Pumpkin (Weight Category 6, super bulky) - 1.5-2 skeins (106 yards per skein)
  • 02
    Alternative: Bernat Blanket Yarn in Pumpkin Spice for more pronounced ribbing
  • 03
    Lion Brand Wool Ease Thick And Quick Yarn in Kale (Weight Category 6, super bulky) - 2-3 yards for stem

β€” Tools Required

  • 01
    10mm crochet hook
  • 02
    Poly-Fil Premium Polyester Fiber Fill (4-5 handfuls)
  • 03
    Yarn needle (large plastic or metal needle for sewing)
  • 04
    Stitch marker
  • 05
    Scissors

Progress Tracker

0% Complete

β€” Hat Base Cap :

Round 1 :

Magic circle with 6 SC inside (6)

Round 2 :

SC INC in every stitch (12)

Round 3 :

*SC in next stitch, SC INC in next stitch* repeat 6 times (18)

Round 4 :

*SC INC in next stitch, SC in next 2 stitches* repeat 6 times (24)

Round 5 :

*SC in next 3 stitches, SC INC in next stitch* repeat 6 times (30)

Round 6 :

*SC INC in next stitch, SC in next 4 stitches* repeat 6 times (36)

Round 7 :

*SC in next 5 stitches, SC INC in next stitch* repeat 6 times (42)

Round 8 :

*SC INC in next stitch, SC in next 6 stitches* repeat 6 times (48)

Rounds 9-18 :

SC in each stitch (48)

Round 19 :

SC FLO in each stitch (48)

β€” Hat Outer Ribbing :

Row Foundation :

SS into first stitch, Chain 16 (adjust to match cap height), Chain 1 and turn

Row 1 :

SS in next 3 stitches, SC in next 3 stitches, HDC INC in next stitch, *HDC in next stitch, HDC INC in next stitch* repeat 4 times, HDC last stitch and first stitch in round together (21)

Row 2 :

SS into next stitch in round, Turn, HDC BLO in next 15 stitches, SC BLO in next 3 stitches, SS BLO in next 3 stitches, Chain 1 and turn (21)

Row 3 :

SS BLO in next 3 stitches, SC BLO in next 3 stitches, HDC BLO in next 14 stitches, HDC BLO last stitch and next stitch in round together (21)

Row 4 :

SS into next stitch in round, Turn, HDC BLO in next 15 stitches, SC BLO in next 3 stitches, SS BLO in next 3 stitches, Chain 1 and turn (21)

Row 5 :

SS BLO in next 3 stitches, SC BLO in next 3 stitches, HDC BLO in next 14 stitches, HDC BLO last stitch and next stitch in round together (21)

Row 6 :

SS into next stitch in round, Turn, HDC BLO in first stitch, *HDC DEC using next 2 stitches* repeat pattern, SC BLO in next 3 stitches, SS BLO in next 3 stitches, Chain 1 and turn (16)

Rows 7-42 :

Repeat rows 1-6 six more times

Rows 43-47 :

Repeat rows 1-5 one more time

Row 48 :

SS into next stitch in round, Turn, connect to foundation chain: HDC BLO current stitch and first leftover loop together, *HDC DEC using next 2 stitches and next leftover loop together* repeat pattern with all stitches, SC BLO next 3 stitches with next 3 leftover loops, SS BLO next 3 stitches with next 3 leftover loops, Fasten off

β€” Stuffing & Closing :

Info :

Sew running stitch through end loops along edges of rows, stuff hat in small handfuls checking for concave base cap shape, pull yarn to gather edges, align with top of base cap and sew together, tie off and weave in ends

β€” Stem :

Round 1 :

Magic circle with 6 SC inside (6)

Rounds 2-4 :

SC in each stitch (6)

Round 5 :

*SC in next stitch, SC INC in next stitch* repeat 3 times (9)

Round 6 :

*SC INC in next stitch, SC in next stitch* repeat 5 times (13)

Vine Tendril 1 :

SS into first stitch, Chain 21, Turn, SS down 20 stitches, SS into next stitch in round, SS to other side of round

Vine Tendril 2 :

Chain 21, Turn, SS down 20 stitches, SS into next stitch in round, SS back to beginning, Fasten off

β€” Finish :

Info :

Sew stem securely to top of hat, tie off and weave ends into inside of hat, weave in loose yarn from magic circle into inside of hat

Assembly Instructions

  • After completing the ribbing, attach the long tail to your yarn needle and prepare for gathering
  • Sew a running stitch through the very end loops along all the row edges until you return to starting point
  • Begin stuffing the hat interior with small handfuls of poly-fil, continuously checking the fit by trying it on
  • Ensure the base cap maintains a concave shape as you stuff to guarantee proper fit on your head
  • Pull the yarn to gather all the ribbed edges together at the top, checking the overall pumpkin shape
  • Align the gathered edges with the very top center of the base cap and sew them securely in place
  • Sew the completed stem with vine tendrils securely to the top gathered section of the hat and weave in all ends

Important Notes

  • πŸ’‘Use a stitch marker consistently to track the beginning of each round throughout the base cap construction
  • πŸ’‘The foundation chain length for ribbing must match your cap height when laid flat against its surface
  • πŸ’‘Always work in back loops only during ribbing rows to create the dimensional ridge effect that forms pumpkin texture
  • πŸ’‘Do not overstuff the hat as this makes it uncomfortable to wear and may cause the shape to distort
  • πŸ’‘Try on the hat multiple times during stuffing to ensure the base cap stays concave for proper head fit
  • πŸ’‘Feel free to adjust the number of increase rounds or regular rounds to customize the fit for different head sizes
  • πŸ’‘The stitch count must remain a multiple of 6 if you modify the base cap pattern for sizing adjustments

This charming Pumpkin Plush Hat pattern was designed to bring festive autumn spirit to your handmade wardrobe! The unique ribbing technique creates authentic pumpkin texture while the stuffed construction adds playful dimension. With its whimsical stem and curly vine tendrils, this hat captures the essence of fall in wearable form. Perfect for Halloween celebrations, harvest festivals, or showing off your pumpkin love all season long. The pattern uses super bulky yarn for satisfying, relatively quick progress despite the impressive results. πŸŽƒ Happy crocheting! 🧢✨

You ask,

we answer.

FAQs

Can I adjust the size of this hat for a child or larger adult head?

Yes! You can add or subtract increase rounds in the base cap section to adjust the circumference. Just make sure your final stitch count is a multiple of 6. You can also add or subtract regular rounds (rounds 9-18) to adjust the depth of the hat for better fit. The pattern recommends making it slightly deeper for a snugger fit once stuffed.

Why is my pumpkin ribbing not showing up clearly?

Make sure you're consistently working in the back loops only (BLO) during the ribbing rows. This technique creates the dimensional ridges. Also, the type of yarn matters - the pattern notes that Bernat Blanket Yarn in Pumpkin Spice creates more pronounced ribbing than other yarns. Don't skip using stitch markers to keep your pattern aligned.

How do I prevent the hat from being too stiff or falling off my head?

The key is proper stuffing technique. Add poly-fil in small handfuls and continuously try on the hat while stuffing. Make sure the base cap maintains a concave shape (curves inward) rather than becoming flat or convex. Don't overstuff - it should be plump but still flexible enough to sit comfortably on your head.

What if my foundation chain doesn't match the height of my base cap?

You can adjust the number of chains in the foundation row (the pattern uses 16). Lay your chain flat against the side of your base cap from the last round to the magic circle center. It should roughly match this height. Just make sure the final number of chains is even so the pattern math works correctly.

Can I make this hat in different colors besides orange and green?

Absolutely! While the pumpkin colors are traditional, you could create this in any color combination. Consider white and green for a ghost pumpkin, purple and black for a gothic version, or even non-pumpkin colors if you just love the textured ribbed hat style. The stuffed construction and stem would still create a fun dimensional effect.