🧶 Beautiful ✨ Detailed 💝 Adorable

Autumn Pumpkin Crochet Pattern

Autumn Pumpkin Crochet Pattern
4.8★ Rating
3-4 Hours Time Needed
3.9K Made This
✂️

Intermediate Level

Ideal for those with basic knitting experience, featuring slightly more advanced stitches and techniques to expand your skills.

⏱️

Weekend Treat

Takes 5-7 hours, making it an enjoyable project to finish over a couple of days.

🎃

Holiday Cheer

Festive fun for the season, bringing handmade magic to celebrations and creating new family traditions.

About This Autumn Pumpkin Crochet Pattern

This delightful pumpkin pattern combines simple crochet techniques with clever sculpting to create a realistic autumn decoration. Working in back loops only creates beautiful ridges that mimic a real pumpkin's natural texture, while the curly moustaches add a whimsical touch. The detailed leaf component features an intricate construction method that results in a realistic fall foliage accent, making this project both enjoyable to create and stunning to display throughout the harvest season.

Autumn Pumpkin Crochet Pattern crochet pattern - detailed view of completed project

The pattern includes detailed photo tutorials showing each step of the leaf construction, making even complex sections easy to follow. With a finished size of 12 cm, this pumpkin is perfect for tabletop displays, shelf styling, or as part of a larger autumn arrangement.

Why You'll Love This Autumn Pumpkin Crochet Pattern

I absolutely love how this pattern transforms simple stitches into something that looks incredibly realistic and three-dimensional. The sculpting technique creates those gorgeous pumpkin ridges that make it look like it just came from the harvest, and working in back loops only is such a satisfying, meditative process. What really makes this pattern special for me is the attention to detail in those curly moustaches and the beautiful leaf construction—they add so much character and charm. It's one of those projects that looks impressive but is actually quite approachable, and you'll feel so proud displaying your handmade autumn decor year after year.

Autumn Pumpkin Crochet Pattern step 1 - construction progress Autumn Pumpkin Crochet Pattern step 2 - assembly progress Autumn Pumpkin Crochet Pattern step 3 - details and accessories Autumn Pumpkin Crochet Pattern step 4 - final assembly and finishing

Switch Things Up

I love experimenting with color variations on this pumpkin pattern to create different moods and styles. Instead of traditional orange, try working with cream or white yarn for an elegant "ghost pumpkin" look that's perfect for sophisticated fall decor. Deep burgundy or burnt orange shades create rich, harvest-inspired pieces that feel extra cozy.

For the leaves, don't feel limited to brown—experiment with multiple autumn shades like rust, golden yellow, deep red, or even variegated yarn that shifts through fall colors. You could even create a whole pumpkin patch by making multiple sizes using different yarn weights, arranging them together for a stunning seasonal display.

Consider adding embellishments like small buttons sewn to the center, embroidered details on the leaves, or even a light dusting of cinnamon-scented powder mixed into your stuffing for a sensory autumn experience. Some crafters love adding wire to the tail for posability or creating variations with different moustache lengths for personality.

The sculpting technique can be adjusted too—create more or fewer segments depending on your preference for how pronounced you want those pumpkin ridges. You might also experiment with the leaf pattern by making multiple leaves in different sizes or colors, clustering them together at the top for a more dramatic harvest presentation that really captures the essence of fall.

Common Mistakes & How to Fix Them

✗ Not working consistently in back loops only throughout the pumpkin body, which results in losing the distinctive ribbed texture that creates the realistic pumpkin ridges. ✗ Stuffing the pumpkin too firmly before sculpting, making it difficult to create the defined sections and causing the shape to become distorted or lumpy. ✗ Pulling the sculpting yarn too tightly when creating the pumpkin segments, which can cause puckering and make the overall shape appear uneven or misshapen. ✗ Skipping the PVA glue treatment for the moustaches, resulting in limp curls that don't hold their spiral shape and lose their decorative impact.

Autumn Pumpkin Crochet Pattern

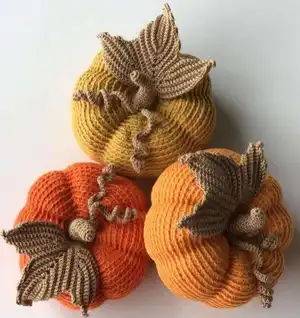
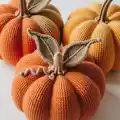
Create a charming autumn decoration with this delightful crochet pumpkin pattern, complete with curly moustaches and a beautiful leaf detail. This adorable 12 cm pumpkin features realistic sculpting that creates natural ridges, bringing your seasonal decor to life with handmade warmth. Perfect for Halloween displays or fall home styling, this pattern uses simple techniques like back loop only stitches and basic sculpting to achieve stunning dimensional results that capture the essence of harvest season.

Intermediate 3-4 Hours

Materials Needed for Autumn Pumpkin Crochet Pattern

— Main Fabric

  • 01
    GAZZAL BABY COTTON yarn 50g/165m in orange color for the pumpkin body
  • 02
    ALIZE FOREVER yarn 50g/300m in brown color for leaves (should be twice thinner than pumpkin yarn)

— Tools Required

  • 01
    Crochet hook matching your yarn weight
  • 02
    Polyester fiberfill or stuffing of your choice
  • 03
    PVA glue for stiffening moustaches
  • 04
    Brown sewing thread for assembly
  • 05
    Yarn needle for sewing and sculpting
  • 06
    Scissors

Progress Tracker

0% Complete

— Pumpkin :

Infos :

Crochet in spiral rounds. Work in back loops only.

Round 1 :

8 sc in a magic ring (8)

Round 2 :

inc*8 (16)

Round 3 :

(1 sc, inc)*8 (24)

Round 4 :

(2 sc, inc)*8 (32)

Round 5 :

(3 sc, inc)*8 (40)

Round 6 :

(4 sc, inc)*8 (48)

Round 7 :

(5 sc, inc)*8 (56)

Round 8 :

(6 sc, inc)*8 (64)

Round 9 :

(7 sc, inc)*8 (72)

Round 10 :

72 sc

Round 11 :

(8 sc, inc)*8 (80)

Round 12-13 :

80 sc

Round 14 :

(9 sc, inc)*8 (88)

Round 15-25 :

88 sc (11 rounds)

Round 26 :

(dec, 9 sc)*8 (80)

Round 27-28 :

80 sc

Round 29 :

(dec, 8 sc)*8 (72)

Round 30 :

72 sc

Round 31 :

(dec, 7 sc)*8 (64)

Round 32 :

(dec, 6 sc)*8 (56)

Round 33 :

(dec, 5 sc)*8 (48)

Round 34 :

(dec, 4 sc)*8 (40)

Round 35 :

(dec, 3 sc)*8 (32)

Info :

Stuff the part well, but not firmly

Round 36 :

(dec, 2 sc)*8 (24)

Round 37 :

(dec, 1 sc)*8 (16)

Round 38 :

dec*8 (8)

Info :

FO, cut the yarn, leave a long tail

— Sculpting :

Info :

Make sculpting to turn this ball to a pumpkin

Step 1 :

Use a yarn needle and the finishing tail. Insert your needle inside the ball through the finishing hole. Pull the needle out through the magic ring

Step 2 :

Insert the needle in the stitch close to the magic ring and pull it out through the stitch close to the finishing hole. Tighten the yarn slightly, repeat that process 1-2 times, fasten the sculpting yarn thread

Info :

Now make 8 sculptings around the ball in the same way, but do the 2nd step along the surface of the ball, passing the needle under the front loops of the rounds. Don't try to get absolutely symmetrical part, so that your pumpkin will look as real one

— Moustache (2 pcs) :

Info :

Make 2 pieces that have different length

Step 1 :

Make a chain of 7 cm length (you can resize the chain fitting to your pumpkin size)

Step 2 :

Crochet sc-row along the chain

Info :

Moisten the moustaches with water solution of PVA glue (in proportion 1:1). Wrap the mustaches on a pencil (for example) and let them dry completely

— Tail :

Round 1 :

8 sc in a magic ring (8)

Round 2-5 :

8 sc (4 rounds)

Round 6 :

3 sl st, 5 sc

Round 7 :

8 sc

Round 8 :

3 sl st, 5 sc

Round 9 :

8 sc

Round 10 :

3 sl st, 5 sc

Round 11 :

8 sc

Round 12 :

(3 sc, inc)*2 (10)

Round 13-14 :

10 sc

Round 15 :

(4 sc, inc)*2 (12)

Round 16 :

12 sc

Round 17 :

(2 sc, inc)*4 (16)

Round 18 :

(1 sc, inc)*8 (24)

Round 19 :

24 sc

— Leaf :

Infos :

Work in back-and-forth rows. Work in the back loops only.

Row 1 :

Make 16 ch

Row 2 :

Starting in the 3rd stitch from the hook: 14 sc, 4 ch, in the back direction 14 sc, 1 ch

Row 3 :

Skip 1 st, 13 sc; in the arch of the chains: 2 sc + 4 ch + 2 sc; 11 sc, 1 ch

Row 4 :

Skip 1 st, 12 sc; in the arch of the chains: 2 sc + 4 ch + 2 sc; 12 sc, 1 ch

Row 5 :

Skip 1 st, 13 sc; in the arch of the chains: 2 sc + 4 ch + 2 sc; 11 sc, 1 ch

Row 6 :

Skip 1 st, 12 sc; in the arch of the chains: 2 sc + 4 ch + 2 sc; 12 sc, 1 ch

Row 7 :

Skip 1 st, 13 sc; in the arch of the chains: 2 sc + 4 ch + 2 sc; 12 sc, 1 ch

Row 8 :

Skip 1 st, 13 sc; in the arch of the chains: 2 sc + 4 ch + 2 sc; 12 sc, 1 ch

Row 9 :

Skip 1 st, 13 sc; in the arch of the chains: 2 sc + 4 ch + 2 sc; 12 sc, 1 ch

Row 10 :

Skip 1 st, 13 sc; in the arch of the chains: 5 sc; 12 sc

Row 11 :

5 ch; starting in the 3rd from the hook (skip 2 sts): 8 sc, 1 ch, skip 1 st, 1 sc in both loops of the next stitch, 1 ch

Row 12 :

Turn, 1 sc in the chain of the previous row, 9 sc

Row 13 :

5 ch, skip 2 sts, 14 sc, 1 ch, skip 1 st, 1 sc in both loops of the next stitch, 1 ch

Row 14 :

Turn, 1 sc in the chain of the previous row, 15 sc

Row 15 :

4 ch, skip 2 sts, 19 sc, 1 ch, skip 1 st, 1 sc in both loops of the next stitch, 1 ch

Row 16 :

Turn, 1 sc in the chain of the previous row, 17 sc, 1 ch

Row 17 :

Skip 1 st, 18 sc, 1 ch, skip 1 st, 1 sc in both loops of the next stitch, 1 ch

Row 18 :

Turn, 1 sc in the chain of the previous row, 15 sc, 1 ch

Row 19 :

Skip 1 st, 16 sc, skip 1 st, 3 sc in both loops of the next stitch, 14 sc

Row 20 :

5 ch, skip 2 sts, 8 sc, 1 ch, skip 1 st, 1 sc in both loops of the next stitch, 1 ch

Row 21 :

Turn, 1 sc in the chain of the previous row, 9 sc

Row 22 :

5 ch, skip 2 sts, 14 sc, 1 ch, skip 1 st, 1 sc in both loops of the next stitch, 1 ch

Row 23 :

Turn, 1 sc in the chain of the previous row, 15 sc

Row 24 :

4 ch, skip 2 sts, 19 sc, 1 ch, skip 1 st, 1 sc in both loops of the next stitch, 1 ch

Row 25 :

Turn, 1 sc in the chain of the previous row, 17 sc, 1 ch

Row 26 :

Skip 1 st, 18 sc, 1 ch, skip 1 st, 1 sc in both loops of the next stitch, 1 ch

Row 27 :

Turn, 1 sc in the chain of the previous row, 15 sc, 1 ch

Row 28 :

Skip 1 st, 16 sc, 1 ch, skip 1 st, 1 sc in both loops of the next stitch, 1 sl st, FO

Assembly Instructions

  • Sew the two curly moustaches at the center point of the pumpkin where the sculpting creates the top indentation.
  • Lightly stuff the lower portion of the tail piece to give it dimension and structure.
  • Attach the stuffed tail to the pumpkin at the same central point where the moustaches meet, creating the stem area.
  • Position and sew the decorative leaf near the tail and moustaches to complete the autumn harvest look.

Important Notes

  • 💡Consistently work in back loops only throughout the pumpkin body to achieve the distinctive ribbed texture that creates realistic ridges
  • 💡Stuff the pumpkin well but not too firmly before sculpting to allow for proper shaping and dimensional work
  • 💡Don't aim for perfect symmetry when sculpting the pumpkin segments—natural variation makes it look more realistic
  • 💡Use the 1:1 water and PVA glue solution for the moustaches and allow them to dry completely on a pencil for best curl definition
  • 💡When working the leaf pattern in back-and-forth rows, pay careful attention to the arch of chains instructions for proper leaf shape
  • 💡The brown yarn for leaves should be approximately twice as thin as the orange pumpkin yarn for proper scale and detail

This charming autumn pumpkin pattern brings seasonal warmth into your home with its realistic sculpted texture and whimsical details. The combination of back loop only stitching and clever sculpting techniques creates those beautiful dimensional ridges that make this pumpkin look like it was just picked from the patch. With curly moustaches adding character and a detailed leaf for that perfect finishing touch, this 12 cm decoration is ideal for creating cozy fall ambiance. Whether displayed on a mantle, shelf, or as part of a harvest centerpiece, your handcrafted pumpkin will be a treasured seasonal piece for years to come. 🎃🍂✨

You ask,

we answer.

FAQs

Can I use different yarn weights for this pumpkin pattern?

Yes, you can use different yarn weights, but your finished pumpkin size will vary. The pattern specifies 50g/165m yarn for a 12 cm pumpkin. If using heavier yarn, adjust your hook size accordingly and expect a larger finished piece. Remember that the leaf yarn should always be approximately twice as thin as your pumpkin yarn for proper proportions.

How do I achieve the realistic pumpkin ridges shown in the photos?

The realistic ridges come from two techniques: first, working consistently in back loops only throughout the entire pumpkin body, and second, the sculpting process described in the pattern. Insert your needle through the center and pull yarn through to create segments, passing under the front loops as you work around the pumpkin. The pattern includes detailed step-by-step sculpting instructions with photos.

What if I don't have PVA glue for the moustaches?

PVA glue mixed with water (1:1 ratio) is recommended to stiffen the moustaches and help them hold their curled shape. If unavailable, you can try fabric stiffener or a mixture of white school glue and water. The key is moistening the crocheted chains, wrapping them around a pencil or dowel, and allowing them to dry completely before attaching to your pumpkin.

Is the leaf construction difficult for someone with basic crochet skills?

The leaf involves back-and-forth row construction with arch techniques that may be new to beginners, but the pattern includes multiple detailed photos showing each step. Take your time following the photo guides, and don't worry if your first attempt isn't perfect—natural leaves have variation! Working in back loops only and keeping track of your chain arches are the key skills needed.

How should I stuff my pumpkin for the best final shape?

The pattern specifically instructs to stuff well but not firmly. This is crucial because over-stuffing makes sculpting difficult and can distort the shape. Use polyester fiberfill and fill the pumpkin so it holds its round shape but still has enough give that you can manipulate it during the sculpting process to create those beautiful dimensional segments.