๐Ÿงถ Beautiful โœจ Detailed ๐Ÿ’ Adorable

Baby Rattle Toy Amigurumi Pattern

Baby Rattle Toy Amigurumi Pattern
4.8โ˜… Rating
3-4 Hours Time Needed
1.8K Made This
โœ‚๏ธ

Beginner Friendly Level

Perfect for those just starting their sewing journey, with clear instructions and simple techniques

โฑ๏ธ

Weekend Treat

Takes 5-7 hours, making it an enjoyable project to finish over a couple of days.

๐Ÿงธ

Cute Companion

An adorable friend to cherish, handcrafted with love to bring comfort and joy for years to come.

About This Baby Rattle Toy Amigurumi Pattern

Baby Rattle Toy Amigurumi Pattern crochet pattern - detailed view of completed project

Designed by Lenn's Craft, these rattles work up quickly using basic amigurumi techniques and simple stitches. The pattern includes complete instructions for a classic white bunny with long floppy ears, a cheerful yellow giraffe with orange accents and tiny horns, and a dreamy pink and white unicorn complete with flowing mane and golden horn.

Why You'll Love This Baby Rattle Toy Amigurumi Pattern

I absolutely adore how these rattle patterns combine functionality with adorable design to create toys that babies will love and parents will appreciate. There's something incredibly special about making handmade toys for little ones, knowing that each stitch is filled with care and love. I love that this pattern gives you three different character options, so you can either make a matching set or choose your favorite design. The elongated body shape is genius for baby rattles because it's perfectly sized for little hands to grip easily. What really makes my heart melt is how each character has its own distinct personality through simple details like the bunny's floppy ears, the giraffe's sweet expression, or the unicorn's magical mane.

Baby Rattle Toy Amigurumi Pattern step 1 - construction progress Baby Rattle Toy Amigurumi Pattern step 2 - assembly progress Baby Rattle Toy Amigurumi Pattern step 3 - details and accessories Baby Rattle Toy Amigurumi Pattern step 4 - final assembly and finishing

Switch Things Up

I love how versatile these rattle patterns are for customization! While the pattern provides three adorable characters, you can easily switch things up by experimenting with different color combinations to match any nursery theme or personal preference. Try making the bunny in soft pastels like lavender or mint green, or create a spotted giraffe by adding small darker yellow dots with embroidery after completion.

For the unicorn, I absolutely adore switching up the mane colors - imagine a rainbow mane using small sections of different colored yarn, or a sparkly effect using yarn with metallic thread. You could even make the horn in different colors like pink, silver, or iridescent white for extra magic.

I've found that adding small embroidered details can really bring these rattles to life - try adding little smile lines with embroidery thread, rosy cheeks using pink thread in a circular pattern, or even tiny heart shapes on the body. For a special touch, you could embroider the baby's name or initials on the back of the rattle body.

Consider making the body in contrasting colors or adding stripes by changing colors every few rounds - this works especially well for the bunny and unicorn. The giraffe looks amazing with embroidered or surface-crocheted spots in brown or tan.

Don't be afraid to adjust the ear sizes or shapes slightly to give each rattle its own personality, or add other features like a small bow tie, flower crown, or tiny crocheted accessories that can be securely sewn on for decoration.

Common Mistakes & How to Fix Them

โœ— Not stuffing the head and body firmly enough results in floppy rattles that don't hold their shape well during play โœ— Placing safety eyes too high or too low on the head changes the entire expression and makes the characters look less appealing โœ— Forgetting to insert the rattle element before closing up the body means having to partially unstuff and resew the piece โœ— Sewing ears and horns at incorrect angles creates an unbalanced appearance that affects the overall cuteness of the finished toy

Baby Rattle Toy Amigurumi Pattern

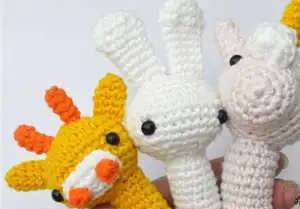
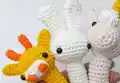
Create three adorable baby rattle toys with this delightful amigurumi pattern featuring a sweet bunny, a charming giraffe, and a magical unicorn. Each rattle measures approximately 14 cm tall and includes a built-in rattle feature perfect for entertaining babies and toddlers. These soft, cuddly designs combine safety and functionality with irresistible cuteness, making them ideal gifts for baby showers, nurseries, or first birthdays. Work up all three characters using soft cotton yarn in gentle pastel colors that are perfect for little ones.

Beginner Friendly 3-4 Hours

Materials Needed for Baby Rattle Toy Amigurumi Pattern

โ€” Main Fabric

  • 01
    Soft Cotton yarn in white
  • 02
    Soft Cotton yarn in soft pink
  • 03
    Soft Cotton yarn in yellow
  • 04
    Soft Cotton yarn in orange
  • 05
    Fiberfill for stuffing
  • 06
    Baby rattle insert (1.5 cm - 2 cm diameter)

โ€” Tools Required

  • 01
    Crochet hook 2.25 mm (3/0)
  • 02
    Safety eyes 6mm
  • 03
    Yarn needle for sewing
  • 04
    Scissors
  • 05
    Pins for positioning
  • 06
    Stitch markers

Progress Tracker

0% Complete

โ€” BUNNY RATTLE :

Head :

Info :

White yarn

Round 1 :

6sc in magic ring (6)

Round 2 :

(inc) repeat 6 times (12)

Round 3 :

(sc in next st, inc) repeat 6 times (18)

Round 4 :

(sc in next 2 sts, inc) repeat 6 times (24)

Round 5 :

(sc in next 3 sts, inc) repeat 6 times (30)

Round 6 :

(sc in next 5 sts, inc) repeat 5 times (35)

Round 7-10 :

sc in each st (35)

Round 11 :

(sc in next 3 sts, dec) repeat 7 times (28)

Round 12 :

(sc in next 2 sts, dec) repeat 7 times (21)

Round 13 :

(sc in next st, dec) repeat 7 times (14), fasten off and stuff

Info :

Insert safety eyes between rnd 8 and rnd 9 and 8 stitches between each eye

Body :

Info :

White yarn

Round 1 :

6sc in magic ring (6)

Round 2 :

(inc) repeat 6 times (12)

Round 3 :

(sc in next st, inc) repeat 6 times (18)

Round 4 :

(sc in next 2 sts, inc) repeat 6 times (24)

Round 5 :

sc in each st (24)

Round 6 :

(sc in next 3 sts, dec) repeat 4 times, sc in next 4 st (20)

Round 7 :

(sc in next 2 sts, dec) repeat 5 times (15)

Round 8 :

sc in each st (15)

Round 9 :

(sc in next 4 sts, dec) repeat 2 times, sc in next 3 st (13)

Round 10-33 :

sc in each st (13). Fasten off and leave tail for sewing and stuff

Ears (make 2) :

Info :

White yarn

Round 1 :

6sc in magic ring (6)

Round 2 :

(inc) repeat 6 times (12)

Round 3 :

(sc in next st, inc) repeat 6 times (18)

Round 4 :

(sc in next 1 st, dec) repeat 6 times (12)

Round 5-10 :

sc in each st (12), fasten off and leave tail for sewing
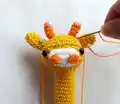
โ€” GIRAFFE RATTLE :

Head :

Info :

Yellow yarn

Round 1 :

6sc in magic ring (6)

Round 2 :

(inc) repeat 6 times (12)

Round 3 :

(sc in next st, inc) repeat 6 times (18)

Round 4 :

(sc in next 2 sts, inc) repeat 6 times (24)

Round 5 :

(sc in next 3 sts, inc) repeat 6 times (30)

Round 6 :

(sc in next 5 sts, inc) repeat 5 times (35)

Round 7-10 :

sc in each st (35)

Round 11 :

(sc in next 3 sts, dec) repeat 7 times (28)

Round 12 :

(sc in next 2 sts, dec) repeat 7 times (21)

Round 13 :

(sc in next st, dec) repeat 7 times (14), fasten off and stuff

Info :

Insert safety eyes between rnd 7 and rnd 8. Leave 8 stitches between each eye

Body :

Info :

Yellow yarn

Round 1 :

6sc in magic ring (6)

Round 2 :

(inc) repeat 6 times (12)

Round 3 :

(sc in next st, inc) repeat 6 times (18)

Round 4 :

(sc in next 2 sts, inc) repeat 6 times (24)

Round 5 :

sc in each st (24)

Round 6 :

(sc in next 3 sts, dec) repeat 4 times, sc in next 4 st (20)

Round 7 :

(sc in next 2 sts, dec) repeat 5 times (15)

Round 8 :

sc in each st (15)

Round 9 :

(sc in next 4 sts, dec) repeat 2 times, sc in next 3 st (13)

Round 10-33 :

sc in each st (13). Fasten off and leave tail for sewing and stuff

Ears (make 2) :

Info :

Yellow yarn

Round 1 :

4 sc in magic ring (4)

Round 2 :

(sc in next st, inc) repeat 2 times (6)

Round 3-5 :

sc in each st (6) fasten off and leave tail for sewing

Mouth :

Info :

White yarn, Ch 6, start from 2nd ch from hook

Step 1 :

Sc in next 4 sc, inc in last st (6)

Step 2 :

Working on opposite side of chain sc in each st (5)

Step 3 :

Work continuously, sc in each st and then fasten off. Leave tail for sewing

Nostrils (make 2) :

Info :

Orange yarn

Step 1 :

Ch 2, st 3 in first ch, sl. Fasten off and leave tail

Short horns (make 2) :

Info :

Orange yarn

Round 1 :

4 sc in magic ring (4)

Round 2-4 :

sc in each st (4). Fasten off and leave tail. Stuff carefully

โ€” UNICORN RATTLE :

Head :

Info :

Soft pink yarn

Round 1 :

6sc in magic ring (6)

Round 2 :

(inc) repeat 6 times (12)

Round 3 :

(sc in next st, inc) repeat 6 times (18)

Round 4-5 :

sc in each st (18)

Round 6 :

(sc in next 2 sts, inc) repeat 6 times (24)

Round 7 :

(sc in next 3 sts, inc) repeat 6 times (30)

Round 8 :

(sc in next 9 sts, inc) repeat 3 times, sc in next 3 sts (33)

Round 9-12 :

sc in each st (33)

Round 13 :

(sc in next 5 sts, dec) repeat 4 times, sc in next 5 st (29)

Round 14 :

(sc in next 4 sts, dec) repeat 4 times, sc in next 5 st (25)

Round 15 :

(sc in next 3 sts, dec) repeat 5 times (20)

Round 16 :

(sc in next 2 sts, dec) repeat 5 times (15)

Round 17 :

(sc in next st, dec) repeat 5 times (10), start stuffing

Round 18 :

dec in each st (5), fasten off

Info :

Insert safety eye between rnd 7 and 8. Leave 8 stitches between each eye

Body :

Info :

White yarn

Round 1 :

6sc in magic ring (6)

Round 2 :

(inc) repeat 6 times (12)

Round 3 :

(sc in next st, inc) repeat 6 times (18)

Round 4 :

(sc in next 2 sts, inc) repeat 6 times (24)

Round 5 :

sc in each st (24)

Round 6 :

(sc in next 3 sts, dec) repeat 4 times, sc in next 4 st (20)

Round 7 :

(sc in next 2 sts, dec) repeat 5 times (15)

Info :

Switch to soft pink yarn

Round 8 :

sc in each st (15)

Round 9 :

(sc in next 4 sts, dec) repeat 2 times, sc in next 3 st (13)

Round 10-33 :

sc in each st (13). Fasten off and leave tail for sewing and stuff

Ears (make 2) :

Info :

Soft pink yarn

Round 1 :

3 sc in magic ring (3)

Round 2 :

(sc in next st, inc) (4)

Round 3 :

(sc in next 2 sts, inc), sc in next st (5)

Round 4 :

(sc in next 3 sts, inc), sc in next st (6)

Round 5-6 :

sc in each st (6). Fasten off and leave tail for sewing

Horn :

Info :

Yellow yarn

Round 1 :

4 sc in magic ring (4)

Round 2 :

(sc in next st, inc) repeat 2 times (6)

Round 3-6 :

sc in each st (6)

Front Rolling mane :

Info :

White yarn

Step 1 :

Ch 12, 6 hdc each st

Mane :

Info :

White yarn

Step 1 :

Ch 29, hdc start from 3rd ch from hook. hdc each st (27)

Assembly Instructions

  • Sew the body rattle firmly onto the head, ensuring a secure connection that can withstand baby play
  • For the bunny: Attach the two ears to the top of the head, spacing them evenly apart for a balanced look
  • For the giraffe: First attach the white mouth piece to the front of the head, then sew the two small nostrils onto the mouth
  • For the giraffe: Position and sew the two small orange horns on top of the head, then attach the ears on either side
  • For the unicorn: Place the rolling mane in the middle between the eyes as shown in the reference images
  • For the unicorn: Pin the longer mane piece along the back of the head in a zigzag pattern for a natural flowing look, then sew in place
  • For the unicorn: Attach the golden horn centered on top of the head between the ears for that magical finishing touch

Important Notes

  • ๐Ÿ’กInsert the rattle element into the body section before stuffing completely and closing the opening
  • ๐Ÿ’กPosition safety eyes carefully between the specified rounds and ensure they're secured tightly for baby safety
  • ๐Ÿ’กStuff all pieces firmly but not too tightly to maintain the proper shape while keeping the rattle soft and cuddly
  • ๐Ÿ’กUse pins to position all pieces before sewing to ensure proper placement and symmetry
  • ๐Ÿ’กWhen working with multiple colors, carry yarn loosely on the inside to avoid puckering
  • ๐Ÿ’กThis pattern is for personal use only and should not be duplicated, redistributed, or resold

These adorable baby rattle patterns by Lenn's Craft are designed to bring joy and comfort to the littlest members of your family. Each character offers its own unique charm while maintaining the perfect size and shape for tiny hands to grasp. The built-in rattle adds an engaging sensory element that babies love, while the soft cotton construction ensures safety and durability. Whether you're making a special gift for a baby shower or creating handmade toys for your own little one, these patterns deliver professional results with beginner-friendly instructions. ๐Ÿงถ Happy crocheting! ๐ŸŽ€โœจ

You ask,

we answer.

FAQs

What size rattle insert should I use for these baby rattles?

The pattern recommends using a rattle insert with a diameter of 1.5 cm to 2 cm. These small plastic rattle inserts are specifically designed for baby toys and can be found at most craft stores or online retailers specializing in amigurumi supplies.

Can I use different yarn weights or hook sizes for this pattern?

Yes, you can use different yarn weights and corresponding hook sizes, but keep in mind that this will change the final size of your rattle. The pattern is designed for soft cotton yarn with a 2.25mm hook, which creates rattles approximately 14cm tall. Using thicker yarn will create larger rattles, while thinner yarn will make smaller ones.

When should I insert the safety eyes and rattle element?

Insert the safety eyes between the rounds specified for each character (usually rounds 7-9) before you start decreasing the head. The rattle element should be inserted into the body section before you completely stuff and close the opening, typically after completing most of the body rounds.

Are these rattles safe for babies and at what age?

These rattles are suitable for babies when made with proper safety precautions. Ensure all parts are securely sewn, safety eyes are properly installed, and the rattle is thoroughly checked for any loose pieces before giving to a baby. They're generally appropriate for babies 3 months and older, but always supervise during play.

How do I make the giraffe's features look proportional?

The key to a well-proportioned giraffe is careful placement of features. Attach the white mouth piece first to the lower front of the head, then position the nostrils on the mouth. Place the horns on top of the head with ears on either side. Use the reference photos in the pattern and pin everything in place before sewing permanently.